Google takes a very different approach to unlocking a device for development purposes from Apple. Android allows you to install and run apps that have not been digitally signed for public release (debug version). But in order to do so, you must first enable a setting on a device that is turned off by default on a real device. And since there are so many types of Android devices and versions of the Android OS, the exact instructions on how to set it might be different. If you're having trouble locating it, do a quick on-line search. The apps PhoneGap Build compiles for Android are actually assigned a debug key automatically. When an app is ready to release publicly it will need to be signed digitally with a personal key.
While it is easier to use Dreamweaver to create an app, you can use a Command Line Interface (CLI) using PhoneGap. If you are using PhoneGap CLI (Command Line Interface), you need to download SDKs. However, if you are using PhoneGap Build Cloud-based service you DO NOT need to download SDKs.
Set Device Environment
Testing on real devices is more reliable than testing in browsers and there are somethings that cannot be tested in a browser (e.g., phone). However, there are a few steps that you need to do before you can connect and test on a real device:
- set security on device
- install USB device driver
- set USB debugging (Optional)
Set Security
The security setting is turned off by default and has to be turned on in order to load an app onto your device without going to an app store. Because there are so many device types, it may be different from the instruction below. Do an on-line search or review your device manual for details.
- On your Android device, go to the Settings option.
- Click the Security option and then enable the security setting that say something like "Unknown sources: Allow installation from both trusted and unknown sources" in order to load an app onto a device.
CAUTION: Now, any app can be installed onto your device. However, be careful, you can download an app that could be potentially harmful.
- Read the caution in the dialog box that appears (e.g., Your phone and data are more vulnerable to attack by unknown sources...) and then click the OK button.
Install Device Driver (Windows)
If you are using a Google Nexus device, the device driver need to be loaded:
- Go to Tools > Android > SDK Manager.
- Click the SDK Tools tag and select the Google USB Driver rev xx (where xx is the current version).
- Click the Apply button.
- Go to the Window Device Manager:
- Windows 8, 8.1 and 10: Right-click on the Window icon in the lower left corner and select Control Panel.
- Windows 7: Use the Start menu.
- Type Device Manager in the Search field and then click the Device Manager link.
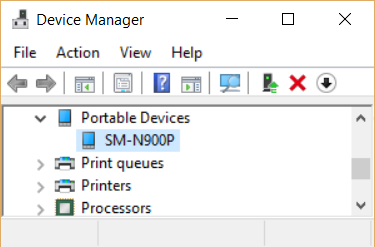
- CHECK POINT: Connect your device to your computer using a USB cable. The device (e.g., Nexus 5) should show up in the Device Manger under Android Phone, Portable Devices, or Other devices.
- If the device driver is already installed, you can right-click on the device and select Update Driver Software… from the menu to install the latest version.

- In the dialog box that appears, click the Browse My Computer for Driver Software and then click the Browse button to go to the USB driver folder.

- In the dialog box that appears, click the browser button to the SDK directory to locate the device driver under the extras\google\usb_driver\i386 directory and then click the Next button.
- Complete the other dialog prompts to install or upgrade the device driver.
NOTE: Once the installation is complete, it should show in the Control Panel. If not, reboot your computer and then un-attach and reattach the device using the USB cable.
- If you need a device driver from another vendor other than Google, go to http://developer.android.com/tools/extras/oem-usb.html and then click the OEM Driver link to navigate to a page with a listing on all of the Original Equipment Manufacturers (OEM) drivers. Click the appropriate link for your device vendor to download the device driver.
Set USB Debugging (Optional)
While this is not needed to load an app on your phone without going to the app store, it is highly recommended that you turn on the debug feature to enable the Developer mode so that you can debug your app on your device from your computer. (See Use Debug, Hydar, Plugins, etc and Test #2 Debug Version of Devices for information on how to setup for debugging and how to debug your device on your computer).
- On your device, locate the Settings option and click on it.
NOTE: If you see the Developer options, you are already a developer and you can skip the remaining steps.
- Click the About Phone option and then click the Build Number three times.
- After the third click, you will see a prompt that says, "You are now 4 steps away from being a developer", click four more times until you see the message, "You are now a developer."
- CHECK POINT: Click the Back button to return to the Settings screen and you should now see the Developer options, click on it and turn on USB debugging and then click the OK button to the prompt "Allow USB Debugging...".
- CHECK POINT: You should see another prompt but this time showing the computer's RSA Key fingerprint which identifies the computer.
- (Optional) If you always want to connect from this computer easily and not have to deal with this dialog box again, click the checkbox option and then click the OK button.
TIP: If you do not want the device to connect every time, Go to Settings > Developer options > Revoke USB debugging authorization and then in the dialog box that appears, click the OK button. Unplug and then replug the device and you will see the option again to choose Allow USB debugging each time you attach your device. However, it is best to select this option as a developer so that you don't see this prompt again and again.
- (Optional) Select the Stay Awake checkbox.
WHY: With this option turned on, when the phone is plugged in using the USB cable it will not go to sleep.
- (Optional) There is a host of other options you can also set:

Connect And Test on Real Device
It is best to test on a physical device wherever possible. Steps may vary depending on device.
Windows:
- Connect your device to your computer with a USB cable.
- CHECK POINT: After a while, you should see the app loaded onto your physical device. You may also see the Run window appears showing the apps being installed and running on your device. If you exit the app and return to the Home screen you should see the app listed there. If you press and hold the app's icon, you can drag it to the Home screen for convenience.
Mac: (NEED VERIFICATION)
- After connecting a device, you need to ensure that it is connected correctly.
- On the launcher screen, drag down from the top to reveal the notification(s).
- Touch the USB for charging notification and change the setting to Photo Transfer (PTP) to open the photo app
- From the main menu, click the Import option
- If the photo app does not work, you need to check the cable, etc.