If you had to develop native apps for each of the major platforms, you would have to know the various languages for each platform as well as know how to install and use the various Integrated Device Environment (IDE) tools and SDKs for each platform which can be very time consuming:
- iOS > Objective C or Swift > Xcode
- Android > Java > Android Studio
- Windows > C# or XAML > Visual Studio
Adobe PhoneGap Build, as the name implies, bridges the GAP between the web and mobile by using HTML5, CSS3 and JavaScript which is supported by all major platforms to create a mobile app. It is an open-source cloud-based service for building cross-platform mobile apps for iOS, Android™ and Windows®.
- iOS, Android or Windows > HTML5, CSS3 and JavaScript
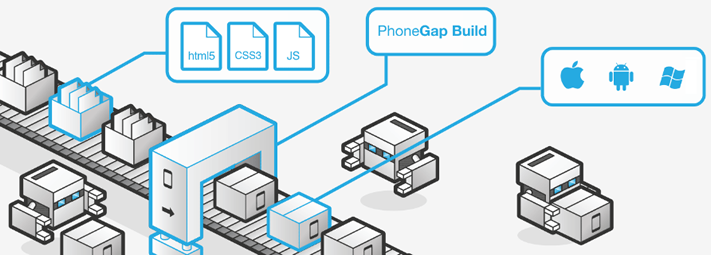
Image extracted from PhoneGap website.
It takes your HTML5, CSS3 and JavaScript and wrap it in a Native Web View (a native application component) that is used to display web content within a native app for multiple platforms (Android, iOS and Windows) using the most up-to-date SDK without having you to download any SDK yourself like you would if you used PhoneGap CLI or Android Studio.
[REPLACE WITH MY OWN GRAPHICS]

The web app running inside the Native WebView container is like any other app that would run within a mobile browser. It can:
- open HTML pages
- execute JavaScript
- play media files (audio/video)
- communicate with remote servers
This creates a hybrid app in which PhoneGap Build provides a collection of JavaScript APIs that allow access to various device's API capabilities (e.g., camera, accelerometer, storage) via plug-ins.
Because PhoneGap Build DOES NOT take your HTML, CSS and JavaScript and convert it into a native code, you can use ANY solution to create your app UI framework:
However, PhoneGap Build only works with local client-side (HTML, CSS and JavaScript) and not server-side technologies (PHP, JSP, Coldfusion, ASP or ASP.NET). However, you can use these server-side technologies to provide data using REST API or other methods.
There are various ways to use PhoneGap Build to compile an app. However, they are not currently fully interchangeable because the config.xml file format that is needed to create an app is different for each:
- Cordova PhoneGap Command Line Interface (CLI)
- PhoneGap Command Line Interface (CLI)
- PhoneGap Desktop App
- Web interface - PhoneGap Build Cloud Service (recommended)
The PhoneGap Build website supports two methods for getting the app compiled:
- Uploading a zip archive
- Pulling from a GitHub repository
Prep For PhoneGap Build
There are several things that has to be done BEFORE an app can submitted to PhoneGap Build:
- Setup File Structure (lang and meta tag for mobile and accessibility)
- Include LOCAL minimized (compressed) framework files instead of REMOTE if necessary
- Include link to phonegap.js in the the index.html page
- Zip HTML, CSS and JavaScript files so that it can be uploaded to PhoneGap Build
- Create config.xml file
- (OPTIONAL) Exclude unnecessary files.
Setup File Structure
When creating web apps, it's best practice to maintain each one in its own site's folder.
- If necessary, copy the site folder to either the:
- htdocs folder of the PHP server
- wwwroot folder of a Coldfusion server
- wwwroot folder of the IIS server
- inetpub folder of a ASP server
NOTE: In Dreamweaver, create a new site definition for the folder you copy over to the server. If MAMP is used on the Mac, to avoid having to write local host with the port number of 8888 every time, under Preferences, choose Set Apache & MySQL ports to 80 and 3306.
- Ensure that the following files are at the top level of the site root directory:
- index.html (home page)
- config.sys (see Create Config.xml File for details)
- icon.png (default icon, see Create Graphic Assets for details)
- splash.png (default splash screen, see Create Graphic Assets for details)
Include Local Minimized Resources
It is best practice to INCLUDE any external resources like jQuery and jQueryMobile libraries as LOCAL and NOT REMOTE hosted files on a server or a Content Delivery Network (CDN). With mobile apps, consider how the app will function offline so the app can still work even if there is no network connection.
Since the goal is to have the smaller possible file size particularly when creating mobile apps, it is best practice to have the minimized (compressed) versions of the JS and CSS files. You can distinguish the minimized versions because they will have *.min in the file name.
- Convert ALL REMOTE CSS frameworks files to LOCAL counterparts.
- Convert ALL REMOTE JS framework files to LOCAL counterparts.
- Ensure ALL CSS and JS files use the minimized versions (e.g., jquery.mobile-1.4.5.min.js).
- Open the index.html file.
- If necessary, download the jQuery framework file from jquery.com (e.g., jquery-1.11.2.min.js) .
- If necessary, download the jQueryMobile files from jquerymobile.com (e.g., jquery.mobile-1.4.5.min.js).
- Move the jQueryjQueryMobile files and CSS files to the correct folders (e.g., themes, js, css).
- Replace the http references (example highlighted below) from the CSS and JS files with the local folder path (e.g., themes, js) (highlighted below as well):
From this:
<link rel="stylesheet" href="CompletedApp.zip/themes/cornchop.min.css" />
To this:
<link rel="stylesheet" href="CompletedApp.zip/themes/jquery.mobile.icons.min.css" />
<link rel="stylesheet" href="http://code.jquery.com/mobile/1.4.5/jquery.mobile.structure-1.4.5.min.css" /> <script src="http://code.jquery.com/jquery-1.11.1.min.js"></script>
<script src="http://code.jquery.com/mobile/1.4.5/jquery.mobile-1.4.5.min.js"></script>
<link rel="stylesheet" href="themes/myThemes.min.css" />
<link rel="stylesheet" href="themes/jquery.mobile.icons.min.css" />
<link rel="stylesheet" href="themes/jquery.mobile.structure-1.4.5.min.css" />
<script src="themes/jquery-1.11.2.min.js"></script>
<script src="themes/jquery.mobile-1.4.5.min.js"></script>
- CHECK POINT: Save the file and test it in a browser to see if the files are linked correctly.
NOTE: In the tutorial example, this step could have done been done initially. However, it was easier to link to the CDN versions because they do not require any downloads.
Include Link To Phonegap.js
While PhoneGap Build automatically creates the phonegap.js, you still need to provide a link to it.
- Write the following highlighted
<script>
element below the other
<script>
elements in the
<head>
element:
<script src="phonegap.js"></script>
</head>
NOTE: The phonegap.js file does not currently exist. It is INJECTED into the code during the build process by PhoneGap Built for each SPECIFIC platform (Android, iOS, and Window) and is the reason why it is not included as an actual file on your computer. If you get an error when running the file locally, disregard it.
- Save the file.
Zip File
You need to zip ALL of the files and folders including:
- HTML pages (e.g., *.html)
- CSS style sheets (e.g., *.css)
- JavaScript files (e.g., *.js)
- Image assets (e.g., *.png, *.jpg)
- Configuration file (e.g., config.xml)
- Ensure that all of the files mentioned above are in one location.
CAUTION: The home page must be named index.html or it will not work with PhoneGap Build.
- On Windows, use a zip program (e.g., Winzip) and then right-click on the folder with all of the needed files to zip files and folders. On the Mac, right-click or CTRL + Click on the folder with all of the files that are needed in it and select Compress from the menu.
NOTE: Notice, you created the zip file from the folder level instead of selecting all of files INSIDE of the folder. This way the zip file will get created OUTSIDE of the app's folder.
Include Config.xml File
Incude the config.xml file. (See Create Config.xml File under the Deploy & Test App menu for details on how to create).
Exclude Unneccessary Files (OPTIONAL)
If you don't want to move files or directories in the app directory that are not needed to create the app (e.g., *psd, unused images, resource files), you can create a special file called .pgbomit and place it in a directory that tells PhoneGap Build that it should NOT include them as part of the native app.
Login To PhoneGap Build
Before you can use PhoneGap Build, you need to have an account and then login to the service.
- Go to https://build.phonegap.com
- Click the Get Started! button to go to the Choose your plan section.
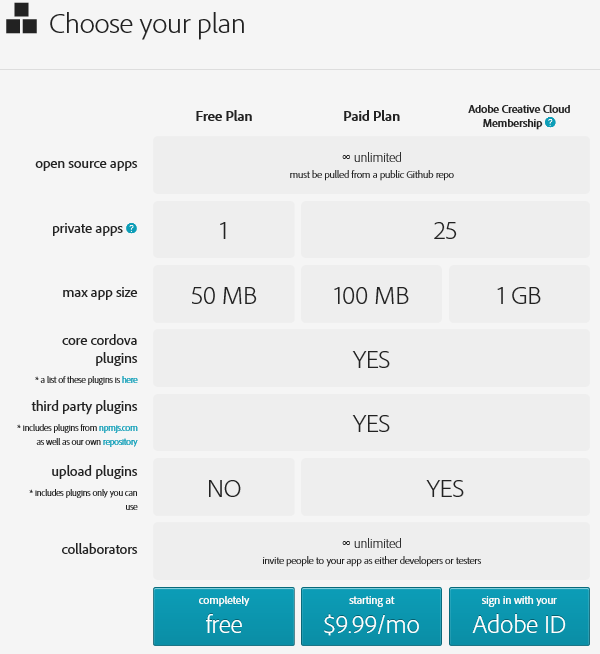
NOTE: Currently, there are three plans. All of them allow you to create unlimited, open source apps with unlimited collaborators. If you want to build a private app, you can create one for free and up to 25 apps with either the Paid Plan or the Creative Cloud Membership. Notice that you can have unlimited open source apps if they are pulled from a public Github repo.
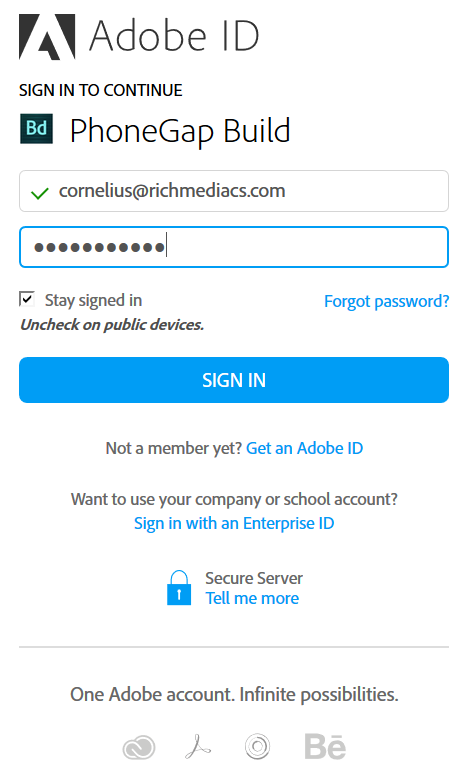
- With this tutorial, we will use the Creative Cloud subscription, so click the Sign In with your Adobe ID button.
- Enter an email address and password and then click the SIGN IN button.
NOTE: Initially, you'll be taken to the Apps page. If you've just started, this page will be empty.
Preview Current Apps
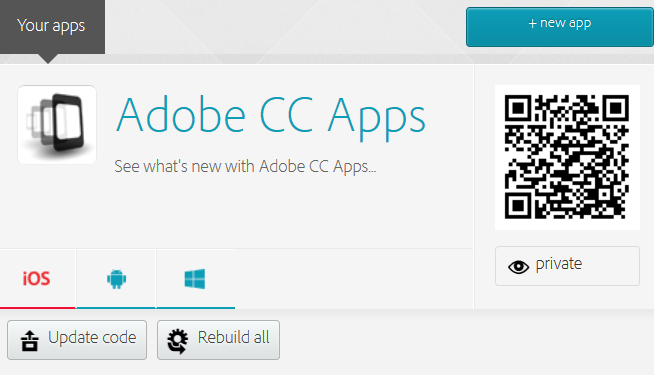
Once logged in, if you have created any apps, you'll see a summary of all your current apps with the basic detail information.
On the left side, you may see:
- App Icon (either the default or a custom one you created and uploaded with the zip file)
- App Title (e.g., Chopinisms)
- App Description (e.g., See what's new in Adobe CC Apps)
- Android, iOS or Window Phone icons that represents app types
- The Update code button allows you to RELOAD an updated .zip archive of your project and PhoneGap Build will AUTOMATICALLY rebuilt for ALL platforms.
- The Rebuild all button allows you to MANUALLY rebuild ANY ONE or ALL apps by clicking on the corresponding Rebuilt button for that platform. This also allow you to enter a signing key for a particular platform (e.g., iOS). For Android, PhoneGap will use the DEBUG version of the sign in key. However, when you are ready to create a RELEASED version of the app to be able to submit the app to Google Play store, you will need to enter it here again.

NOTE: The OS icons in blue represent valid builds for iOS, Android, and Windows Phone. Click on any one to download the associated app file. Below the icons are two buttons:
On the right side, you may see:
- App ID number (If you contact support, they will need this ID to help you)
- Version number
- Owned by (Which account created the app)
- PhoneGap version numbers (iOS / Android / Windows)
- Source type (e.g., .zip package)
- Last built (xx) date
- QR code (used for installing app on a device)
- Private or Public

Create New App
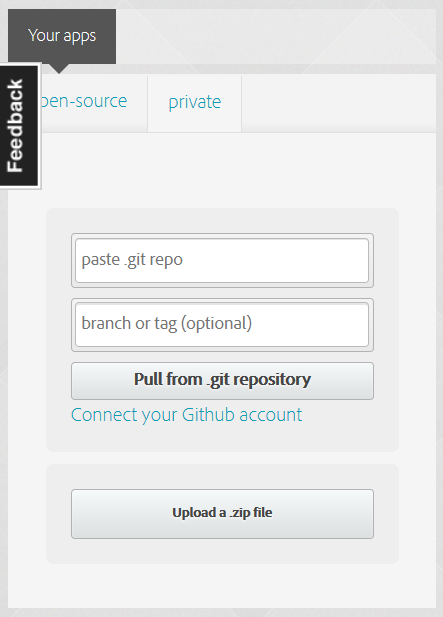
There are two ways to create an app:
- Use a zip file
- Use private or public Github repository
Use A Zip File To Create App
- Click on the "+ new app" button.
- In the Your apps page that appears, click on Upload a zip file button and navigate to the zip file you created earlier and then click the Open button:
WHY: To upload the zip file to the PhoneGap Build cloud service.
- In the page that appears, give the app a name (e.g., Adobe CC Apps) and a description (e.g., See what's new with Adobe CC Apps...).
NOTE: If you get the error "This app isn't using the latest version of PhoneGap, you can upgrade to the latest version." For now, you can safely ignore it by clicking on the x icon to dismiss it.
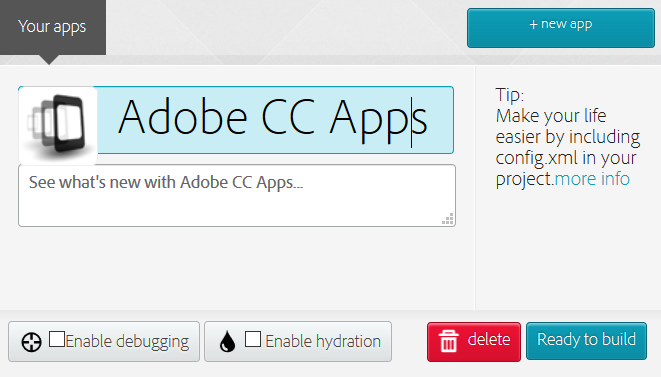
- (OPTIONAL) Click the Enable debugging or the Enable hydration checkboxes (See Use Debug, Hydra and Plugins under the Test App menu for detial information about these two topics.).
- (OPTIONAL) Click the delete button if you want to the delete the app if you selected the wrong zip file, etc.
NOTE: You will not see this delete button again HERE. However, you will be able to see it in the Settings panel, once the app is created. Also, notice that the PhoneGap Build service automatically parsed the config.xml file to display the app's name, description and icon, if icon is custom, version number, etc.
- Click the Ready to build button (See the screenshot above).
- CHECK POINT: In the screen that appears, you should see several additional icons, buttons and a Quick Response (QR) barcode appear. If any of the three icons turn BLUE, that means the app is ready. (e.g., the iOS is red because it needs more info (e.g., signing keys), the Android and Windows are blue so they are ready).
Use GitHub To Create App (ALTERNATIVE)
To build an app from a GitHub repository:
- Go to the GitHub website and copy a URL from the GitHub repository at the top of the screen.
NOTE: If it is a private GitHub, you need to login. If it is public GitHub, you only need to get the URL. If it is a private GitHub, you need to click the Connect your GitHub account link. In the Edit Account screen that appears, type in the Linked AdobeID and Email and then click Sign In button with your GitHub credentials.
- Go back to PhoneGap Build and paste URL into GitHub text field.
WHY: To have PhoneGap Build automatically compile the app.
- Click the Pull from git repository button.
WHY: To have PhoneGap Build compile for each platform from a GitHub repo. - Click the Ready to build button (See the screenshot above).
App Detail Screen
Once the app has been built, the app's title color change from black to blue indicating that it is a link and can now be clicked on to reveal detail information about the app.
NOTE:
See Use Debug, Hydra, Plugins, etc. under the Deploy App menu for detail instructions
- Click on the app's title to go to the app's detail screen where you can use the following:
- Install button (below the QR code) - used to install the app.
- Update code button - used to upload updated code to PhoneGap Build to rebuilt for all platforms
- Rebuild all button - used to manual rebuild app
- Builds tab - used to show the status of each app (e.g. whether there is an red Error buttons or an available buttons (e.g., apk buttton) to downloal app.
- Plugins tab - used to show you what plug-ins you have. If you are not using any plugin, you will see the message, "This application has no plugins."
- Collaborators tab - used to add or delete a collaborator. If no collaborator exist, you will see the Add a collaborator button only.
- Settings button - used to:
- Upload new code
- Enable or disable debugging
- Enable or disable Hydration
- Select or unselect Private application
- Allow or disallow public sharing
- Delete app (in Danger Zone)
- Signing key combo box and additional buttons (e.g., Rebuild, Log, Error) are displayed for each platform
- Exit PhoneGap and follow the steps in the next section to deploy app.