The Android platform requires that all installed apps be digitally signed with a certificate whose private key is held by the app developer as a way to identify the app's author. The certificate does not need to be signed by a certificate authority, it can use a self-signed certificate. (http://developer.android.com/guide/publishing/app-signing.html).
After a .keystore file is created, the next time the app is exported, the Use Existing Keystore option MUST be selected by clicking on the Browse button to select an app and then entering its password.
There are several ways to create a keystore:
- Use JDK
- Use Android Studio
Google takes a very different approach to unlocking a device for development purposes from Apple. Android allows you to install and run apps that have not been digitally signed for public release (debug version). But in order to do so, you must first enable a setting on a device that is turned off by default on a real device. And since there are so many types of Android devices and versions of the Android OS, the exact instructions on how to set it might be different. If you're having trouble locating it, do a quick online search.
There are two build variants for an app:
- a debug build that is used during development to preview the app on a real device.
- a released build that is used to create a signed APK version of the app that is used for distribution to an app store (e.g., Google Play, Amazon) that can than be downloaded and installed by a user.
Why Does The App Need to be Signed?
Signing an app is like signing a document but you are signing it digitally. So, what you are doing in essence in signing the -debug version to create a -released version of the app so to say that you are the rightful owner of that app.
Create a Signing Key
As the name implies, a keystore is a store (a place) where a key (or several keys) are "stored." In essence, it is a file that contains a private key or a set of private keys that is held by the app developer and is used to identify the app developer.
CAUTION: A keystore can be created ONCE but you can have ONE or MORE private keys stored in it. That is why is is so important to keep the KEYSTORE and ITS PASSWORDS in a safe and secure place. Since all UPDATES must use the SAME KEY, don't lose the keystore after you publish an app. The only way to recover from this is to delete the current version and use the basic version again.
NOTE: You can have one private key per app or you can have a diffrent private key for each app.
After a *.keystore file is created, the next time the app is exported, the Use Existing Keystore option can be selected by clicking on the Browse button to select an app and then entering its password.
When you create a debug version of an app (either virtual or physical), Android Studio will automatically create and sign a debug keystore file and automatically transfer it to an emulator or a real device.
When you create a release version of an app, a private key needs to created and stored in the keystore that can then be used to "sign" the app so that it can be publish in an app store.
The steps for creating and distributing an app is:
- Build and test app
- Export app
- Create a keystore with a private key or a set of private keys
- Generate APK*
- Use private key to "sign" app
- Publish App to Google Play, etc.
*APK - Android app package that is a SINGLE file with all of the resources (e.g., xml files, java files, graphics, icons, manifest file) you need to distribute and install an app onto a device.
Use JDK To Create Signing Key
If you are just using PhoneGap Build, use can create an Android Keystore file using the Java Development Kit (JDK):
- If you have not already done so, download the Java Development Kit (JDK), double-click on the file and follow the instruction on how to install it.
- Open the command prompt from within Windows by typing command in the search field at the bottom of the screen:
- Type cd.. and press the ENTER key.
- Type cd Program files and press the ENTER key.
- Type cd Java and press the ENTER key.
- Type cd jdk1.8.0_25 (or whatever is the later version) and press the ENTER key.
- Type cd bin and press the ENTER key.
TIP: You can also set up a system variable to avoid having to doing these steps.
- Type the following syntax and change what is highlighted to your information:
keytool -genkey -v -keystore Your_personal_file_title.keystore -alias Your_personal_alias -keyalg RSA -keysize 2048 -validity 10000
keytool -genkey -v -keystore Chopinisms.keystore -alias Chopinisms_alias -keyalg RSA -keysize 2048 -validity 10000
- CAUTION: Ensure you write the password down and do not lose. Note also that when you are TYPING your password, the large block insertion will not move pass the first letter in your password.
Enter your profile when prompted:- key store password: mykeystore$500
- first and last name: Cornelius Chopin
- organizational unit: skip
- name of your organization: Rich Media Creative Services
- city: Round Rock
- state: Texas
- two letter country code: US
- is correct? yes
- key password: Press the Enter key to add the SAME password as keystore password mykeystore$500
- CHECK POINT: This will create an Android Keystore file in the CURRENT directory: (e.g., C:\Users\Cornelius) with the name you gave it. You can activate it in whatever app you generate your Android apps in (e.g., https://build.phonegap.com).
CAUTION: You may want to take a screen shot or a text file of the command prompt with all of its settings and save an electronic copy in a save place along with a printed copy. You don’t want to lose your signing key. So you may want to save your it in multiple places and even in the cloud (e.g., dropbox or google drive). If you lose it, you won’t be able to update your app.
IMPORTANT: If you get an <Access Denied> error, you have to set the permission on the Java directory:
- Navigate to the Java folder, right-click on it and select Properties from the content menu.
- Click the Security Tab at the top of the Java Properties dialog box.
- Click the Edit... button and then click the Add... button in the Permission for Java dialog box that appears.
- In the "Enter the object names to select (examples):" text field, type the word everyone and then click the OK button.
- With Everyone select in the Group or user names list, select the checkbox to allow Full control and then click the OK button.
- Repeat steps i-ix above.
See the following YouTube video, if it is still available:
Android keystore access denied problem (solved)
Use AS To Create Signing Key
If you are familiar with Android Studio, you can also use it to create a keystore.
WHY: To
generate a signed APK (not debug version) to be distribute to an app store. When you create a debug version of an app (either virtual or physical), a debug keystore file is created automatically.
- Create a new project (See Android Studio for Detail).
- From the menu, select Build > Generate Signed APK.
NOTE: To generate a signed APK, you will first need a keystore file which will be done in the next step.
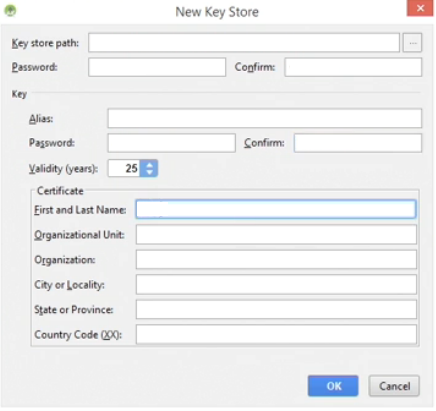
- In the Generate Signed APK dialog box that appears, click the Create new... button.

- In the New Key Store dialog box that appears, click on the browse-to-file button denoted with three dots (...) and in the Choose key store dialog box navigate to where you want the file to be saved (e.g., the desktop is a convenient place) and give the file a name (e.g., myAppNameKeyStore) and then click the OK button.
NOTE: Your should see the file name will an extension of jks.
- Back in the New Key Store dialog box, enter a password twice.
NOTE: Save password in a safe and secure place.
- Type an alias.
NOTE: This can be any string with no spaces and no special characters.
- Enter a password twice for the alias.
NOTE: Again, save the password in a safe and secure place.
- Leave the Certificate Validity at its default value of 25 years.
- Enter your full name or organization Unit or Organization.
- Enter City or Locality, State or Province and Country Code (XX).
- Click the OK button.
- To use the keystore in the Generate Signed APK, enter the Key store password, the Key alias from the combo box and the Key password you created earlier. You can also click the Remember passwords checkbox so that each time you use the KeyStore file, you won't need to re-these values the next time.
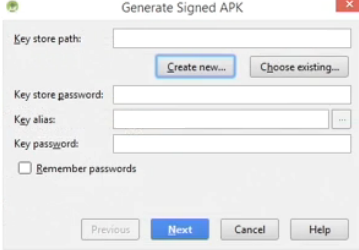
- Click the Next button.
- In the Generate Signed APK, enter destination folder (e.g., desktop) for the APK file.
- Set Build Type to Release.
- Click the Finish button.
- CHECK POINT: After a while, in the Generate signed APK dialog box that appears, you should see the message "Signed APK's generated successfully."
- Click the Show in Explorer button or Show in Finder button to open the APK file or navigate to where you saved it.
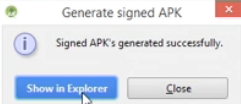
- You can now submit this release version of the APK to the app store.