Before you can update, search, or delete records from a database, you need to add records to it or have a database that already contains records. The ADD EMPLOYEE page will be designed to add a new employee record. This page will be redirected automatically to the EMPLOYEE MASTER PAGE (e.g., master_page.php) once the ADD EMPLOYEE button is clicked.
Although, you can use phpMyAdmin (or any other graphical interface app) to insert records into a database table, it is best practice to create a CUSTOM form to insert records which gives you more control over who can access the database and where they can access the database to view, insert, update, or delete records. Also, anybody with the right privilege can access the database from the web.
Since no recordset is needed for the ADD EMPLOYEE page, it is one of the EASIEST dynamic page to create. However, there is an option in this tutorial on how to create a dynamic combo box from a database table. However, this does requires a recordset.
The code that will be created will perform the following tasks:
- PART A: CREATE STATIC CONTENT
- Create Static Form and Form Elements
- PART B: ADD DYNAMIC SCRIPT
- Add SQL INSERT Script
- Add Redirect Script
- Option 1: Provide Basic Form Validate
- Option 2: Add Dynamic Combo Box
- Option 3: Create Upload Image Functionality
PART A: CREATE STATIC CONTENT
Create Static Form and Form Elements
Create form and form elements (also known as form variables or form controls) that are needed for the ADD EMPLOYEE page.
- Open the add_page.php page that you created earlier and add the following highlighted code BELOW the
<h2>
tag:
WHY: To create a form for the ADD EMPLOYEE page.
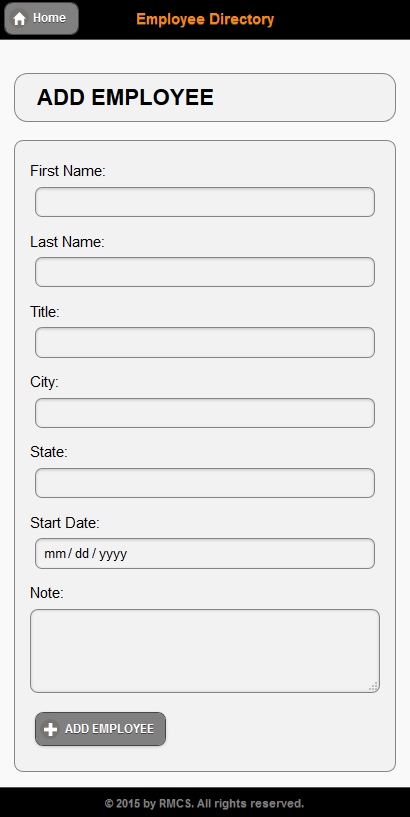
<h2 class="ui-body ui-body-a ui-corner-all">ADD EMPLOYEE</h2>
<form action = "" method="POST">
  <div class = "ui-body ui-body-a ui-corner-all">
  <p><label for = "FirstName">First Name:</label>
  <input type="text" name = "FirstName" id="FirstName" data-mini = "true" ></p>
  <p><label for = "LastName">Last Name:</label>
  <input type = "text" name = "LastName" id = "LastName" data-mini = "true" ></p>
  <p><label for = "Title">Title:</label>
  <input type ="text" name = "Title" id = "Title" data-mini = "true" ></p>
  <p><label for = "City">City:</label>
  <input type = "text" name = "City" id="City" data-mini = "true" ></p>
  <p><label for = "State">State:</label>
  <input type = "text" name = "State" id = "State" data-mini = "true" ></p>
  <p><label for="StartDate">Start Date:</label>
  <input type = "date" name = "StartDate" id = "StartDate" data-mini = "true" ></p>
  <p><label for = "Note">Note:</label>
  <textarea cols = "40" rows = "8" name ="Note" id = "Note" data-mini = "true" class = "define-textarea"></textarea></p>
  <p><input type = "submit" name = "add_record" value = "ADD EMPLOYEE" data-inline = "true"
  data-mini = "true" data-icon = "plus" data-iconpos = "left"/></p>
  </div>
</form>
CODE EXPLANATION:
- Except for the ADD EMPLOYEE button, each of the form elements MATCHES a column name in the database. This is similar to DATA BINDING where the columns in the database are "bound" to form variables in a form of the SAME column names in a database.
- Notice there is no spaces in FirstName, LastName, and StartDate of these database names because it is best practice not to include spaces in database column names.
- The button type is set to submit; otherwise, the form will not execute when button is clicked.
- CHECK POINT: Save the file and preview it in a browser. You should see the form displays when the page loads.
PART B: ADD DYNAMIC SCRIPT
Add SQL INSERT Script
Now that we have the form and form elements created, it is time to add the code that will actually ADD the data from the form to a single row in the database. The following code performs the actions listed below:
- Check to see if form has been submitted
- Connect to database
- Create query
- Create prepared statement
- Execute the query
- Add the following highlighted PHP connection script ABOVE the <!doctype html> statement at the top of the page.
<?php
	require("db.php");
if(!empty($_POST["add_record"])) {
	$sql = "INSERT INTO employees ( FirstName, LastName, Title, City, State, StartDate, Note)
VALUES ( :FirstName, :LastName, :Title,  :City, :State, :StartDate, :Note)";
	$pdo_statement = $pdo_conn->prepare($sql);
    $result = $pdo_statement->execute( array (
    ':FirstName'=>$_POST['FirstName'],
    ':LastName'=>$_POST['LastName'],
    ':Title'=>$_POST['Title'],
    ':City'=>$_POST['City'],
    ':State'=>$_POST['State'],
    ':StartDate'=>$_POST['StartDate'],
    ':Note'=>$_POST['Note'] ) );
}
?>
<!doctype html>
<html>
CODE EXPLANATION:- The conditional statement (!empty($_POST["form_variable"]) means "Is the post array not empty?"
- The $_POST["form_name"] is a FORM variable that reference the value of the form element id (e.g., id="FirstName"). For example, if a user type his or her first name (e.g., Cornelius) into a input text form element with a name attribute of FirstName, Cornelius would be the value of the form variable $_POST["FirstName"].
- Notice that the ID is NOT included in the list of database column names. That's because it is a primary key that is set to auto increment when a record is created in the database. You could have however included it in the list and set it value to zero (0) which will automatically get updated in the database with the next logical value. However, this is not necessary.
- Notice also that the complete INSERT INTO statement is WRAPPED in double quotes
- While not required, it is common practice to write SQL statements (e.g., INSERT, UPDATE, DELETE, SELECT) in all capital letters to make it easier to identify SQL statements within a lot of code.
- When inserting information between the parentheses for both the INSERT INTO and VALUE ensure that:
- they have the same number of values
- they are in the same order for each column in the database table that they will match.
- they are separated by commas
- Strings and dates are in quotes
- Numbers are not in quotes
- The header('location:master_page.php'); method is used to REDIRECT the page to another page by passing it a location (e.g., master_page.php)..
- After page is submitted and data added to the database, a user is REDIRECTED to the EMPLOYEE MASTER PAGE. You could also create a separate confirmation page if you needed to.
- If PHP detects an error, the redirect code will not be executed.
Add Redirect Script
Once we insert a record into the database, we want to redirect the user back to the EMPLOYEE MASTER PAGE (master_page.php).
- Add the following highlighted code to the existing PHP script.
<?php
	require("db.php");
if(!empty($_POST["add_record"])) {
	$sql = "INSERT INTO employees ( FirstName, LastName, Title, City, State, StartDate, Note)
VALUES ( :FirstName, :LastName, :Title,  :City, :State, :StartDate, :Note)";
	$pdo_statement = $pdo_conn->prepare($sql);
    $result = $pdo_statement->execute( array (
    ':FirstName'=>$_POST['FirstName'],
    ':LastName'=>$_POST['LastName'],
    ':Title'=>$_POST['Title'],
    ':City'=>$_POST['City'],
    ':State'=>$_POST['State'],
    ':StartDate'=>$_POST['StartDate'],
    ':Note'=>$_POST['Note'] ) );

	if (!empty($result) ){
	  header('location:master_page.php');
	}
}
?>
<!doctype html>
<html>
- CHECK POINT: Save the file and preview the page in a browser. Add data to the form and then click the ADD EMPLOYEE button. You should be taken to the EMPLOYEE MASTER PAGE page (e.g., master_page.php) where you should see the new employee added to the ListView.
Enhancements
You can come back later after you have finished the "MUST HAVE" features of this app with these "NICE TO HAVE" features for this page. See Enhancement tab for details.
OPTION 1: Provide Basic Form Validation
When you create a form, you should always validate particular form elements to determine if required form elements have been filled out or that the correct format is given (e.g., email address). There are a host of techniques on how to validate form elements. While minimum validation was done with the required keyword, additional validation can be done with some of the form elements.
OPTION 2: Add Dynamic Combo Box
It is best practice to DYNIMICALLY populate a menu if the SAME menu will be used on MULTIPLE pages. This way, if there are any changes (additions or deletions) to the menu, it can be done from one table in the database and all of the pages will reflect the changes.
OPTION 3: Create Upload Image Functionality
It is best practice create an upload image function when images are needed with the app.