Now that you can insert new employee records and view them, we can now turn our attention on how to update (edit) an existing employee record. A recordset will be created and used to pre-populate a form to "see" existing fields and "edit" ones that needs updating so that they all can be reinserted back to the database. The EDIT EMPLOYEE page is a little more involved than the other pages because you have several processes to handle.
It is helpful to think of an EDIT EMPLOYEE page as a "two-way" street. One way is when a recordset is created to "read" a SINGLE RECORD FROM a database via a SQL SELECT query. The other way is to "write" a SINGLE RECORD TO a database via a SQL UPDATE query. A recordset is created and its dynamic text fields will be created for the text fields in the form so that the existing fields can be pre-populated with a record from the database based on an ID value passed from the EMPLOYEE MASTER PAGE (master_page.php).
An EDIT link on the EMPLOYEE MASTER PAGE (master_page.php) that was created earlier will be used to pass data to this page to build a new recordset and populate the form.
The code that will be created will perform the following tasks:
- PART A: CREATE STATIC CONTENT
(From Add Employee Page)
- Create Static Table
- Create Static Button
- PART B: ADD DYNAMIC SCRIPTS
- Add SQL SELECT Recordset Script
- Add Dynamic Variables Script
- Add SQL UPDATE Recordset Script
- Option 1: Validate Basic Form Elements
- Option 2: Add Dynamic Combo Box
- Option 3: Create Upload Image Functionality (NOT COMPLETED)
PART A: CREATE STATIC CONTENT
Static form and form elements will be used from the Add Employee page that was created earlier.
Create Edit Employee Page
- If necessary, open the add_page.php and save it as edit_page.php in the site root directory. Then, close the add_page.php file.
WHY: The EDIT EMPLOYEE page is similar to the ADD EMPLOYEE page, so it will be used to get a head start. - Update the ADD EMPLOYEE heading to read EDIT EMPLOYEE.
- Update the ADD EMPLOYEE button value to read SAVE.
PART B: ADD DYNAMIC SCRIPTS
Add SQL SELECT Recordset Script
- DELETE the entire PHP script ABOVE the <!doctype html> tag:
WHY: So that it can be replaced with a SELECT clause instead of an INSERT INTO clause.
<?php
require("db.php");
if(!empty($_POST["add_record"])) {
require_once("db.php");
$sql = "INSERT INTO employees ( FirstName, LastName, Title, City, State, StartDate, Note)
VALUES ( :FirstName, :LastName, :Title, :City, :State, :StartDate, :Note)";
$pdo_statement = $pdo_conn->prepare( $sql );
$result = $pdo_statement->execute( array( ':FirstName'=>$_POST['FirstName'], ':LastName'=>$_POST['LastName'],
':City'=>$_POST['City'],
':State'=>$_POST['State'],
':StartDate'=>$_POST['StartDate'],
':Note'=>$_POST['Note'] ) );

if (!empty($result) ){
header('location:master_page.php');
}
}
?>
<!doctype html>
- Replace the deleted PHP script with the following recordset in a PHP code block ABOVE the
<!doctype>
tag:
WHY: To be used later to per-populate the form elements.
<?php
require("db.php");
/* STEP 1: Retrieve a single record to pre-populate form elements */
$pdo_statement = $pdo_conn->prepare("SELECT * FROM employees where ID = 3");
$pdo_statement->execute();
$result = $pdo_statement->fetchAll();
?>
<!doctype html>
NOTE: Only the columns needed could have been retrieved from the database. However, to simplify the query the wildcard asterisk ( * ) was used to select ALL columns. Also, notice that a temporary ID has been set (e.g., EmployeeID = 3).
CAUTION: If you get an error when you check the file, it may be that you have already deleted a record with an Employee ID of 3. Look at the database to find an ID that you can use.
Add Dynamic Variables Script
- Add the following dynamic variables to each input fields value attribute AND to the inside of the textarea tag:
WHY: To pre-populate form elements with data from the database.
CAUTION: Notice that the Note textarea tag DOES NOT have a value attribute and is not in quotes. It is INSERTED between the opening and closing textarea tags (<textarea cols = "40" rows = "8" name ="Note" id = "Note" data-mini = "true" class = "define-textarea">
<?php echo $result[0]['Note']; ?> </textarea>).<form action = "" method="POST">
<div class = "ui-body ui-body-a ui-corner-all">
<p><label for = "FirstName">First Name:</label>
<input type="text" name = "FirstName" id="FirstName" data-mini = "true"
value="<?php echo $result[0]['FirstName']; ?>" ></p>
<p><label for = "LastName">Last Name:</label>
<input type = "text" name = "LastName" id = "LastName" data-mini = "true"
value="<?php echo $result[0]['LastName']; ?>" ></p>
<p><label for = "City">City:</label>
<input type = "text" name = "City" id="City" data-mini = "true"
value="<?php echo $result[0]['City']; ?>" ></p>
<p><label for = "State">State:</label>
<input type = "text" name = "State" id = "State" data-mini = "true"
value="<?php echo $result[0]['State']; ?>" ></p>
<p><label for="StartDate">Start Date:</label>
<input type = "date" name = "StartDate" id = "StartDate" data-mini = "true"
value="<?php echo $result[0]['StartDate']; ?>" ></p>
<p><label for = "Note">Note:</label>
<textarea cols = "40" rows = "8" name ="Note" id = "Note" data-mini = "true" class = "define-textarea">
<?php echo $result[0]['Note']; ?> </textarea></p>
<p><input type = "submit" name = "add_record" value = "SAVE" data-inline = "true"
data-mini = "true" data-icon = "plus" data-iconpos = "left"/></p>
</div>
</form>
CODE EXPLANATION:
- The value attributes are used to pre-populate the form elements.
- It is also important to note that the Note textarea does NOT have a value attribute like the <input> form elements.
  The dynamic PHP script is written BETWEEN the opening and closing <textarea> tags and will be rendered as text in
  the textarea field.
- The $result array index value is zero (e.g., $result[0]['Image'];) for all of the form fields because only ONE
  record is returned from the database so the index value will always be zero.
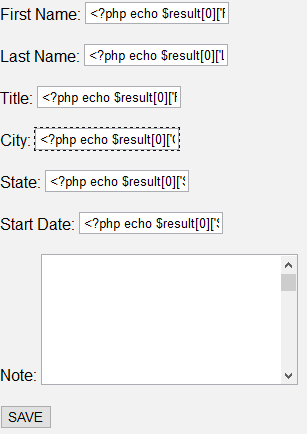
If you look at the page in Design View in Dreamweaver, you will see the PHP script literally shown INSIDE of the input form elements: Notice you will NOT see a dynamic variable displayed in the screenshot below for the NOTE textarea because it don't have a value attribute like the text input fields.
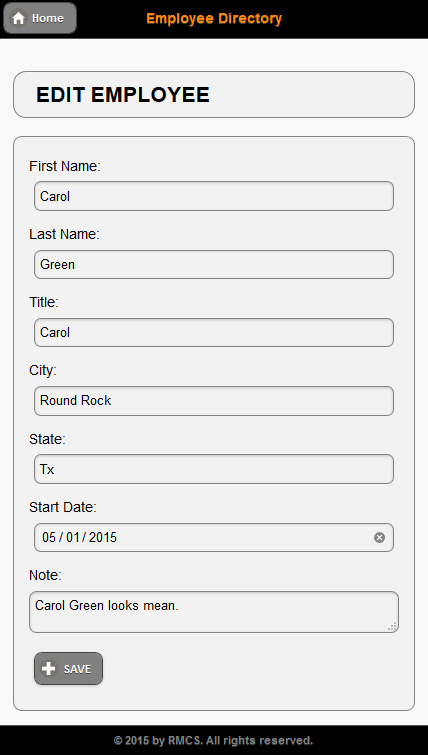
If you look at the page in Live View using Dreamweaver, you will see the form PRE-POPULATED with data from the database based on a recordID value:
- CHECK POINT: Save the file and preview the page in a browser. You should see the record returned that has an ID value of 3 from the database. However, we need to make the value dynamic instead of static (e.g., 3). Later, we will test this page from the EMPLOYEE MASTER PAGE that will pass the value to this page via a URL query string so that the correct record from the database is displayed based on the value passed.
- Replace the literal numeric value 3 with a dynamic reference to the value that will be passed to it either from the browser URL or from the EMPLOYEE MASTER PAGE.
WHY: The $_GET[ ... ] represents a URL variable that will be used later. Conversely, $_POST [ ... ] represents a FORM variable.
CAUTION: Be careful to not place DOUBLE QUOTES around the URL variable. Also note the period (.) that is used to concatenated the
string with the dynamic variable string.
$pdo_statement = $pdo_conn->prepare("SELECT * FROM employees where ID=" . $_GET[recordID]);
- CHECK POINT: Open the EMPLOYEE MASTER PAGE (master_page.php) and hover of a few of the edit icons (pencils) on the far right side of the ListView. You should see the recordID values that will be passed to the edit_page.php at the bottom of the browser.
edit_page.php?recordID=28
- CHECK POINT: Click any EDIT icon on the far right of the ListView. You should be taken the the EDIT EMPLOYEE page with the form elements pre-populated. Repeat this step several times with different ListView items. You should see that the fields get updated for each ListView item tested.
Add SQL UPDATE Recordset Script
The first SQL SELECT query was used to per-populate form elements. Now, we need to create a SQL UPDATE query to update any changes that need to be made to a row in the database table.
- Return to the edit_page.php fiel and then add the following highlighted code to the existing PHP script at the top of the code:
WHY: To add an UPDATE statement that will save any changes to a SINGLE record to the database.
NOTE: Because there is no penalty for spaces, the query has been formated so that you can see the STRUCTURE better which makes is easier to add new columns later if you need to.
<?php require_once("db.php"); /*
STEP 1: Retrieve a single record to pre-populate form elements */
$pdo_statement = $pdo_conn->prepare("SELECT * FROM employees WHERE ID=" . $_GET[recordID]);
$pdo_statement->execute();
$result = $pdo_statement->fetchAll();

/* STEP 2: Insert updated form elements to database */
if(!empty($_POST["add_record"])) {
	$pdo_statement=$pdo_conn->prepare("UPDATE employees SET
    FirstName='"  . $_POST[ 'FirstName' ] . "',
    LastName='"  . $_POST[ 'LastName' ]. "',
    Title='"           . $_POST[ 'Title' ]. "',
    City='"            . $_POST[ 'City' ]. "',
    State='"          . $_POST[ 'State' ]. "',
    StartDate='"    . $_POST[ 'StartDate' ]. "',
    Note='"           . $_POST[ 'Note' ]. "'
    WHERE ID="   . $_GET[recordID]);
   	$result = $pdo_statement->execute();
	if($result) {
		header('location:master_page.php');
   }
}
?>
<!doctype html>
CODE EXPLANATION:
- The UPDATE query SETS the form variables to MATCH the columns in the database.
- The UPDATE query SETS the form variables to MATCH the columns in the database.
- CHECK POINT: Save the file and then open the EMPLOYEE MASTER PAGE (master_page.php) in a browser:
- Click any of the EDIT icon link on the right side of the ListView.
- On the EDIT EMPLOYEE page, make changes to any of the fields.
- Click the SAVE button.
You should be immediately returned to the EMPLOYEE MASTER PAGE and you should see that the data for that employee got updated.
NOTE: If a user modify none, any or all fields, ALL fields will be updated in the database regardless.
Enhancements
You can come back later after you have finished the "MUST HAVE" features of this app with these "NICE TO HAVE" features for this page. See Enhancement tab for details.
OPTION 1: Provide Basic Form Validation
When you create a form, you should always validate particular form elements to determine if required form elements have been filled out or that the correct format is given (e.g., email address). There are a host of techniques on how to validate form elements. While minimum validation was done with the required keyword, additional validation can be done with some of the form elements.
OPTION 2: Add Dynamic Combo Box
It is best practice to DYNIMICALLY populate a menu if the SAME menu will be used on MULTIPLE pages. This way, if there are any changes (additions or deletions) to the menu, it can be done from one table in the database and all of the pages will reflect the changes.
OPTION 3: Create Upload Image Functionality
It is best practice create an upload image function when images are needed with the app.