Install XAMPP
Before we can create a MySQL database, it is best practice to download a bundle software package to install the necessary resources that are needed to create it. There are a host of packages available (e.g., LAMP, MAMP, ZendAMF, etc.). However, we will download a popular package known as XAMPP. XAMPP will install Apache, MySQL, Perl and PHP. The "X" in XAMPP represents one of three operating systems (Windows, Mac and, Linux) that are supported. We will not be using Perl in this tutorial.
If you do not already have XAMPP installed, follow the procedures below:
- Download XAMPP to your computer. (Go to http://www.apachefriends.org/en/xampp.html)
- Double click the installation file to install XAMPP. If you accept the default options, it will be installed in the c:/xampp directory unless you specified otherwise. You only need to install Apache and MySQL from the installation dialog box.
- CHECK POINT: The XAMPP Control Panel should open after the installation. If you need to open it again later, there are three main ways:
- Select All Programs > ApacheFriends > XAMPP Control Panel from the Window's Start menu.
- Click the file named xampp-control.exe in the c:/xampp folder (or wherever you installed it)
- Click the xampp icon in the task bar at the bottom of the screen if it is available there
Check Server and Database
Once you have installed XAMPP, you will want to start the Apache server and the MySQL database to ensure that there are no issues that are preventing them from starting.
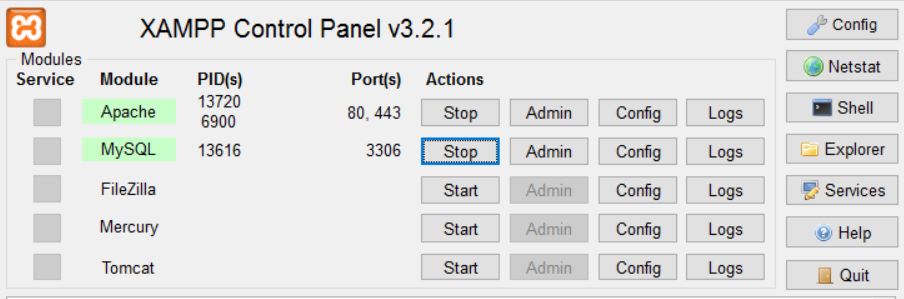
- If necessary, open the XAMPP Control Panel Application dialog box and click the Start button for both Apache and MySQL to turn on both services.
- CHECK POINT: You should see the word Apache and MySQL highlighted in green to let you know that both services started correctly.
ADD UPDATED SCREEN SHOT HERE
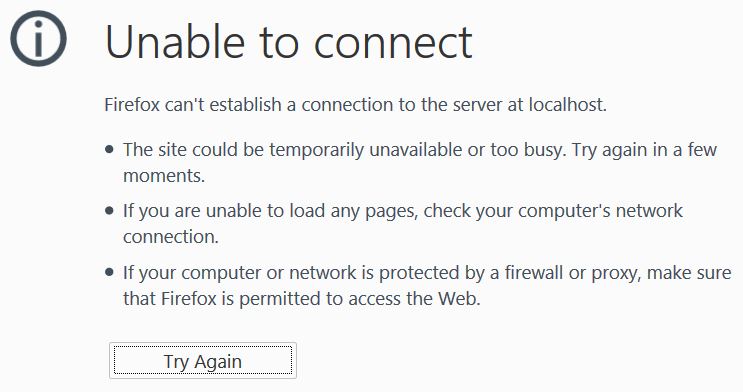
- Type localhost or 127.0.0.1 into a web browser and press the ENTER key. For Mac users the path is: http://localhost/~username/phpMyAdmin/. (VERIFY MAC STEP)
WHY: To test to see if the server is set up correctly to "serve up" pages.
NOTE: It is important to remember that you are typing a WEB URL (localhost or http://localhost) that points to a FILE DIRECTORY (C:\xampp\htdocs\MyAppFolder\).
- CHECK POINT: You should see another page with a title of "XAMPP for Windows." If you don't see this page, you may get the following error:
If either one or both of these services does not start, check the following, and then test again:- the error log at the bottom of the XAMPP Control Panel to see if you can determine what the problem is.
- your internet connection.
- make sure you are not running another server (e.g., IIS) on the same port 80 at the same time. Only one server can use port 80. If so, turn off the other server (For IIS, Select Control Panel > System Administrative Tools > Services, select IIS and click the Stop button).
- Turn off another program (e.g., SKYPE) may be attempting to share the same port as APACHE. You may be able to resolve it in SKYPE by selecting Actions > Options > Connection and removing the check mark at "use port 80 for an alternate port" and then restart Skype.
- Deactivate a firewall or virus scanner or uninstall it.
- If the previous steps does not work, delete the xampp folder and then reinstall a fresh copy of XAMPP and test again.
Check PHP
- Create a new document and save it as phpinfo.php in the server site root directory.
- Add the following highlighted PHP script between the body tags:
<body>
<?php print ("Hello World"); ?>
</body>
CODE EXPLANATION:
- The print method is used to "print" what is in the parenthesis to the screen at that point on the page. Parenthesis are optional.
- Add the following highlighted PHP script below the previous PHP script:
<body>
<?php print ("Hello World"); ?>
phpinfo();
</body>
CODE EXPLANATION:
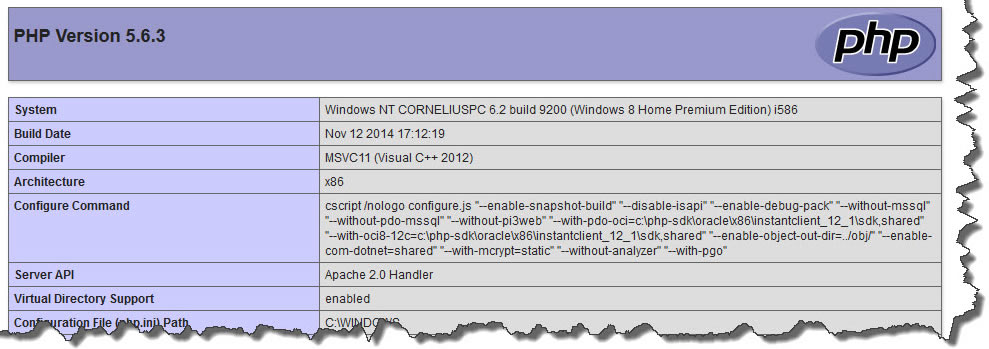
- The phpinfo() method is used to output all of the PHP settings in a series of tables.
-These tests were only done to ensure that your PHP script is working correctly.
- CHECK POINT: Save the file and preview it in a browser. You should see the phrase "Hello World" appear at the top of the page and a host of PHP configuration setting tables below it.
Hello World
- Delete the phpinfo() statement:
<body> <?php print ("Hello World"); ?>phpinfo();</body>
(OPTIONAL) Check PHP Output / Format
- Add the following highlighted PHP code below the previous PHP script:
<body>
<?php print ("Hello World"); ?>
<?php echo ("Goodbye World"); ?>
</body>
CODE EXPLANATION:
- The echo method is used to "print" what is in the parenthesis to the screen at that point on the page. Parenthesis are optional.
- Both the print and echo methods are used to output data to the screen. However, there are some small differences:
  - The echo method has no return value (null); whereas, the print method return 1 so it can be used in expressions.
  - The print method takes one argument; whereas, the echo method can take multiple arguments (although this is rare).
  - The echo method is marginally faster than the print method.
- CHECK POINT: Save the file and preview it in a browser again. You should see the phrase "Hello World Goodbye World" appear at the top of the page.
- Modify the existing code to read:
<body>
<?php print ("<h1>Hello World</h1><br/>"); ?>
<?php echo ("<h1>Goodbye World</h1>"); ?>
</body>
CODE EXPLANATION:
- You are not limited to literal text only. You can add any HTML tags with the quotes.
- CHECK POINT: Save the file and preview it in a browser again. You should see the phrase "Hello World and Goodbye World" appear at the top of the page as <
h1
> tags on separate lines because of the line break tag (
<br/>
).
- Modify the existing code again to read:
<body>
<?php print ("<h1 style='color:red'>Hello World</h1><br/>"); ?>
<?php echo ("<h1>Goodbye World</h1>"); ?>
</body>
CODE EXPLANATION:
- You are also not limited to HTML. You can add any CSS style you want.
- Notice the value of the CSS style is in single quotes because double quotes has already been used.
- CHECK POINT: Save the file and preview it in a browser again. You should see the phrase "Hello, World appear in red because of the CSS style that was applied.
- (ALTERNATIVE) You could have written both statements within a SINGLE PHP wrapper instead of two like this:
<body>
<?php
  print ("<h1 style='color:red'>Hello World</h1><br/>");
  echo ("<h1>Goodbye World</h1>");
?>
</body>
- CHECK POINT: Save the file and preview it in a browser again. You should see the same result as before but the code has been simplified.