If you access the database DIRECTLY through phpMyAdmin there no need to connect to it. However, when using a PHP script you have to CONNECT to the database INDIRECTLY. PHP can connect to most databases (e.g., PostgreSQL, SQLite, Sybase) servers. If you use a database that does not have DIRECT support, you will need to use a PHP Open Database Connectivity (ODBC) method with ODBC drivers to connect to a database. We will be using the MySQL server that comes bundle with XAMPP.
Setup Site and Testing Server
Once you create a database and its tables, phpMyAdmin will create a folder with the same name as the database in a server folder. In our case, it is C:/xampp/mysql/data/pdo_employee_directory1234 with database related files in it. It is important to remember that data for an application get saved in one folder (e.g., C:/xampp/mysql/data/) while the application get saved in another folder (e.g., C:/xampp/htdocs/). This is true for all applications that you build.
Before you can connect to a database, you have to first setup a testing or remote server. The process is more involved than creating a static website:
- You MUST setup a application from a particular folder for a particular server (e.g., for PHP the folder is htdocs, for IIS the folder is wwwroot).
- You MUST have the files for your application residing in this folder (it will not work from your desktop). The reason for this is that in order for a file to be "served" from a server, it has to be in a server's root directory and viewed from a browser (it will not render if you click a file in the File Explorer).
Setup Static Web Site
First, we need to setup a LOCAL static web site for our application. This is no different from any other static web site setup that you create in Dreamweaver.
- If necessary, open Dreamweaver and select Site > New Site... from the menu.
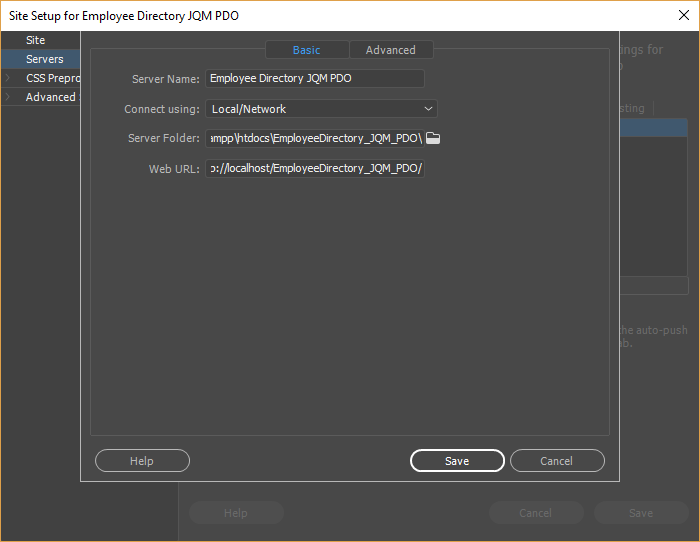
- In the Site Setup dialog box that appears, add a Site Name (Employee Directory JQM PDO),
NOTE: Remember, this file was already created from the exercise zip file. Normally, you would have to create one on your own.
- Click the folder icon next to the Local Site Folder text field
- Navigate to C:/xampp/htdocs/EmployeeDirectory_JQM_PDO
- Click the Select Folder button.

CAUTION: Be careful to use a SINGLE back slash (\) instead of a DOUBLE back slash (\\) in the Local Site Folder text field.
Setup Testing or Remote Server
When creating a database driven website you not only need to setup a LOCAL static web site in Dreamweaver but you also need to setup either a TESTING or REMOTE server. For this tutorial, we will be using a testing server.
- If necessary open Dreamweaver and select Site > Manage Sites...
- Either click the EmployeeDirectory_JQM_PDO site in the dialog box that appear OR click the Edit current selected site icon (pencil).
WHY: To open the Site Setup for EmployeeDirectory_JQM_PDO.

- With the Basic tab selected, in the left pane, click the Servers link, click the Add new server (plus sign icon), and in the Site Setup dialog box that appears, add the following settings:
- Server Name: Employee Directory JQM PDO
- Connect using: Local/Network
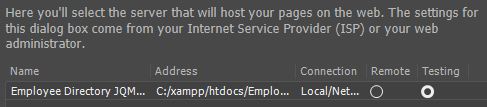
NOTE: If you are using an ISP, you will need to select an FTP option instead of Local/Network and enter all of the necessary data provided to you by your ISP. You can also click on the Test button to confirm that the remote server connected successfully.
- Server Folder: c:/xampp\htdocs\EmployeeDirectory_JQM_PDO
NOTE: The sever folder is the SAME as the LOCAL site root directory:c:/xampp\htdocs\EmployeeDirectory_JQM_PDO
- Web URL: http://localhost/EmployeeDirectory_JQM_PDO
NOTE: This URL is how you access the app from within a browser. You may want to bookmark it so that you have easy access to it later.
CAUTION: It is important to note that the slashes in the path for the Server Folder can be
FORWORD OR  BACK SLASHES ( \ ) depending on the OS:
- Mac/UNIX - Forward slash
- Windows - Back slash
Whereas, the slashes for the Web URL MUST  ALWAYS BE FORWARD SLASHES ( / )
- Click the Advanced tab and in the Server Model combo box select PHP MySQL and then click the Save button

- Click the Testing Server radio button and then click the Save, OK and then the Done button.
Connect To Server
Once you have a site and server setup, then you can connect to a database. We have a standard PHP script that is provided for you. All you have to do is change the database credentials.
- Open Dreamweaver and in the file panel, double-click the db.php file to open it.
- Change the $dbHost, $dbUsername, $dbPassword, and $dbName variables based on your database credentials that you used to create the table:
If you did not create a user for the database, you don't have any database credential. All you need to do is specify the correct database name. In this case, pdo_employee_directory1234. Notice that the $username = "root" and $password = "". Host is most of the the localhost.
<?php
$host ="localhost";
$username = "root";
$password = "";
$database = "pdo_employee_directory1234";
// Create Connection ----------------------------------------
$pdo_conn = new PDO( "mysql:host=$host; dbname=$database", $username, $password);
?>
CAUTION: When you don't have any credential, you will see the following message at the bottom of the phpMyAdmin screen,
"Your configuration file contains settings (root with no password) that correspond to the default MySQL privileged account.
Your MySQL server is running with this default, is open to intrusion, and you really should fix this security hole by setting
a password for user 'root'."
Or, if you have different credentials, you need to provide for the following highlighted values:
<?php
$host ="localhost";
$username = "Cornelius";
$password = "admin";
$database = "pdo_employee_directory1234";
// Create Connection ----------------------------------------
$pdo_conn = new PDO("mysql:host=$host; dbname=$database", $username, $password);
?>
CAUTION: The user name and password are case sensitive. So corneliuschopin is not the same as CorneliusChopin as the user name.CODE EXPLNATION:
- If you are working locally, the host will always be localhost, if you have an ISP, you need to provide the path
to your ISP server.
- mysql represents the database driver that is being used.
- $pdo_conn represents the database handler.
- 'mysql:host=localhost;dbname=pdo_employee_directory1234' -- notice the equal sign after the word host and
the semicolon between localhost and dbname with the whole statement enclosed in a set of single quotes.