Download Exercise Files
Before we get started, we need to download the necessary exercise files for our project. Most of them will be used later when we create the app. This zip file contains the following assets.
- images - folder with employee images and an avatar image.
- css - folder with CSS file (e.g., custom_styles.css)
- search_and_pagination.php - this is a PHP file that is used to create the search and pagination functionality.
- pdo_employee_directory1234.sql - SQL script used to create database table and default records.
- db.php - this is a standard PHP script to connect to MySQL
- themes - folder that has jQueryMobile files
- js - folder that has jQuery files
- Download the EmployeeDirectory_JQM_PDO.zip file and place it in the c:/xampp/htdocs folder.
- Right-click zip file and select Extract All... from the menu.
WHY: To extract all files and folders in the zip file and at the same time creating a named folder for our project.
Create Database
It is best to start by creating a database with a few records in it before you create a database driven application. To save time, we have already provided a script for the database.
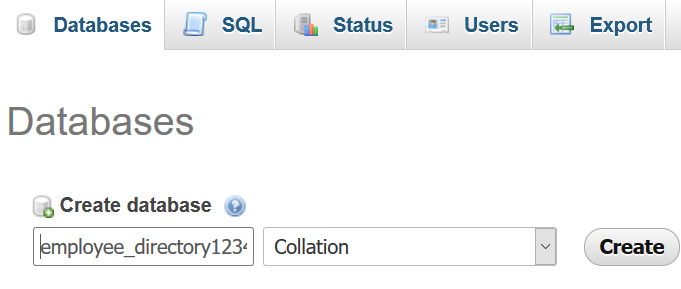
- Open phpMyAdmin and click the New Database link in the left panel.
- Type pdo_employee_directory1234 into the Create Database text field and then click the Create button.
- Select this database (pdo_employee_directory1234) from the panel on the right.
- Click the Import tab, click the Browse... button, and navigate to the pdo_employee_directory1234.sql in the EmployeeDirectory_JQM_PDO folder in htdocs folder and in the File Upload dialog box that appears, click the Open button.
- Click the OK button at the bottom of the Import screen.
- CHECK POINT: You should see the message "Import has been successfully finished..."
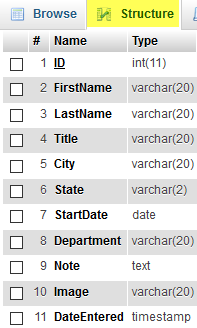
- For the selected table, click the Structure tab to review the column names and table structure.
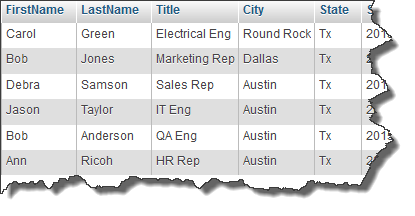
- Click the Browse tab to review the default records.
IMPORTANT NOTICE:
This content below is for informational or experimental purposes only.
The information below gives more details about the database above and how it was created for the *.sql script that is used. You DO NOT need to perform these steps.Before creating a database driven application, it is best to create the database FIRST. There are several good reasons for doing it first:
- Once you create the database, you can test it in a third party interface like phpMyAdmin.
- You know in advance what data columns are needed for your your web site or application.
There are also three things (3 Cs) that you typically do when working with a database:
- Create IT
- Connect to IT (Connect to and select database)
- Communicate with IT (Test and query database)
There are three things you typically do when adding data to multiple tables in a database:
- Create THEM
- Relate THEM (You don't always have to relate tables. )
- Populate THEM
This tutorial uses PDO (PHP Data Objects) instead of the old mysql_ * or mysqli_ extensions: Remember, PDO is the way to GO!!!
Except from https://forums.phpfreaks.com/
Switching from the old mysql_* functions to the new mysqli_* functions takes a lot more than adding an “i” everywhere.
Or adding connection arguments. You first have to unlearn plenty of wrong practices: Your code has SQL injection
vulnerabilities all over the place, and printing error messages on the screen isn't very smart either.

It gives attackers valuable information about your system, and it makes legitimate users think your website is fudged up.

Then you need to actually learn mysqli. The old extension represented the technology of the 90s, mysqli is a database
interface for the 21st century and often takes a very different approach. For example, passing data to queries is
now implemented with prepared statements, which provides much better protection against SQL injection attacks. mysqli
also supports exceptions to properly indicate errors.

Unfortunately, mysqli is fairly difficult to learn, especially when you don't like to read manuals. A much better
alternative is the PDO extension. Since you haven't invested any time into mysqli yet, now would be a great time to
jump straight to PDO.
While you can create a database using:
- The command line console, or
- PHP script within an HTML page
A better and more VISUAL approach is to use a Graphic User Interface (GUI) like phpMyAdmin which is what we will be doing. phpMyAdmin is a popular PHP-based administrative tool that is supported by most ISPs. It is a Relational Database Management System (RDMS) which means, as the name suggests, it can manage multiple databases at the same time. In fact, there are a few databases that are automatically created when you install certain frameworks like XAMPP:
- information_schema – contains details of other databases within the RDMS.
- mysql – contains user account and security info.
- test – a blank database that you can use or delete.
There are several types of relational databases. Choose the one that you are most familiar with or have the necessary resources available to complete (e.g., Operating System, database type, server type and server-side technology language). Click on a panel below for details:
Normalize Data
Duplicated data can cause errors every time records in a database is inserted, updated or deleted and can lead to unpredictable results such as the inability of entering data into a database. Duplicate data happens when two or more fields are inadvertently combined into a single table. To avoid this from happening, if the table is designed using a process called normalization, it will be free from duplicates. To normalize tables, you have to split the tables into separated tables with the correct fields in them. A database is said to be normalized when each fields contain one value and each table has the correct number of fields. Normalization can be summarized as follow:
- Each table should have a primary key that will always to unique that is used to identification a given record.
- Each group of associated data should have its own table.
- Tables should be cross-reference using a primary key in the parent table and a foreign key in its child table.
- Only one item should be stored in each field (i.e., you can not have two phone numbers is a single field).
Create A Database
A typical relational database is made up of "related" tables (grid of cells with rows and columns). Each row represent a complete "record" of data for a given topic. A set of rows is rightly called a recordset. The columns are called fields.
IMPORTANT NOTE: While the steps are generic; however, the values (in bold) are specific to the upcoming tutorial.
- Type in localhost (or 127.0.0.1) in a browser and then click the phpMyAdmin link.
TIP: A shortcut to phpMyAdmin is localhost/phpmyadmin/.
- Click the new database link in the left sidebar:
- On the page that appears, give the database a name (in our case, type pdo_employee_directory1234) in the Create database text field and then click the Create button.
CAUTION: It is important to give your database a name the cannot be easily hacked. This is the reason the 1234 was added to the database name. phpMyAdmin will automatically convert any database name to all lowercase so you may want to insert underscores between words (e.g., employee_directory1234)
Leave other field set to collation unless you are going to use SQL to compare strings in a non-Latin character set. mySQL was developed in Sweden so it defaults to latin1_swedish and is fine for the default.
- CHECK POINT: phpMyAdmin display a message that the database was created. You will now see the database listed in the left sidebar with the database name you gave earlier. Also, phpMyAdmin created a folder in xampp/htdocs/mysql/data/ with the name of the database you gave it (e.g., pdo_employee_directory1234). Within that folder you will see a file named db.opt. When you create tables in the next step, you will see several additional files with the name of your tables with an ".ibd" and ".frm" extensions (e.g., employees.ibd, employees.frm). The SQL that was used to generate the database was: CREATE DATABASE 'employee_directory1234';
Create Tables
After you create the empty database, you need to create tables inside of it. In our case, we will be creating the following three tables for our CMS that we will be using in an upcoming modules:
- employees
- departments
- passwords
Click on one of the tab's links below to see detail information on how to structure a table or what is common to all tables. Click again to collapse a panel.
It is best practice to create a Entities Relationship Diagram (ERD) to define tables structure before creating a MySQL database. It can be difficult to change some aspect of a table once it is created and you may have to recreate it if it is not done correctly. Also, before populating a table, you need to define its structure.
- Determining the number of columns – This should be determine from the ERD.
- Naming the tables/columns – (1-64 characters – $, numbers, letters and underscore) with a descriptive name. It is best practice to give the table a prefix (e.g., tb_employee_directory). Table can begin with a number but cannot be exclusively all numbers.
NOTE: You cannot use MySQL reserve words (e.g., date, time, etc.) when you create column names. Instead use a compound word like pick_up_date or drop_off_date. - Setting column data type – Below is a list of the most common data types that may need further explanation:
- Storing text:
- CHAR – fixed length width text up to 255 characters. You can define a default value.
NOTE: If you insert data that is larger than the allocated space, the data will be truncated in the database. - VARCHAR – variable length width text up to over 65K. You can define a default value.
- TEXT – stores a maximum of 65K of text. User cannot define a default value. It is useful because you do not have to specify a maximum size.
TIP: Use VARCHAR for short text and TEXT for long text.
- CHAR – fixed length width text up to 255 characters. You can define a default value.
- Storing numbers:
- TINYINT – whole numbers (integer) between -2,147,483,648 and 2,147,483,648. If the column is declared as UNSIGNED, the range is 0 to 4,294,967,295. Notice that we you used unsigned the range double on the positive values.
- INT – whole numbers (integer) between -128 and 127. If the column is declared as UNSIGNED, the range is 0 to 255
- FLOAT – Any floating-point number.
- DECIMAL – Any floating-point number that is stored as a string.
NOTE: Decimal is used mainly for currency. However, since it is stored as a string, it is best avoided if you plan to do any kind of calculation with currency. It is best to use INT and then use PHP to divide the result by 100 and then format the currency.
NOTE: Do not use commas or spaces in your currency. You can only use the negative sign ( - ) or the period ( . ).
- Storing dates and times:
- DATE – store date as YYYY-MM-DD
NOTE: MySQL by defaults stores dates as YYYY-MM-DD - DATETIME – date and time is displayed (e.g., YYYY-MM-DD HH:MM:SS)
- TIMESTAMP – will generate a computer system timestamp.
- DATE – store date as YYYY-MM-DD
- Storing pre-defined lists:
- ENUM – store a single choice from a predefined list (i.e., yes, no or male, female).
- SET – store zero or more choices up to 64 from a predefined list. It is useful when an item form a complete unit (e.g., optional extras)
NOTE: ENUM and SET are stored in a comma separate string. Individual values can include spaces but not commas for obvious reason.
- Storing binary data (BLOB - Binary Large Objects):
- TINYBLOB – store up to 255 bytes
- BLOB – store up to 64KB
- MEDIUMBLOB – store up to 16MB
- LONGBLOB – store up to 4GB
- Storing text:
- Determining the Default Values – self explanatory.
- Determining the Collation (Sort Order) – Collation determines the sort order of records for entire database, individual table or column. Unless you are using another language other than English, Swedish, or Finnish, you should leave the Collation drop-down box at its default.
- Determining the Attributes – You can set whether the value is binary, unsigned, unsigned, unsigned zerofill or on update CURRENT_TIMESTAMP
- Setting whether column fields are required to have data – By placing a check in the Null column, you are saying that the field can be null. If you want the null field to be REQUIRED, uncheck the null checkbox. It is common practice to not have the field values to allow nulls. This way, you can create client side code to validate data that will be entered into the database. If you set a default value for a NOT NULL, MySQL will automatically use that default value if nothing is entered for that field.
- Setting table's index – (primary, unique, index and fulltext) Every table should have a primary key even if you don't intend to use it currently.
- Determining if the field will auto increment – When setting the primary key, it is a common practice to set this field as auto increment.
- Adding comments – self explanatory.
- Setting the MIME type –
- Setting the Browse transformation and transformation options –
- It is important to note the some columns are dependent on other columns. For example, If you set the Data Type column to VARCHAR, you must specify a length or value in the Length/Value column and an optional default value in the Default column.
- When creating a database driven application, it is common practice that none of the fields be required (except the primary key fields). It is better to perform form validation to ensure that the data the user will enter meets your requirements. If you allow the database to determine if a field is required, when the missing data is encountered sometimes useless error are thrown. If you use form validation, you can customize the error with instruction on how to resolve it. By default, all of the columns are set to NOT NULL (or Required). To make the columns OPTIONAL, you have to select all of the checkboxes (of course, except when the A_I option is selected for a field which is typically used in conjunction with the table's primary key).
- All primary key fields will have Auto Increment (A.I.)
- Additional fields (columns) can be added later, if necessary.
- Is it best practice to estimate how many characters is needed for a given field because the field sizes determines the size of the database. If the data field is too small, MySQL will truncate the data. If it is too large, it will consume unnecessary database space.
- Every table has a primary key with its field name set to the name of the table (without the "s") but with a suffix of "ID" (e.g., employeeID). Also, its data type checked for Auto Increment.
- If you click on the Home button (the first icon) in the left sidebar at the top, you will see a list of databases listed below it.
- If you go back to edit a table, you will not see the INDEX column. It is shown at the bottom of the table once it is created.
Create First Table
- Click to select the database name (e.g., employee_directory1234) in the left sidebar you created earlier. In the page that appear, type a table name (in our case, type employees) in the Create table text field.
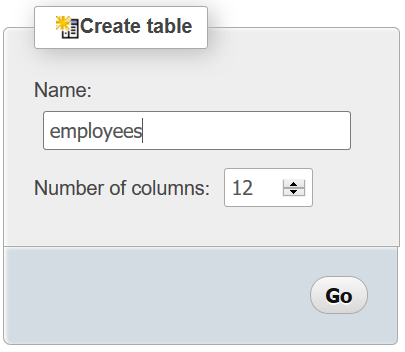
- Type the number of columns (fields) you need for your database (in our case, type 12) in the Number of Columns text field and click the Go button to create the table.
NOTE: You may need to scroll horizontal to see some of the columns. Type or select the information you need for the first row. In our case:
- Type field name (e.g., ID) in the Field column
- Select data type (e.g., INT) in the Type column
NOTE: Like variables in some programming languages that are given data types (e.g., string, number), each field in a database has to be defined as a particular type (e.g., varchar, text, int). See Table Structure Information above for detail on each type.)
- Type 11 in the Length/Value column or if you do not type anything, it will default to 11
- Select PRIMARY in the Index column
NOTE: The primary key is a unique identifier that is often used with Auto Increment listed below to automatically create the values for this column. When entering data into this table DO NOT enter a value for this field.
- Select the AI checkbox in the AI (Auto Increment) column
- Leave other columns at their default.
- Click the first tab below to see the additional fields that are needed for each row. Table cells that are left blank below implies that default values will be used or it is not applicable to the value for those fields. For example, you don't need to set a Length/Value for Date or Time because the Data Type determines the length/value for it.
- Repeat steps 1-3 for the other rows.
- Click the Save button to save the current table.
- phpMyAdmin will create a link in the sidebar to the table you just created.
Employees Table
The naming convention for the fields (columns) in the tables uses Initial Case (e.g., ID, DepartmentID)
The Employees table will store employees information.
| Field Name | Type | Length/Value | Index | Auto Increment | Comment |
|---|---|---|---|---|---|
| ID | INT | Primary | checked | Unique identifier | |
| LastName | VARCHAR | 20 | |||
| FirstName | VARCHAR | 20 | |||
| Title | VARCHAR | 20 | |||
| Address | VARCHAR | 50 | |||
| City | VARCHAR | 20 | |||
| State | VARCHAR | 2 | Optional: Set TX in the default column. | ||
| StartDate | DATE | ||||
| Note | TEXT | ||||
| Image | VARCHAR | 20 | |||
| DateEntered | TIMESTAMP | Value is fixed so length not needed. | date and time record was created. | ||
| EditPages | BOOLEAN |
NOTE: When a primary key is set with Auto Increment (AI), it value will be automatically created However, if a record is deleted its ID value will not be repeated.
NOTE: The EditPages will be used later in the CMS to determine who has access to edit pages. It will be used with the Department field to determine who can edit pages but what department can be edited.
Create Other Tables
- Click the database name in the left sidebar again. This will allow you to create another new table in that database.
- In the page that appears, type a table name (in our case, type departments) in the Create table text field.
- Type the number of columns (fields) you need for your database (in our case, type 2) in the Number of Columns text field and click the Go button to create the table.
- Using the second tab above as a guide, repeat the same steps you used to create the first table.
- Click the database name in the left sidebar again. This will allow you to create a third table in that database.
- In the page that appears, type a table name (in our case, type passwords) in the Create table text field.
- Type the number of columns (fields) you need for your database (in our case, type 3) in the Number of Columns text field and click the Go button to create the table.
- Using the third tab above as a guide, repeat the same steps you used to create the first table.
FOR INSPIRING GEEKS ONLY:
CREATE TABLE myTable (myTableID INT UNSIGNED NOT NULL AUTO INCREMENT PRIMARY KEY,
Below is the syntax for creating a simple table:
myColumn1 VARCHAR(25) NOT NULL, myColumn2 TEXT NOT NULL, myColumn3 DATETIME NOT NULL)
- Table and column names should not have any space in them and should be alphanumeric.
- The first column is typically the primary key column that is UNSIGNED (positive whole number only), NOT NULL (required) and AUTO INCREMENT (value automatically increment when a row is added) and PRIMARY KEY (unique identifier for column that cannot be repeated).
- The DATETIME is used to create a timestamp when each record is added.
Relating Tables (Need Updating to MySQL instead of MS Access)
After a database has been created and tables inserted into it. It is important to create "relationship" between particular tables. Because EACH asset must be assigned to a user from the tbHumanResources table, a relationship between these two tables will be created. Also, because a username and password is assigned to EACH employee from the tbHumanResources table, a relationship between these two table will be created as well.
- With the database (in our case, rmcs_database1234.mdb) still open, select Tools > Relationships from the menu.
- In the Show Table dialog box that appears, select all four tables and click the Add button.
- Tables must be saved to see all fields listed.
- Click on the Close button to close the Show Table dialog box.
- You should see the four tables in the Relationships window.
- Click the EmployeeID field in the tbInformationServices and drag it onto the EmployeeID field in the tbHumanResources box.
- A one-to-many relationship is created which means that one employee record in the tbHumanResources table can have many records in the tbInformationServices table (i.e., phone, computer, etc.).
- In the Edit Relationships dialog box, check ALL three options and then click the Create button.
- By checking the Referential Integrity, when a record is delete from the tbHumanResources database, the records will also be deleted in the tbInformationServices database.
- Click and drag the EmployeeID field in the tbUsernamePassword box onto the EmployeeID field in the tbHumanResources box.
- Again, select all three check boxes and click the Create button to create a relationship between these two tables.
- Close the Relationships window and save the file.
- If you are prompted with a Security Alert, click on the Option button and select the "Enable this content."
Populate Tables
After you create a database and its tables, you will need to populate those tables. You can either populate the tables from within:
- phpMyAdmin
- A web application (e.g., CMS)
NOTE: We will be populating these tables in upcoming tutorials from within the web application that will be created.
- You can also create a blank database and then import data into it from an external source like a *.sql file (e.g., employee_directory.sql).
Create A User And Set Privilege
When you installed MySQL, it created one registered user called "root" which allow unfeathered access to all of the databases. This should only be used by the administrator with a username and password that is created. It is best practice to create a user access for each specific database as well. Typically, the administrator has complete access and users have limited access.
- Click to select the database (e.g., employee_directory1234) in the left sidebar.
- Click the Privileges tab at the top of the page to view a list of user accounts.
- If this is a new installation, you should only see the root user account.
- Click the Add user link.
- In the Login Information section:
- Type a user name in the second field of the User name row. (e.g., CorneliusChopin)
- Click on the drop-down menu next the the word Host to select localhost to display the word localhost in the second field.
- Type the same password in the Password and Re-type fields.(e.g., admin)
- In the Global privileges section:
- Click the Check All checkbox.
- Click the Go button.
NOTES:
- Notice that four Data privileges types matches the SQL command types (e.g., SELECT, INSERT, UPDATE and DELETE).
- If you selected "config" as the authentication type when you set up phpMyAdmin, you need to update the config.inc.php file manually by updating the following line: $cfg['Servers'] [$i] ['password'] = 'enterNewPassWordHere' ;
- You can create user accounts that can have fewer privileges, if necessary, for a single database.
- CHECK POINT: You should see a confirmation that says "You have added a new user."
- To delete a user, click on the localhost link and the select the user you want to delete by clicking on the checkbox next to it and then click the checkbox in the Remove selected users section and then click the Go button.
Export Database (Backup)
Once you create a database and add content to it, it is important the you make a backup of it just in case something goes wrong (e.g., data gets corrupt, etc.)
- Select the database you would like to backup from the list on the left.
- Click the Export button and give the file a name (e.g., pdo_employee_directory1234.sql).
Review *.SQL File
It is important to note that the *.sql file is a text file with a set of instruction on how to RECREATE the data for a database. Below is link to the sample database that you is used for this tutorial:
pdo_employee_directory1234.sql
Import Database
If you need to IMPORT data into a database, follow the steps below:
- First, create a blank database by clicking the New database icon and giving the database a name (e.g., pdo_employee_directory1234.sql) and then click the Create button.
- With the database selected in the left sidebar that you want to add tables from an *.sql, click the import button and the data will be recreated in that database.