Before you can provide login capability, you need to already have a table in the database with usernames and passwords so that the login page can match them. Instead of having an administrator enter usernames and passwords for users (e.g., visitors), you can the user to create their own username and password. This can be accomplished by creating a registration page that will allow a user to "register" his or her own username and password into the database.
Below is a list of resources for creating login/registration pages:
- http://www.itidabhoi.org/demo/php-pdo-ajax-crud-datatables/ 1
- http://webdevelopingcat.com/creating-a-registration-page-with-php-and-pdo/ 2
- https://codereview.stackexchange.com/questions/140824/user-registration-and-authentication-in-php-and-pdo
- https://www.itechempires.com/2016/06/php-login-registration-system-with-php-data-object-pdo/
- http://www.codingcage.com/2015/04/php-login-and-registration-script-with.html
- https://www.youtube.com/watch?v=xnSKohfSR4A
- http://www.eggslab.net/php-login-script/
- http://www.phpcodify.com/php-registration-login-crud-app-admin-panel-mysql-bootstrap/ 3
The code that will be created will perform the following tasks:
- PART A: CREATE STATIC CONTENT
- Create Static Form and Form Elements
- PART B: ADD DYNAMIC SCRIPT
- Create Register User Script
- Create Register User Script
- Option 1: Validate Form Fields
- Option 2: Create Sticky Form
- Option 3: Send Confirmation Email (NOT COMPLETED)
(PHP Third Edition page 222-226) - Option 4: Check for Unique Username / Email (NOT COMPLETED)
PART A: CREATE STATIC CONTENT
Create Static Form and Form Elements
- Open the registration_page.php file that was created earlier and add the following highlighted code including the blank lines BELOW the
<h2>
container:
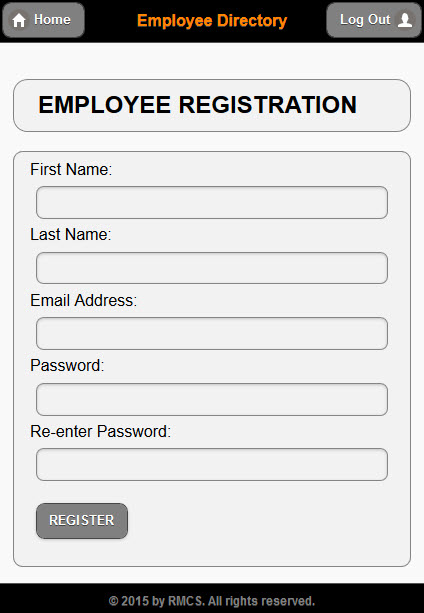
WHY: To create the STATIC VERSION of the registration form.
<div data-role="content">
<h2 class="ui-body ui-body-a ui-corner-all">EMPLOYEE REGISTRATION</h2>
<div class="ui-body ui-body-a ui-corner-all">


<form action="registration_page.php" method="post">
<label for="FirstName">First Name:</label>
<input type="text" name="FirstName" size="20" data-mini="true" value=""/>
<label for="LastName">Last Name:</label>
<input type="text" name="LastName" size="20" data-mini="true" value=""/>
<label for="Email">Email Address:</label>
<input type="text" name="Email" size="20" data-mini="true" value="" />
<label for="Password1">Password:</label>
<input type="password" name="Password1" size="20"data-mini="true"/>
<label for="Password2">Re-enter Password:</label>
<input type="password" name="Password2" size="20"data-mini="true"/>
<p><input type="submit" name="Submit" value="REGISTER" data-inline="true" data-mini="true"/></p>
</form>


</div>
</div>
CODE EXPLANATION:- The <div> with class="ui-body ui-body-a ui-corner-all" is used to style the form container to have rounded edges (See screenshot below).
- The action method's value of the <form> tag is set to the SAME name as the file itself (e.g., registration_page.php). This process is called SELF POSTING or POST BACK and is used to submit the form on TOP OF ITSELF in order for the variables to be set or defined.
- The jQueryMobile data-mini="true" attribute is used to minimize certain form elements height.
- The jQueryMobile data-inline="true" is used to ensure the button behave like an inline element and does not expand 100% the width of its parent container.
- Form variables (e.g., FirstName) are written EXACTLY like the column names in the database (e.g., FirstName) to make is easier to remember how to BIND them together in code.
- It is important to note that only the text input fields have CORRESPONDING label tags associated with them:
<label for="Password1">Password:</label>
<input type="password" name="Password1" size="20"data-mini="true"/> - The REGISTER button (<input type="submit"....>) does not have a label tag associated with it.
- CHECK POINT: Save the file and preview it in a browser. You should see the form displayed with all of the form elements when the page loads.
PART B: CREATE DYNAMIC SCRIPTS
Check Form Submission
A common method is to check to see if a form has been submitted by the user clicking a submit button (REGISTER). It is important to remember that EACH form element (sometimes called a form variable) is treated as an element of an array--the _$POST array to be exact. To see these elements we will "trace" its results.
- Wrap the opening and closing
<form>
tags with a set of PHP scripts using an "if" statement at the top and and "else" statement at the bottom.
WHY: To make the form part of a "if/else" conditional statement.
<div data-role="content">
<h2 class="ui-body ui-body-a ui-corner-all">EMPLOYEE REGISTRATION</h2>
<div class="ui-body ui-body-a ui-corner-all">

<?php
 if ( empty( $_POST ) )
{  ?>
<form action="registration_page.php" method="post">
<label for="FirstName">First Name:</label>
<input type="text" name="FirstName" size="20" data-mini="true" value=""/>
<label for="LastName">Last Name:</label>
<input type="text" name="LastName" size="20" data-mini="true" value=""/>
<label for="Email">Email Address:</label>
<input type="text" name="Email" size="20" data-mini="true" value="" />
<label for="Password1">Password:</label>
<input type="password" name="Password1" size="20"data-mini="true"/>
<label for="Password2">Re-enter Password:</label>
<input type="password" name="Password2" size="20"data-mini="true"/>
<p><input type="submit" name="Submit" value="REGISTER" data-inline="true" data-mini="true"/></p>
</form>
<?php
}
else
{
    echo ("Hello World");
}
?>

</div>
</div>
CODE EXPLANATION:
- The empty() method is used to check to see if the $_POST array is, well, "empty." When the page first loads, the $_POST array is indeed empty.
  Once a user clicks the REGISTER button and the page reloads on top of itself (self posting) because it has the same name as the current page,
  the array is populated with one element (Submit) if not input fields have data entered or more elements (the form elements) if any or all of
  the input fields have data entered.
- When the page first loads, the empty() method returns true, and the "if" portion is executed and the form is displayed.
- When the REGISTER button is pressed, the empty() method returns false and the "else" portion of the "if/else" is executed and the
  output of the echo statement is displayed (e.g., Hello World).
- CHECK POINT: Save the file and preview it in a browser. You should see the form displayed as before because the form variables are not yet submitted. Now, click the REGISTER button. You should see that that the form has been REPLACED with the "else" portion of the "if/else" statement and now displays the phrase "Hello World."

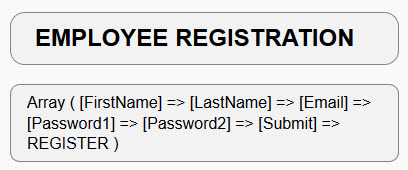
- Replace the echo statement with the following highlighted print_r statement:
<?php
}
else
{
    print_r( $_POST );
}
?>
Alternatively, for more advanced users, if you wanted to reduce the number of lines in the code, you could format the code to read:
<?php }
else {
    print_r( $_POST );
}
?>

// or even a single line of code:

<?php } else { print_r( $_POST ); } ?>
CODE EXPLANATION:
- Notice the method is print_r and not print or echo. They are all used to output data to the screen.
  - print_r() is used for printing the array in human readable format.
  -  echo has no return value so it will returns void; whereas, print will return 1 so it can be used in expressions.
  - echo is considered slightly faster than print.
  - echo can take multiple arguments (however, this is rare); whereas, print can only take one argument.
- The $_POST super-global variable is passed as an argument to the print_r method.
- Several other predefined variables (e.g., _$GET, $_SERVER, $_FILES, _SESSION, etc.) in PHP are "super-globals",
  which means that they are always accessible, regardless of scope - and you can access them from any function,
  class or file without having to do anything special.
- (OPTIONAL) CHECK POINT: Save the file and preview it in a browser. You should see the form displayed as before because the form variables are not yet submitted. Now, without entering any data, click the REGISTER button. You should see that the form has been replaced with an array of ALL of the form variables as elements of that array. Notice that the Submit key is the only one with a value (REGISTER).
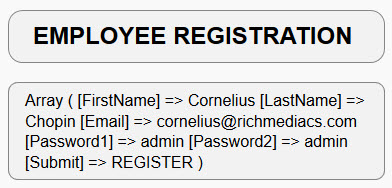
Now, ENTER data into each of the form input fields, and then click the REGISTER button. You should see that that the form has been replaced with an array of ALL of the form variables as elements of that array. However, this time, you should see BOTH the key/value or name/value pairs for each element in the array.
- Replace the print_r statement with the following highlighted echo statement:
<?php
}
else
{
   echo ("<p>Thank you. You have been registered.</p>
     <a href='index.php' class='ui-btn ui-icon-user ui-corner-all ui-btn-icon-left ui-btn-inline ui-mini'>Log In</a>");
}
?>
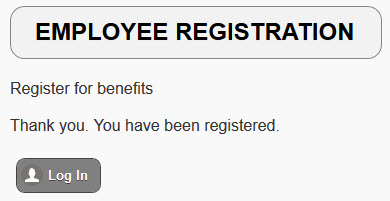
- CHECK POINT: Save the file and preview it in a browser. With or without entering data into the form, click the REGISTER button. You should see that the form has been replaced with the following:

If you click the Log In button, you will be taken to the Log In page even though NOTHING has been saved to the database yet. We will do that shortly.
Create Register User Script
What we have implemented so far was done with PHP not the database. Now, we need to actual submit the form variables data to the database table. Remember, the associative array keys match the column names in the MySQL table (employees).
- Add the following highlighted link to the database connection ABOVE the
<!doctype html>
tag:
WHY: To connect to the database.
<?php
   require ('db.php');
?>
<!doctype html>
- Add the following highlighted variables WITHIN the ELSE code block but ABOVE the ECHO statement
WHY: To make the variables more manageable.
<?php
}
else
{

$FirstName = $_POST[ 'FirstName' ];
$LastName = $_POST[ 'LastName' ];
$Email = $_POST[ 'Email' ];
$Password = $_POST[ 'Password1' ];

echo ("<p>Thank you. You have been registered.</p>
<a href='index.php' class='ui-btn ui-icon-user ui-corner-all ui-btn-icon-left ui-btn-inline ui-mini'>Log In</a>");
}
?>
CODE EXPLANATION:
- It is important to remember that form variables don't get DEFINED UNTIL AFTER the form is processed by clicking the submit button
  (REGISTER). As a result, the variables are placed inside of the "else" portion of the "if/else" conditional statement where the form is
  processed.
- Notice that only one password field is set a variable because only one is needed (Password1).
- Add the following highlighted SQL statement BELOW the variables:
WHY: To WRITE the SQL query.
<?php
}
else
{

$FirstName = $_POST[ 'FirstName' ];
$LastName = $_POST[ 'LastName' ];
$Email = $_POST[ 'Email' ];
$Password = $_POST[ 'Password1' ];

$sql = "INSERT INTO passwords ( FirstName, LastName, Email, Password )
            VALUES ( :FirstName, :LastName, :Email, :Password )";

echo ("<p>Thank you. You have been registered.</p>
<a href='index.php' class='ui-btn ui-icon-user ui-corner-all ui-btn-icon-left ui-btn-inline ui-mini'>Log In</a>");
}
?>
- Add the following highlighted code BELOW the SQL query.
WHY: To do the following:- ASSIGN the SQL query to a variable ($query)
- PREPARE the SQL query by passing in the SQL statement as an argument
- EXECUTE the SQL query and save the data to the database
<?php
}
else
{

$FirstName = $_POST[ 'FirstName' ];
$LastName = $_POST[ 'LastName' ];
$Email = $_POST[ 'Email' ];
$Password = $_POST[ 'Password1' ];

$sql = "INSERT INTO passwords ( FirstName, LastName, Email, Password )
        VALUES ( :FirstName, :LastName, :Email, :Password )";

$query = $pdo_conn->prepare($sql);
$query->execute( array( ':FirstName'=>$FirstName, ':LastName'=>$LastName, ':Email'=>$Email, ':Password'=>$Password ) );

echo ("<p>Thank you. You have been registered.</p>
<a href='index.php' class='ui-btn ui-icon-user ui-corner-all ui-btn-icon-left ui-btn-inline ui-mini'>Log In</a>");
}
?>
- Set the result of the $query to a variable called $result.
WHY: So it can be used in an if/else statement in the next step.
$query = $pdo_conn->prepare( $sql );
$result = $query->execute( array( ':FirstName'=>$FirstName, ':LastName'=>$LastName, ':Email'=>$Email, ':Password'=>$Password ) );
- Wrap the current code below with an "if" code block AND an "else" code block with another echo statement:
if($result)
{
  echo ("<p>Thank you. You have been registered.</p>
  <a href='index.php' class='ui-btn ui-icon-user ui-corner-all ui-btn-icon-left ui-btn-inline ui-mini'>Log In</a>");
}
else
{
   echo "<p>Sorry, there has been a problem registering. Please contact admin.</p>";
}
}
?>
- CHECK POINT: Save the file and preview it in a browser. Fill out all of the form fields and then click the REGISTER button. Open up phpMyAdmin and navigate to the passwords table. You should see the data as a new record in the database table.

You should also see the message, "Thank you. You have been registered" along with the Log In button.
OPTION 1: Validate Form Fields
For both usability and security reasons, it is best practice to validate form elements.
OPTION 2: Create Sticky Form
It is best practice to implement a sticky form fields on a registration form so that if a user submit the form, the data is not lost if the form is not submitted. See the Enhancement tab for details.
OPTION 3: Send Confirmation Email
It is best practice to let the user know that his or her registration was successful. One way of doing this is to send a confirmation e-mail to the user. See the Enhancement tab for details.
OPTION 4: Check for Unique Username / Email
It is important to check to ensure that two users do not have the same username. See the Enhancement tab for details.