Security
The examples below are for demonstration only. Add these techniques throughout the app wherever there are form variables.
BASIC ENHANCEMENTS:
- Restrict Access to other ADMIN pages (NOT COMPLETED)
- Close Connections (NOT COMPLETED)
- Secure Query Data (NOT COMPLETED)
- Add Validation for Security
ADVANCED ENHANCEMENTS:
- Prevent Cross Site Attacks (XSS)
- Salt and Hash Passwords (NOT COMPLETED)
- Use Cookies, SESSION, and Tokens (NOT COMPLETED)
- Use Multiple Tables (NOT COMPLETED)
IMPORTANT NOTE: Online forms can be a "gateway" for malicious attacks unless the data that are entered into them have valid format. However, unless you are collecting sensitive information (e.g., social security numbers, medical records, etc.), you do not have to worry about it as much. However, if it does, you need to seek advise from a security expert to avoid any security risks to your site.
BASIC ENHANCEMENTS:
Restrict Access to Other ADMIN pages
Any admin page should have access to it restricted. To do this, we will add some PHP script to prevent these pages from being open without the proper credentials. If a user attempt to open an admin page directly, he or she should be taken to the login page to login first.
Close Connections
Once a connection has been opened, it is best practice to close the connection once a query has been made.
Secure Query Data
To make query more secure, it is best to use PDO extensions instead of my_sql and my_sqli extensions to avoid SQL injections. We have already done this a part of the basic steps. (Page 368)
Add Validation for Security
Proper form validation is important to protect form from hackers and spammers!
Handle Form
The PHP $_GET and $_POST are superglobal variables that are used to collect data from a form. Superglobal variables are always accessible, regardless of scope which means that you can access them from any function, class, or file without having to do anything.
- The $_POST is an array of variables that get passed to the current script via the HTTP POST method.
- The $_GET is an array of variables that get passed to the current script via the HTTP GET method.
The array of variables (e.g., array(key1 =>value1, key2 =>value2, key3 =>value3) is a set of key/value or name/value pairs where the keys are form element names and values are user input data that is entered (e.g., input fields) or selected (e.g., combo box) by a user.
- Create a new PHP file and name it login_test.php.
- Add the following highlighted HTML
<title>
tag and
<form>
between the body tags:
<!doctype html>
<html>
<head>
<meta charset="utf-8">
<title>Login Test</title>
</head>
<body>
<form action="login_test.php" method="POST">
<label for =”name”>Name: </label>
<input type="text" name="name"><br>
<label for =”email”>Email: </label>
<input type="text" name="email"><br>
<input type="submit" value="Login"></form>
</body>
</html>
Post Method
When a user fill out the form and click the Submit button, the form element (sometimes called form variables or form fields), is sent for processing to a PHP file named login_test.php using the HTTP POST method. To see the values of the form elements, you could use the echo command to display them anywhere on the page:
- Add the following highlighted code below the closing
</form>
tag:
</form>
NOTE: In Dreamweaver, notice that the POST variables are rendered as {Form.name} and {Form.email} and both of them are highlighted.
<p>Welcome: <?php echo $_POST["name"];?></p>
<p>Your email is: <?php echo $_POST["email"];?></p>

- CHECK POINT: Save the file and preview it is a browser. You should see the following two warnings below the form because the form has NOT been submitted.
Welcome:
Notice: Undefined index: name in C:\xampp\htdocs\EmployeeDirectory_JQM_PDO\login_test.php on line 16
Your email is:
Notice: Undefined index: email in C:\xampp\htdocs\EmployeeDirectory_JQM_PDO\login_test.php on line 17 - CHECK POINT: Add a name and email and then click the Login button. You should see the name and email displayed below the form. Notice the errors are gone because the form has been submitted.
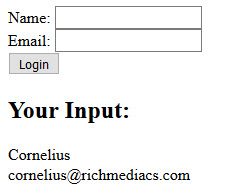
Welcome: Cornelius Chopin
Your email is: cornelius@richmediacs.com
When To Use POST?
- should be used ALWAYS to send SENSITIVE data (e.g., password, SSN) in a form
- used to HIDE the form variables name/value pairs (e.g., input fields) from the user by embedding them within the body of the HTTP request
- has no limit on the amount of data that can be send
- supports advanced functionality such as multi-part binary input which is useful in uploading files to a server
- cannot bookmark the page when using it
Get Method
The HTTP GET method could have just as easily been used.
- Change the word POST to GET in the opening
<form>
tag:
<form action="login.php" method="GET">
- Change the word POST to GET in the two echo statements:
Welcome: <?php echo $_GET["name"];?> <br/>
NOTE: In Dreamweaver, notice that the GET variables are rendered as {URL.name} and {URL.email} and both of them are highlighted.
Your email is: <?php echo $_GET["email"];?>

- CHECK POINT: Save the file and preview it in a browser. You should see the same thing as the POST method:
Welcome: Cornelius Chopin
Your email is: cornelius@richmediacs.com
When To Use GET?
- should be used ONLY to send NON-SENSITVE data in a form
- used to SHOW the form variables name/value pairs (e.g., input fields) from the user in the URL
- has a limit of 2000 characters that can be send
- can bookmark page because the variables are displayed in the URL
ADVANCED ENHANCEMENTS:
Prevent Cross Site Attacks (XSS)
Cross-Site Scripting (XSS) attach is a type of computer security vulnerability that enables attackers to INJECT client-side script into a web app.
- Replace the action’s value login_test.php with the following highlighted PHP script.
FROM:
<form method=”POST” action="login_test.php">
TO:
<form method=”POST” action="<?php echo $_SERVER['PHP_SELF'];?>">
CODE EXPLANATION:
- The $_SERVER['PHP_SELF'] is a super global variable that returns the filename of the currently executing  script.
So it sends the submitted data to the page ITSELF instead of going to another page. This is typically done to
check to see if the form has been submitted and also to set error messages on the  same page as the form.
This technique is sometimes referred to a POST BACK or  SELF POSTING.
It can be done with (action=”<?php echo  $_SERVER['PHP_SELF'];?>”) or without (action=”login.php”) the PHP_SELF variable.
- Notice the PHP_SELF is in SINGLE quotes because the attribute value is in DOUBLE quotes.
- CHECK POINT: Save the file and preview it in a browser. You should see that it behaves as before but uses the $_SERVER['PHP_SELF'] superglobal variable. However, the $_SERVER['PHP_SELF'] supervariable can still be exploited by hackers as will soon be seen shortly
- Enter only the URL to the page in a browser:
http://localhost/EmployeeDirectory_JQM_PDO/login_test.php
- CHECK POINT: The form will process the form element as:
<form method=”POST” action=”login_test.php”>
- Enter the URL to the page in a browser, follow by a slash (/) AND then following highlighted script:
NOTE: If PHP_SELF is used, then a hacker can enter a slash (/) and then some Cross Site Scripting (XSS) commands to execute a client-side script.
http://localhost/EmployeeDirectory_JQM_PDO/login_test.php/%22%3E%3Cscript%3Ealert('You have been hacked!!!')%3C/script%3E
- CHECK POINT: Press the ENTER key. You should see the following in the browser URL field:

The form will process the form element as below and an alert dialog box will be displayed with the message “You have been hacked!!!” This is a harmless example, but a more malicious example could be used by a hacker. Any JavaScript code can be added inside of a <script> tag (e.g., redirect user to another server, submit form to another address to save user data). We will see in the next steps how to avoid $_SERVER[“PHP_SELF”] exploits.
If you right-click the page and select View Page Source, you should see something similar to this:

- CHECK POINT: Press the ENTER key. You should see the following in the browser URL field:
- WRAP the following htmlspecialchar() method around the supervariable in the opening
<form>
tag:
<form method=”POST” action=”<?php echo htmlspecialchars($_SERVER[“PHP_SELF”]);?>”>
CODE EXPLANATION:
- The htmlspecialchars() function converts special characters to HTML entities. This means it will replace HTML characters
like < and > with < and > to prevent attackers from exploiting the code by injecting HTML or Javascript code (Cross-site Scripting attacks) in a form.
- CHECK POINT: Save the file and preview it in a browser. Type http://localhost/EmployeeDirectory_JQM_PDO/login_test.php/%22%3E%3Cscript%3Ealert('You have been hacked!!!')%3C/script%3E again and press the ENTER key. This time you should not see the alert dialog box.
If you right-click the page and select View Page Source, you should see something similar to this:

The exploit attempt failed so no harm was done.
Test Form Inputs
While we could add the htmlspecialchars() method on every input field, a more convenient way is to create a function that will handle ALL input fields for us. We will also include in this function the ability to:
- Strip unnecessary characters (extra space, tab, or newline) from the user input data using the PHP trim() method.
- Remove backslashes (\) form user input date using the PHP stripslashes() method.
- Add the following highlighted PHP script BELOW the closing
</body>
tag:
</body>
<?php
// define variables and set to empty values
$name = $email  = "";

function  test_input($data) {
$data = trim($data);
$data = stripslashes($data);
$data = htmlspecialchars($data);
return $data;
}

if ($_SERVER["REQUEST_METHOD"]  == "POST") {
$name = test_input($_POST["name"]);
$email = test_input($_POST["email"]);
}

?>
CODE EXPLANATION:
- The “if” statement is used to check it the form is using the POST method and if so run the test_input() method.
- Currently, all fields are optional.
- Note that while we only have two variables set to an empty string AND tied together with a series of equal signs,
  you could set as many variables as you need based on the form elements on the page.
- REPLACE the two
<p>
tags with the following highlighted PHP script BELOW the closing </form> tag:
</form>
<?php
echo "<h2>Your Input:</h2>";
echo $name;
echo "<br>";
echo $email;
?>
- CHECK POINT: Save the file and preview it in a browser. Type a name and an email, and then press the Login button. You should see the result below the form
Salt and Hash Passwords
Use Cookies, SESSION, and Tokens
Use Multiple Tables
(e.g., Passwords in a separate table from employee data)
Output Buffering??? (Need updating or deleting)
OPTION FOR ALL PAGES: Implement Output Buffering
As we have already seen, normally, any HTML or PHP print() statement outside the PHP script is immediately sent to the browser. However, there are several methods (e.g., header(), setcookies()) that can only be called if nothing (including HTML or a blank space) has been sent to the browser; otherwise, a header already sent error message will be displayed. To avoid this error, you can implement what is called output buffering.
With output buffering any HTML or PHP print() statement will be placed in a memory buffer and then it can be sent to the browser or cleared without being sent to the browser if needed.
To begin output buffering, add a ob_start() method to the top of the script and an ob_end_flush() method at the end of the script to send the content of the buffer to the browser. You can also use ob_end_clean() method to delete the content of the buffer without sending it to the browser.
We will add the first two methods in the header.inc.php and footer.inc.php pages, respectively, so that is can be used by all pages within the site or app.
- In the employee_login.php page, add the following code below the "You are logged in!" print statement:
{ // Correct email and password!
print "<p>You are logged in!</p>";
header("Location: index.php");
}
- The highlighted code is used to redirect a user to another page. (In this case, index.php).
- CHECK POINT: Save the file and preview it in a browser. You should see that you are taken to the index.php page if you have a new version of PHP. However, if you have an other version of PHP you will see the header not sent error because the header() method was used WITHOUT output buffering.
- Open the header.inc.php page and add the following line to the top of the file above the <!doctype html> tag:
<?php ob_start();?>
<!doctype html>
<html>
- Open the footer.inc.php page and add the following line to the the very bottom of the file below the </html> tag:
</html>
<?php ob_end_flush();?>
- PHP automatically executes the ob_end_flush method at the end of a script if it does not exist; however, it is still good idea to use it.
- CHECK POINT: Save the file and test it in a browser. You should see the file works as expected. The ob_end_flush() method will send the content of the buffer to the browser and then turn off output buffering.