Add Page (Add Employee)
- Provide Basic Form Validation
- Add Dynamic Combo Box
(Must be done on both Add and Edit Pages) - Create Upload Image Functionality
(Must be done on both Add and Edit Pages)
Provide Basic Form Validation
When you create a form, you should always validate particular form elements to determine if required form elements have been filled out or that the correct format is given (e.g., email address). There are a host of techniques on how to validate form elements. While minimum validation will be done with the required keyword, additional validation can be done with some form elements.
- Add the following SIX highlighted "required" attributes to each
<input>
form elements.
TIP: In Dreamweaver, if you click on a form element in the Design View and then click the Required checkbox in the Properties panel, it will add the required="required" attribute for that form element. Repeat for all <input> form elements.

<form action = "" method="POST">
  <div class = "ui-body ui-body-a ui-corner-all">
  <p><label for = "FirstName">First Name:</label>
  <input name = "FirstName" type="text" required="required" id="FirstName"
   value="<?php echo $result[0]['FirstName']; ?>" data-mini = "true"></p>
  <p><label for = "LastName">Last Name:</label>
  <input name = "LastName" type = "text" required="required" id = "LastName"
   value="<?php echo $result[0]['LastName']; ?>" data-mini = "true"></p>
  <p><label for = "Title">Title:</label>
  <input name = "Title" type ="text" required="required" id = "Title"
   value="<?php echo $result[0]['FirstName']; ?>" data-mini = "true"></p>
  <p><label for = "City">City:</label>
  <input name = "City" type = "text" required="required" id="City"
   value="<?php echo $result[0]['City']; ?>" data-mini = "true"></p>
  <p><label for = "State">State:</label>
  <input type = "text" required="required" name = "State" id = "State" data-mini = "true"
    value="<?php echo $result[0]['State']; ?>"></p>
  <p><label for="StartDate">Start Date:</label>
  <input name = "StartDate" type = "date" required="required" id = "StartDate"
   value="<?php echo $result[0]['StartDate']; ?>" data-mini = "true"></p>
  <p><label for = "Note">Note:</label>
  <textarea cols = "40" rows = "8" name ="Note" id = "Note" data-mini = "true"
   class = "define-textarea"><?php echo $result[0]['Note']; ?></textarea></p>
  <p><input type = "submit" name = "add_record" value = "SAVE" data-inline = "true"
  data-mini = "true" data-icon = "plus" data-iconpos = "left"/></p>
  </div>
</form>
CODE EXPLANATION:
.
- You may notice the word required used by itself in some books. To be HTML5 valid, attribute VALUES need to be in single or double quotes. While required = "required" is not nice looking, it makes the code HTML 5 valid.
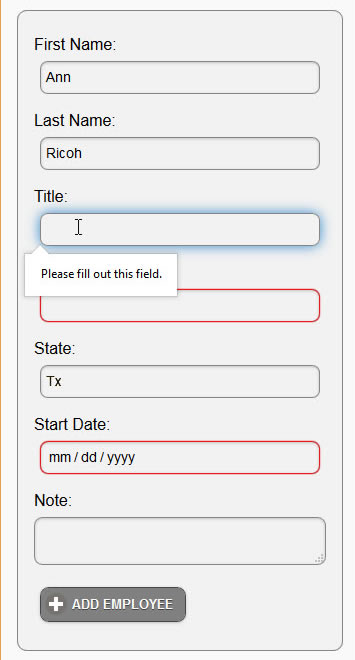
- CHECK POINT: Save the file and preview it in a browser. Add some but not all data to the form. You should see a red highlights around form elements that were not completed and a tool tip (Please fill out this field) on the first form element that was not completed.
Add Dynamic Combo Box
It is best practice to DYNIMICALLY populate a menu if the SAME menu will be used on MULTIPLE pages. This way, if there are any changes (additions or deletions) to the menu, it can be done from one table in the database and all of the pages will reflect the changes.
- Add the following highlighted
<label>
and
<select>
tags BELOW the
<textarea>
tag:
<textarea cols = "40" rows = "8" name ="Note" id = "Note" data-mini = "true" class = "define-textarea"></textarea></p>
 <p><label for = "Department">Department:</label>
  <select name = "Department" id = "Department" data-mini = "true" data-inline = "true">
    <option>Human Resource</option>
    <option>IT</option>
    <option>Engineering</option>
    <option>Marketing</option>
    <option>Manufacturing</option>
    <option>Sales</option>
  </select></p>
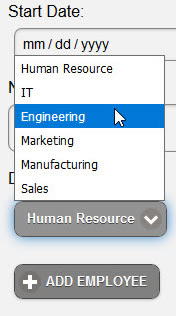
- CHECK POINT: Save the file and preview it in a browser. Log into the app and click on an EDIT icon button to navigate to the EDIT EMPLOYEE page. You should see the STATIC combo box below the Note textarea. Click the combo box to expand it to see the combo list items.
- Add the following highlighted SELECT SQL query ABOVE the <!doctype html> statement:
WHY: To create a recordset (or resultset) to POPULATE the combo box.
<?php
/* Retrieve data from Department column for combo box */
$pdo_statement = $pdo_conn->prepare( "SELECT DepartmentID, Dept FROM departments" );
$pdo_statement->execute();
$result = $pdo_statement->fetchAll();
?>
<!doctype html>
- Replace ALL of the
<option>
tags with the following highlighted PHP scripts BETWEEN the opening
and closing
<select>
tags with a foreach loop. Comments are optional. Spaces are intentional added to see the PHP scripts code block better.
WHY: To create a recordset to retrieve the department names from a table called departments so that it can be used to populate the combo box with the correct department name dynamically.
<p><label for = "Department">Department:</label>
<select name="Department" id="Department" data-mini="true" data-inline="true">
<!-- Loop through middle of select  tag  ----------------------------------------- -->
<?php
   foreach ( $result as $row ) {
?>

<option><?php echo $row['Dept']; ?></option>

<?php
}
 ?>
 <!-- End of select ------------------------------------------------------------------------- -->
</select></p>
- CHECK POINT: Save the file and preview it in a browser. Log in and navigate to the EDIT EMPLOYEE page. You should see the DYNAMIC combo box displayed below the Note textarea. Click the combo box to expand it. The result is the same as before; however, the combo box menu is POPULATED from data from the department table in the database instead of being static.
- MODIFY the SQL query with the highlighted changes.
WHY: To enable the Department value be saved to the Department column in the employees database:
CAUTION: Pay attention to the added comma:
- Before the two words Department
- After the NOTE statement
<?php
require("db.php");
if(!empty($_POST["add_record"])) {
$sql = "INSERT INTO employees (FirstName, LastName, Title, City, State, StartDate, Note, Department)
VALUES (:FirstName, :LastName, :City, :Title, :State, :StartDate, :Note, :Department)";
$pdo_statement = $pdo_conn->prepare( $sql );
$result = $pdo_statement->execute( array(
':FirstName'=>$_POST['FirstName'],
':LastName'=>$_POST['LastName'],
':Title'=>$_POST['Title'],
':City'=>$_POST['City'],
':State'=>$_POST['State'],
':StartDate'=>$_POST['StartDate'],
':Note'=>$_POST['Note'],
':Department'=>$_POST['Department']
) );
if (!empty($result) ){
   header('location:master_page.php');
}
}
?>
- CHECK POINT: Save the file, click the ADD EMPLOYEE button, fill out the form, and click the ADD EMPLOYEE button. You should be taken to the EMPLOYEE MASTER PAGE where you should see the employee record added to the ListView. Also, if you check the database (localhost/phpmyadmin), you should see that the Department value of the combo box was added to the Department column in the database.
Create Upload Image Functionality
While having images already in an folder name images is convenient, it is not best practice. In this case, you would have to FTP images to the this folder separate and remember the names to enter into the ADD EMPLOYEE form page. This is not very practical. To be a true CMS, an image should be uploaded AUTOMATICAILLY to the server when a record is added to the database. To do this requires some specialize handling of binary data in the form.
To make an EXISTING form capable of uploading a file (e.g., image, etc.) requires:
- image input field
- configure php.ini file
- enctype attribute added to the form element
- additional input elements
- PHP upload script
Add Static Image Input Field
- Add the following highlighted
<input>
tag BELOW the closing
</select>
and
</p>
tags.
WHY: To create a static input field to allow employee image REFERENCE (e.g., ann_ricoh.jpg) to be saved to the Image column in the employee database.
<!-- End of select -------------------------------------------------------------- -->
</select></p>
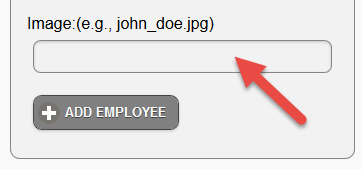
<p><label for = "Image">Image:(e.g., john_doe.jpg)</label>
<input type = "text" name = "Image" size = "50" data-mini = "true"/></p>
- CHECK POINT: Save the file and preview it in a browser. You should see label and image input field below the Department combo box:

- MODIFY the SQL query with the highlighted changes.
WHY: To enable the Image value be saved to the Image column in the employees database:
CAUTION: Pay attention to the added commas:
- Before the first two Image words
- At the end of ['Department']
<?php
require("db.php");
if(!empty($_POST["add_record"])) {
$sql = "INSERT INTO employees (FirstName, LastName, Title, City, State, StartDate, Note, Department, Image)
VALUES (:FirstName, :LastName, :City, :Title, :State, :StartDate, :Note, :Department, :Image)";
$pdo_statement = $pdo_conn->prepare( $sql );
$result = $pdo_statement->execute( array(
':FirstName'=>$_POST['FirstName'],
':LastName'=>$_POST['LastName'],
':Title'=>$_POST['Title'],
':City'=>$_POST['City'],
':State'=>$_POST['State'],
':StartDate'=>$_POST['StartDate'],
':Note'=>$_POST['Note'],
':Department'=>$_POST['Department'],
' :Image'=>$_POST['Image']
) );
if (!empty($result) ){
   header('location:master_page.php');
}
}
?>
- CHECK POINT: Save the file and preview it in a browser. Fill out the form including an image name that is currently in the Images folder (debra_samson.jpg) and then click the ADD EMPLOYEE button. You should see that the image was added to the EMPLOYEE MASTER PAGE as a thumbnail. If you click that list item, you should see a larger version of the image in the EMPLOYEE DETAIL page. However, in order for this to work, an image file would have to be MANUALLY placed in the image folder. This problem will be resolved shortly.
Also, if you check the database (localhost/phpmyadmin), you should see that the Image value of the combo box was added to the Image column in the database.
Configure PHP.INI File
Before you attempt to create an upload functionality, you need to ensure that your server is setup to do uploads
- Open the php.ini file in the server directory, search for the file_uploads directive, and ensure that is is turned On. If not, set it to On:
file_uploads = On
- Save the php.ini file and close it.
Add HTML Attributes and Elements
- Add the following attributes to the <form> element:
<form action = "" method="POST" enctype="multipart/form-data" data-ajax="false">
CODE EXPLANATION:
- The form element must be edited to have an enctype="multipart/form-data" and method="post" attribute if it does
  not already have either of these attributes. Without these requirements, the file upload will not work.
- The enctype attribute lets the browser know that "multiple" data type can be submitted (e.g., text and binary).
- The method attribute is how to file is submitted--in this case post.
- The data-ajax attribute has to be set to false when using jQueryMobile. Otherwise, the upload function will not work.
- Modify the code for the image to read:
FROM:
<p><label for = "Image">Image:(e.g., john_doe.jpg)</label>
TO:
<input type = "text" name = "Image" size = "50" data-mini = "true"/></p>
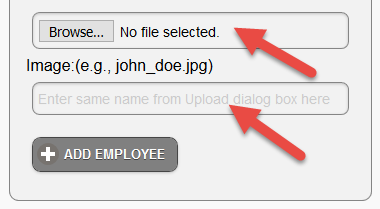
<p><input type = "file" name = "fileToUpload" id="fileToUpload" size = "20" data-mini = "true"/>
<label for = "Image">Image:(e.g., john_doe.jpg)</label>
<input name = "Image" type = "text" size = "50" data-mini = "true" placeholder = "Enter same name from Upload dialog box here"
maxlength = "50" required = "required" /></p>
CODE EXPLANATION:
- This is used to create a text field AND a browser button so that a user can either type in a file name or browser
 to a file on their computer.
- Notice that there is both the type of "text" and "file." The "file" type cannot be used in the SQL query so the "text"
  type is still needed. Later, we will add a value attribute to the "text" type and make its value the same as the image
  name (e.g., value = "ann_ricoh.jpg) based on a dynamic variable created by the uploadScript.php script so that it CAN
  be used. We will also hide this field.
- CHECK POINT: Save the file and preview it in a browser. You should see that the text field has been replaced by a file field with a Browse... button that may have a phrase "No file selected." shown next to it on some browsers.
FROM:
TO:
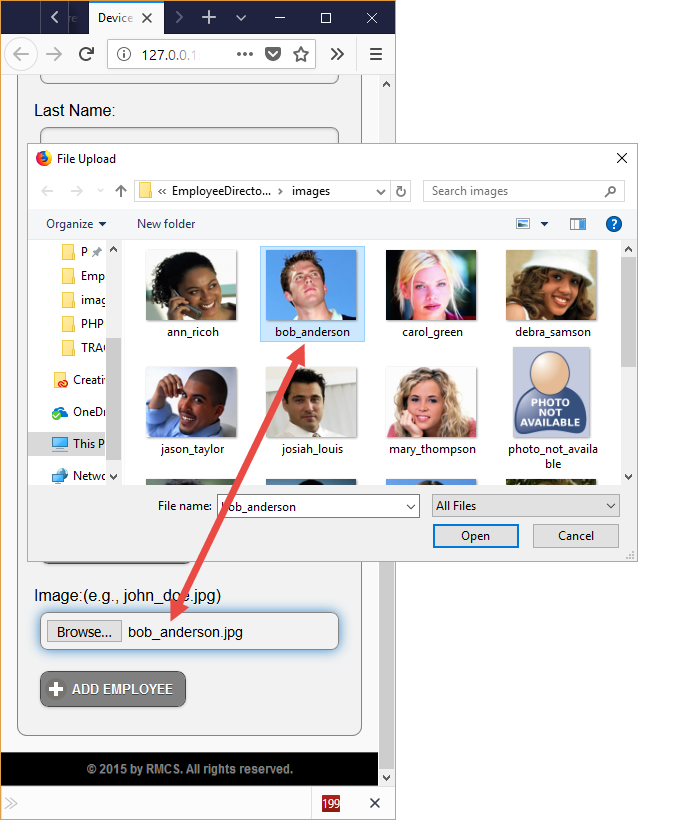
If you click the Browse... button, it will open the File Upload dialog box.
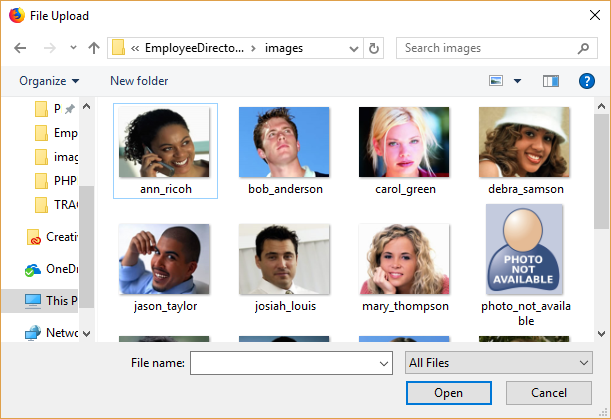
In the Upload File dialog box that appear, If you click to select a file (in this case, an image), the file name will be displayed in the file input field. However, if you fill out the ADD EMPLOYEE form and then click the ADD EMPLOYEE button, the file (e.g., image) will not be uploaded because the code for it has not yet been created.
Test $_FILES Array
- Comment out the header statement in the PHP script:
WHY: To temporary comment out the header statement so that it does not open the EMPLOYEE MASTER PAGE so that you can see the print_r result that will be created next.
	if (!empty($result) ){
	  // header('location:master_page.php');
	}
- Comment out the jQueryMobile script at the top of the page.
WHY: To temporary disable the jQueryMobile framework so that you can see messages displayed at the top of the page.
FROM:
<script src="http://code.jquery.com/mobile/1.4.5/jquery.mobile-1.4.5.min.js"></script>
TO:
<!-- <script src="http://code.jquery.com/mobile/1.4.5/jquery.mobile-1.4.5.min.js"></script> -->
- Add the following highlighted code BELOW the closing form tag ( </form>):
</form>
<pre>
<?php
if (isset($_POST['add_record'])) {  print_r($_FILES)
}
?>
</pre>
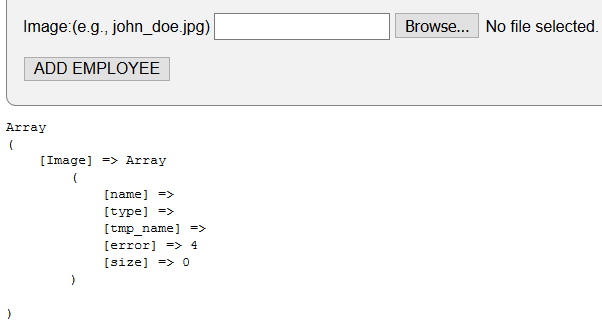
- CHECK POINT: Save the file and preview it in a browser. Fill out the required fields and then click the ADD EMPLOYEE button WITHOUT selecting the Browser... button to add an image. You should see the Image Array with no property value listed EXCEPT for error of 4. This is because no image was selected using the Browse... button.
Error codes: (No error 5)
0 - Upload successful
1 - File exceeds maximum upload size specified in the phoniness file (Default is 2MB)
2 - File exceeds maximum upload size specified by the MAX_FILE_SIZE value (See code below)
3 - File only partially uploaded
4 - For submitted with no file specified
6 - No temporary folder
7 - Cannot write file to disk
8 - Upload stopped by an unspecified PHP extension
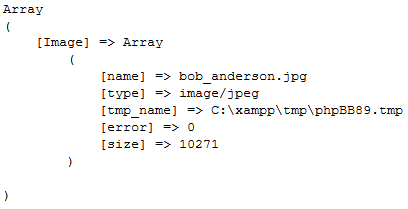
Fill out the form AGAIN, but this time click the Browse... button, navigate to an image, and then click the Open button. You should see the Image Array populated with ALL of its values:
- Delete the PHP script that was written below the closing form tag (</form>):
WHY: This was a temporary PHP script to show how the $_FILE array works.
</form>
<pre>     <?php
if (isset($_POST['add_record'])) {  print_r($_FILES)
}    ----------------------
?>  --------------------
</pre> ------------- - Add the following require statement ABOVE the current PHP script at the top of the document.
CAUTION: Be careful NOT to include a "d" on the end of require (e.g., required).
<?php require 'uploadScript.php';?>
<?php
CODE EXPLANATION:
- The require statement is used to insert the content of another PHP file into PHP file before the server execute it. There
is also an include statement that could be used. The different is:
  - require will produce a fatal error (E_COMPILE_ERROR) and stop the script
  - include will only produce a warning (E_WARNING) and the script will continue
- In the case of a CMS, it is always wise to use the require statement to avoid compromising the app security.
The include is used if you would like to create a standard header, content, footer, or menu files for all your web pages.
Then, when one of these areas need to be updated, only that PHP script file need to be updated. - CHECK POINT: Save the file and preview it in a browser. Fill out the form including the image input field WITH AN IMAGE THAT IS OUTSIDE OF THE CURRENT IMAGES FOLDER and press the ADD EMPLOYEE button. You should see the image was added to the EMPLOYEE MASTER PAGE and the EMPLOYEE DETAIL page. Also, if you check the uploads folder, you should see the image got uploaded there.
IMPORTANT INFORMATION: The steps below is for information use only to show how the uploadScript.php file was create.
You DO NOT have to do them unless you want to create the script yourself.
- Create a new PHP file and delete all of the content, save it as uploadScript.php, and then add the following code:
WHY: To see if the require statements is working.
<?php
   echo "Hello World";
?>
- CHECK POINT: Save the file and preview it in a browser. You should see the phrase, "Hello World" displayed at the top of the page.
Check If Actual Image
You want to safeguard that an actual image is being upload to the server.
- Replace the echo statement with the following highlighted code including the extra blank lines.
<?php  // Set variables upfront ----------------------------------------------
$target_dir = "images/";
$target_file = $target_dir . basename($_FILES["fileToUpload"]["name"]);
$uploadOk = 1;
$imageFileType = strtolower(pathinfo($target_file,PATHINFO_EXTENSION));
// Check if image file is a actual image ---------------------
if(isset($_POST["add_record"])) {
    $check = getimagesize($_FILES["fileToUpload"]["tmp_name"]);
    if($check !== false)       {
        echo "File is an image - " . $check["mime"] . ".";
        $uploadOk = 1;
    }        else       {
        echo "File is not an image.";
        $uploadOk = 0;
    }
} // End of complete upload script -----------------------------------------  ?>
CODE EXPLANATION:
- $target_dir = "images/" specifies the directory where the file is going to be uploaded.
It is important to add the forward slash (/) at the end.
- $target_file specifies the file name to be uploaded.
- $uploadOk=1 is used to set a flag that will be used later.
- $imageFileType holds the file extension (e.g., jpg, png, gif, txt).
- The outer "if" statement checks to see if the ADD EMPLOYEE button has been clicked. - The inner "if/else" statement is used to check if the image is an actual image and then set the flag. - CHECK POINT: Save the file and preview it in a browser. Fill out the required fields, click the Browser... button and select an IMAGE, and then click the Open button on the Upload File dialog box. Then, click the ADD EMPLOYEE button. You should see the message, "File is an image - image/jpeg." Repeat again but this times select a file that is NOT AN IMAGE. You should see the message, "File is not an image."
Limit File Size
You should limit the file size that a user can upload by checking the file for a certain size. In our case, if the file size is larger than 500KB, a message is displayed and $uploadOk is set to 0:
- Write the following highlighted code ABOVE the closing PHP curly brace and comment statement (e.g., } // End of complete upload script).
// Check file size ------------------------------------------------------
if ($_FILES["fileToUpload"]["size"] > 500000) {
    echo "File is too large.";
    $uploadOk = 0;
}

} // End of complete upload script
?>
CODE EXPLANATION:
- The "if" statement checks if the fileToUpload size is greater than 500KB. If so, display a message and set the $uploadOK flag to zero.
- The fileToUpload is the value of the name attribute of the file input field.
  (e.g., <input type = "file" name = "fileToUpload" id="fileToUpload" size = "20" data-mini = "true"/>).
- CHECK POINT: Save the file and preview it in a browser. Fill out the required fields, click the Browser... button and select an IMAGE LARGER THAN 500K, and then click the Open button on the Upload File dialog box. Then, click the ADD EMPLOYEE button. You should see the message, "File is too large."
Limit File Type
Since the only thing we want a user to upload is an image, we can also check to ensure that only the required image format is uploaded.
- Write the following highlighted code ABOVE the closing PHP curly brace and comment statement (e.g., } // End of complete upload script).
// Allow only certain image  formats -------------------------------------------------------------------------
if($imageFileType != "jpg" && $imageFileType  != "png" && $imageFileType != "jpeg" && $imageFileType != "gif")
{
    echo "Only jpg, jpeg, png, or gif image formats are allowed.";
    $uploadOk = 0;
}    } // End of complete upload script
?>
CODE EXPLANATION:
- The code below only allows users to upload JPG, JPEG, PNG, and GIF files. All other file types gives an error message before setting $uploadOk to 0:
- CHECK POINT: Save the file and preview it in a browser. Fill out the required fields, click the Browser... button and select a file that is NOT AN IMAGE or not one of the required image format (jpg, jpeg, png, or gif), and then click the Open button on the Upload File dialog box. Then, click the ADD EMPLOYEE button. You should see the message, "Only *jpg, *jpeg, *.png, or *.gif image formats are allowed."
Upload File if No Error
Now, it's time to write the code that will ACTUALLY UPLOAD the file is there is no errors.
- Write the following highlighted code ABOVE the closing PHP curly brace and comment statement (e.g., } // End of complete upload script).
// Check if $uploadOk is set to 0 by the error flag ------------------
if ($uploadOk == 0)
{
    echo "File was not uploaded.";
   // If everything is OK, attempt to upload file
}
    else
{
    if (move_uploaded_file($_FILES["fileToUpload"]["tmp_name"], $target_file))
    {
        echo "The file ". basename( $_FILES["fileToUpload"]["name"]). " has been uploaded.";
    }
    else
    {
        echo "There was an error uploading file.";
    }

}


} // End of complete upload script
?>
- CHECK POINT: Save the file and preview it in a browser. Fill out the required fields, click the Browser... button and select an IMAGE LESS THAN 500K, and then click the Open button on the Upload File dialog box. Then, click the ADD EMPLOYEE button. You should see the message, "File <filename> has been uploaded." where <filename> is the actual name of the file being uploaded.
- Add the following highlighted value attribute with a dynamic variable as its value:
<p> <input type = "file" name = "fileToUpload" id="fileToUpload" size = "20" data-mini = "true"/>
 <label for = "Image">Image:(e.g., john_doe.jpg)</label>
 <input name = "Image" type = "text" required placeholder ="Enter same name from Upload dialog
 box here" size = "50" maxlength="50" data-mini = "true" value="<?php echo $selectedFile ?>"/></p>
- CHECK POINT: In Dreamweaver, notice the dynamic variable INSIDE of the text file.

- Open the uploadScript.php file and add the following highlighted variable:
WHY: So that is can be used in the text input field as a dynamic variable in the previous step.
// Set variables upfront ----------------------------------------------
$target_dir = "uploads/";
$target_file = $target_dir . basename($_FILES["fileToUpload"]["name"]);
$uploadOk = 1;
$imageFileType = strtolower(pathinfo($target_file,PATHINFO_EXTENSION));
$selectedFile = $_FILES["fileToUpload"]["name"];
- CHECK POINT: Save the file and preview it in a browser. Fill out the required fields, click the Browser... button and select an IMAGE LESS THAN 500K, and then click the Open button on the Upload File dialog box. Then, click the ADD EMPLOYEE button. Notice that after the page refresh, the undefined dynamic variable is replaced by the actual image name so that it can be used in the SQL query.
FROM: (Before rickey_long.jpg image was selected.)

TO: (After rickey_long.jpg image was selected.)

Check if File Already Exists
You should always check if the file already exists in the uploads folder.
- Write the following highlighted code ABOVE the previous PHP code block that was added:
CAUTION: Be careful to NOT place code ABOVE the curly brace and comment statement
(e.g., } // End of complete upload script) and what do with the other code block.
// Check if file already exists --------------------------------------
if (file_exists($target_file)) {
    echo "Image already exists.";
    $uploadOk = 0;
}

// Check if $uploadOk is set to 0 by the error flag ------------------
if ($uploadOk == 0)
CODE EXPLANATION:
- The file_exists() method is used to check if the $target_file exists. If it does, display a message and change the $uploadOK flag to zero.
- CHECK POINT: Save the file and preview it in a browser. Since we have already upload an image, select the SAME image again. You should get the message, "Image already exists."
- Uncomment out the jQueryMobile script at the top of the page.
WHY: So that the page can be rendered with the jQueryMobile framework.
FROM:
<!-- <script src="http://code.jquery.com/mobile/1.4.5/jquery.mobile-1.4.5.min.js"></script> -->
TO:
<script src="http://code.jquery.com/mobile/1.4.5/jquery.mobile-1.4.5.min.js"></script>
- Uncomment the header statement in the PHP script:
WHY: So the page can go to the EMPLOYEE MASTER PAGE when the file is uploaded.
FROM:
if (!empty($result) ){TO:
// header('location:master_page.php');
}
	if (!empty($result) ){
	  header('location:master_page.php');
} - Change the input type from 'text" to "hidden"
WHY: To hide this input file because it is automatically populated with the correct value from the uploadScript.
FROM:
<input name = "Image" type = "text" required placeholder ="Enter same name from Upload dialog box here"
size = "50" maxlength="50" data-mini = "true" value="<?php echo $selectedFile ?>"/>
TO:
<input name = "Image" type = "hidden" required placeholder ="Enter same name from Upload dialog box here"
size = "50" maxlength="50" data-mini = "true" value="<?php echo $selectedFile ?>"/> - CHECK POINT: Save the file and preview it in a browser. You should see that the text input field is now hidden but still being used. Test page as before.
Complete Upload Code
Below is the complete PHP upload code block.
<?php
// Check if ADD EMPLOYEE button has been click -------------------------
if ( isset( $_POST[ "add_record" ] ) ) {
// Set variables upfront ----------------------------------------------
$target_dir = "images/";
$target_file = $target_dir . basename($_FILES["fileToUpload"]["name"]);
$uploadOk = 1;
$imageFileType = strtolower(pathinfo($target_file,PATHINFO_EXTENSION));
// Check if image file is a actual image  ------------------------------
    $check = getimagesize( $_FILES[ "fileToUpload" ][ "tmp_name" ] );
    if ( $check !== false )
    {
        echo "File is an image - " . $check[ "mime" ] . ".";
        $uploadOk = 1;
    }
    else
    {
        echo "File is not an image.";
        $uploadOk = 0;
    }

// Check file size ------------------------------------------------------
if ($_FILES["fileToUpload"]["size"] > 500000) {
    echo "File is too large.";
    $uploadOk = 0;
}

// Allow only certain image  formats -------------------------------------------------------------------------
if($imageFileType != "jpg" && $imageFileType  != "png" && $imageFileType != "jpeg" && $imageFileType != "gif")
{
    echo "Only jpg, jpeg, png, or gif image formats are allowed.";
    $uploadOk = 0;
}

// Check if file already exists --------------------------------------
if (file_exists($target_file)) {
    echo "Image already exists.";
    $uploadOk = 0;
}

// Check if $uploadOk is set to 0 by the error flag ------------------
if ($uploadOk == 0)
{
    echo "File was not uploaded.";
   // If everything is OK, attempt to upload file
}
    else
{
    if (move_uploaded_file($_FILES["fileToUpload"]["tmp_name"], $target_file))
    {
        echo "The file ". basename( $_FILES["fileToUpload"]["name"]). " has been uploaded.";
    }
    else
    {
        echo "There was an error uploading file.";
    }

}


} // End of complete upload script
?>