Edit Page (Edit Employee)
- Provide Basic Form Validation
- Add Dynamic Combo Box
(Must be done on both Add and Edit Pages) - Create Upload Image Functionality (NOT COMPLETE)
(Must be done on both Add and Edit Pages)
Provide Basic Form Validation
When you create a form, you should always validate particular form elements to determine if required form elements have been filled out or that the correct format is given (e.g., email address). There are a host of techniques on how to validate form elements. While minimum validation was done with the required keyword, additional validation can be done with some of the form elements.
- If you have not already done so using the add_page.php as a template, add the following SIX highlighted "required" attributes to each
<input>
form elements.
TIP: In Dreamweaver, if you click a form element in the Design View and then click the Required checkbox in the Properties panel, it will add the required="required" attribute for that form element. Repeat for all <input> form elements.

<form action = "" method="POST">
  <div class = "ui-body ui-body-a ui-corner-all">
  <p><label for = "FirstName">First Name:</label>
  <input name = "FirstName" type="text" required="required" id="FirstName" data-mini = "true" ></p>
  <p><label for = "LastName">Last Name:</label>
  <input name = "LastName" type = "text" required="required" id = "LastName" data-mini = "true" ></p>
  <p><label for = "Title">Title:</label>
  <input name = "Title" type ="text" required="required" id = "Title" data-mini = "true" ></p>
  <p><label for = "City">City:</label>
  <input name = "City" type = "text" required="required" id="City" data-mini = "true" ></p>
  <p><label for = "State">State:</label>
  <input name = "State" type = "text" required="required" id = "State" data-mini = "true" ></p>
  <p><label for="StartDate">Start Date:</label>
  <input name = "StartDate" type = "date" required="required" id = "StartDate" data-mini = "true" ></p>
  <p><label for = "Note">Note:</label>
  <textarea cols = "40" rows = "8" name ="Note" id = "Note" data-mini = "true" class = "define-textarea"></textarea></p>
  <p><input type = "submit" name = "add_record" value = "ADD EMPLOYEE" data-inline = "true"
  data-mini = "true" data-icon = "plus" data-iconpos = "left"/></p>
  </div>
</form>
CODE EXPLANATION:
.
- You may notice the word required used by itself in some books. To be HTML5 valid, attributes need to be in single or double quotes. While required = "required" is not nice looking, it makes the code HTML 5 valid.
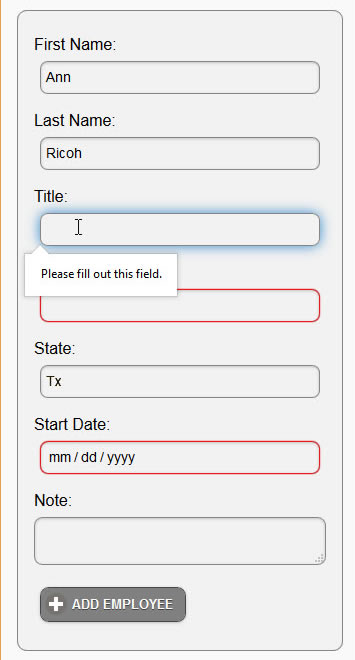
- CHECK POINT: Save the file and preview it in a browser. Log into the app and click on an EDIT icon button to navigate to the EDIT EMPLOYEE page. Add some but not all data to the form. You should see a red highlights around form element that were not completed and a tool tip (Please fill out this field) on the first form element that was not completed.
Add Dynamic Combo Box
It is best practice to DYNIMICALLY populate a menu if the SAME menu will be used on MULTIPLE pages. This way, if there are any changes (additions or deletions) to the menu, it can be done from one table in the database and all of the pages will reflect the changes.
- If you have not already done so using the add_page.php as a template, add the following highlighted
<label>
and
<select>
tags BELOW the
<textarea>
tag:
<textarea cols = "40" rows = "8" name ="Note" id = "Note" data-mini = "true" class = "define-textarea"></textarea></p>
  <p><label for = "Department">Department:</label>
  <select name = "Department" id = "Department" data-mini = "true" data-inline = "true">
    <option>Human Resource</option>
    <option>IT</option>
    <option>Engineering</option>
    <option>Marketing</option>
    <option>Manufacturing</option>
    <option>Sales</option>
  </select></p>
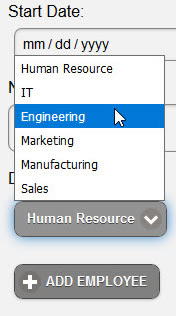
- CHECK POINT: Save the file and preview it in a browser. You should see the STATIC combo box below the Note textarea. Click the combo box to expand it.
- If you have not already done so using the add_page.php as a template, add the following highlighted SELECT SQL query ABOVE the <!doctype html> statement AND the closing PHP tag (?>).
WHY: To create a recordset (or resultset) to POPULATE the combo box.
/* STEP 3: Retrieve data from Department column for combo box */
$pdo_statement = $pdo_conn->prepare( "SELECT DepartmentID, Dept FROM departments" );
$pdo_statement->execute();
$result3 = $pdo_statement->fetchAll();
?>
<!doctype html>
 CODE EXPLANATION:
- Notice that there are separate names for each SQL query result (e.g., $result1, $result2, and $result3)
so that they can be used effectively later.
- Replace ALL of the
<option>
tags with the following highlighted PHP scripts BETWEEN the opening
and closing
<select>
tags with a foreach loop. Comments are optional. Spaces are intentional added to see the PHP scripts code block better.
WHY: To create a recordset to retrieve the department names from a table called departments so that it can be used to populate the combo box with the correct department name dynamically.
<p><label for = "Department">Department:</label>
<select name="Department" id="Department" data-mini="true" data-inline="true">
<!-- Loop through middle of select  tag  ----------------------------------------- -->
<?php
   foreach ( $result3 as $row ) {
?>

<option><?php echo $row['Dept']; ?></option>

<?php
}
 ?>
 <!-- End of select ------------------------------------------------------------------------- -->
</select></p>
- CHECK POINT: Save the file and preview it in a browser. You should see the DYNAMIC combo box displayed below the Note textarea. Click the combo box to expand it. The result is the same as before; however, the combo box menu is POPULATED from data from the department table in the database instead of being static.
- MODIFY the SQL query with the highlighted changes.
WHY: To enable the Department value be saved to the Department column in the employees database:
CAUTION: Pay attention to the added comma after the Note statement.
/* STEP 2: Insert updated form elements to database */
if(!empty($_POST["add_record"])) {
	$pdo_statement=$pdo_conn->prepare("UPDATE employees SET
    FirstName='"  . $_POST[ 'FirstName' ] . "',
    LastName='"   . $_POST[ 'LastName' ]. "',
    City='"       . $_POST[ 'City' ]. "',
    State='"      . $_POST[ 'State' ]. "',
    StartDate='"  . $_POST[ 'StartDate' ]. "',
    Note='"       . $_POST[ 'Note' ]. "',
    Image='"      . $_POST[ 'Image' ]. "',
       Department='   . $_POST[ Department ]. "'
    WHERE ID="    . $_GET[recordID]);
   	$result2 = $pdo_statement->execute();
	if($result2) {
		header('location:master_page.php');
   }
}
- CHECK POINT: Save the file, click the ADD EMPLOYEE button, fill out the form, and click the ADD EMPLOYEE button. You should taken to the EMPLOYEE MASTER PAGE where you should see the employee record added to the ListView. Also, if you check the database (localhost/phpmyadmin), you should see that the Department value of the combo box was added to the Department column in the database.
Sync Combo Box with Database Value
If you were to click the EDIT icon link on the EMPLOYEE MASTER PAGE for several of the employees, you will see that the menu on the Edit Employee Page ALWAYS reflects the same value from the Department combo box. To SYNC the recordset to the correct value from the employees table requires some additional coding.
- If you were to view the source code (e.g., Right click and select View Source) for this page as it is rendered in the browser, you will see that it creates a series of
<option>
tags.
<select name="Department" id="Department" data-mini="true" data-inline="true">
  <option>Human Resource</option>
  <option>IT</option>
  <option>Engineering</option>
  <option>Marketing</option>
  <option>Manufacturing</option>
  <option>Sales</option>
</select> - To make a value the default value, you would have to add an attribute the is rightly called selected to the
<option>
tag you want. The code would look similar to this:
<select name="Department" id="Department" data-mini="true" data-inline="true">
  <option>Human Resource</option>
  <option>IT</option>
  <option selected>Engineering</option>
  <option>Marketing</option>
  <option>Manufacturing</option>
  <option>Sales</option>
</select>
- Replace what is BETWEEN the opening and closing
<select>
tags with the following highlighted PHP scripts. Comments are optional. Spaces are intentional added to see the PHP scripts code block better.
WHY: To create a recordset to retrieve the department names from a table called departments so that it can be used later to populate the combo box with the correct department name dynamically.
FROM:
<select name = "Department" id = "Department" data-mini = "true" data-inline = "true">
<!-- Loop through middle of select  tag  ----------------------------------------- -->
<?php
  foreach ( $DeptResult as $row ) {
?>
<option><?php echo $row['Dept']; ?></option>
<?php
}
?>
<!-- End of select ------------------------------------------------------------------------- -->
</select></p>
TO:
<select name="Department" id="Department" data-mini="true" data-inline="true">
<!-- Loop through middle select  ----------------------------------------- -->

<?php
foreach ( $result3 as $row ) {
if ( $row['Dept'] === $result[0]['Department']) {
?>

<!-- If selected  ------------------------------- -->
<option selected><?php echo $row['Dept']; ?></option>

<?php
} else {
?>

<!-- If NOT selected  --------------------------- -->
<option><?php echo $row['Dept']; ?></option>

<?php
}
}
?>
<!-- End of select ---------------------------------------------------- -->
</select>
CODE EXPLANATION:
- Within the foreach loop, the "if" statement check each loop iteration to see if the Dept variable from the departments table MATCHES the
Department variable from the employees table and if so INJECT the selected attribute within that <option> opening tag. - Save the file.
- CHECK POINT: Save the file and retest it again in a browser. If you were to click the EDIT link on the EMPLOYEE MASTER PAGE for several of the employees, you should see that the Department combo box menu on the EDIT EMPLOYEE page reflects the correct record from the employees database table not the departments database table that is used only to populate the combo box. Also, if you were to view Page source, you would see the selected attribute added for the correct record so that it can be displayed in the combo box. Keywords are highlighted in blue.
<select name="Department" id="Department" data-mini="true" data-inline="true">
<!-- Loop through middle select  ----------------------------------------- -->
<!-- If selected  ------------------------------- -->
<option selected>Human Resource</option>
<!-- If NOT selected  --------------------------- -->
<option>IT</option>
<!-- If NOT selected  --------------------------- -->
<option>Engineering</option>
<!-- If NOT selected  --------------------------- -->
<option>Marketing</option>
<!-- If NOT selected  --------------------------- -->
<option>Manufacturing</option>
<!-- If NOT selected  --------------------------- -->
<option>Sales</option>
<!-- End of select ---------------------------------------------------- -->
</select>
OPTIONAL: Add Department To ListView
If you want to you can add the Department value to the ListView on the Employee Master Page.
- Open the master_page.php and modify the SELECT SQL to read:
CAUTION: Don't forget to include the comma after the word Image.
$sql = "SELECT ID, CONCAT(FirstName, ' ' , LastName) AS FullName, Title, Image, Department FROM employees
WHERE FirstName LIKE :keyword OR LastName LIKE :keyword OR Title LIKE :keyword ORDER BY FullName ASC";
CODE EXPLANATION:
- Notice that when you used the SELECT SQL clause, it does not matter that the column names in not in the same order
as the columns in the database. The Department column was listed last above even though it is listed eight of eleven in the database.
- Add the following highlighted
<p>
tag BELOW the Title
<p>
tag:
<p style = 'color:orange; text-transform:uppercase'><?php echo $row["Title"]; ?></p>
<p class="ui-li-aside"><strong style = "color:orange;">Dept.: <br></strong><?php echo $row["Department"]; ?></p>
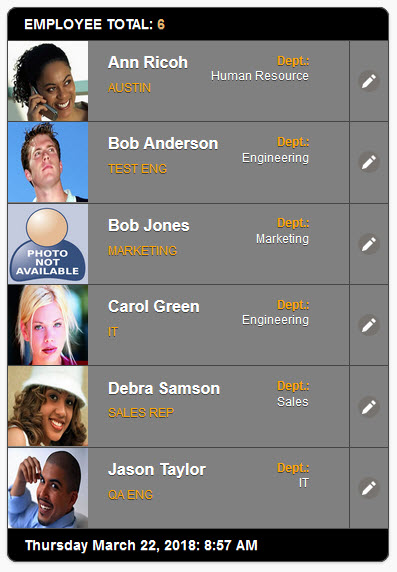
- CHECK POINT: Save the file and preview it in a browser. You should see the department name listed on the right side of the ListView for each employee.
Create Upload Image Functionality
Similar steps need to be done to the EDIT EMPLOYEE page to enable a user to UPDATE an image for a given employee.
- Open the edit_page.php file and add the following require statement at the top of the file.
WHY: To load the uploadScript file to the edit_page.php.
<?php require 'uploadScript.php';?>
<?php
- Add the following attributes to the <form> element:
<form action = "" method="POST" enctype="multipart/form-data" data-ajax="false">
- FINISH LATER..