Master Page (Employee Master Page)
- Display Total Records From Database
- Add Dynamic Copyright Notice
- Add Dynamic Time and Date
- Add Dynamic Thumbnails to Table
- Provide an Avatar for Missing Images
- Display Message If No Record is Found
Display Total Records From Database
It is common practice to return the total number of database records to show the total number of items in a list, table, etc. There is a special method called rowCount() that does just that.
- Add the following highlighted $row_count variable at the bottom of the PHP script:
$result = $pdo_statement->fetchAll();
$row_count = $pdo_statement->rowCount();
?>
- Modify the text to read EMPLOYEE TOTAL: and then add the following highlighted
<span>
tag to the FIRST
<li>
:
<li data-role = 'list-divider'>EMPLOYEE TOTAL: <span style="color:#E8B46A"><?php echo $row_count?></span></li>
NOTE: Notice the <span> tags are used to wrap the dynamic variable so that an inline style could be add just to it and not the whole phrase.
- CHECKPOINT: Save the file and preview it in a browser by logging into the app. You should see the phrase "EMPLOYEE TOTAL:" and the total number of employees displayed in a different color from the rest of the text:

[back to top]
Add Dynamic Copyright Notice
While this enhancement is not required, it adds a nice touch to the footer and causes the year to update AUTOMATICALLY when a new year occurs.
- In the footer's copyright notice, add a dash (-) after the year and then and the following highlighted dynamic year.
WHY: To create a range of years for the copyright notice. If you want a single year, just add the dynamic year instead.
<h4>© 2015-<?php print date("Y")?> by RMCS. All rights reserved.</h4>
CODE EXPLANATION:
- The <?php print date("Y")?> code uses a simply PHP built-in date function that returns the current year as a four-digit number.
- CHECK POINT: Save the file and preview it in a browser by logging into the app. You should see a range of years displayed in the footer. However, this time, the second year will change on the first day of each new year.
ALTERNATIVE:
If you are creating a new app, you may want to provide a way so that the first copyright year is displayed as a single year and the years afterward would be displayed as a range of years.
- Replace the current year, dash, and PHP script with a more dynamic PHP script:
<h4>© <?php echo date_range()?> by RMCS. All rights reserved.</h4>
- Add the following highlighted PHP script ABOVE the <!doctype html> statement:
<!-- Date Range Function --------------------------->
<?php
    function date_range()
    {
       $startYear = 2015;
       $currentYear = date("Y");
       if ($startYear == $currentYear)
         {
           return $startYear;
         }
       else
         {
         return $startYear. ' - ' .$currentYear;
       }
    }
?>
<!doctype html>
CODE EXPLANATION:
- It is important to note that the function in the footer is RESOLVED to a value based on the keyword "return" in the function and
  not a "print" statement as before. In fact, if you used the keyword print instead of return, you would not get the desired result.
- The conditional statement is used to check if the current year and the start year are the same and if so "return" the current year.
  If the two years are not the same, "return" a range of years.
- CHECK POINT: Save the file and preview it in a browser by logging into the app.
- To test the single year format, ensure that the startYear and currentYear have the same value. You should see a single year displayed.
- To test for a range of years format, ensure that the startYear and currentYear have different values. You should see a range of years displayed.
© 2015 - 2018 by RMCS. All rights reserved.
Add Dynamic Time and Date
While adding a dynamic year is easy, adding a dynamic time requires a little more effort because you have to consider time zones, etc.:
- It is best practice to establish a time zone before calling a date or time method. Otherwise, you will get the time zone of where the server is which may not be the same time zone that you are in. Hence, the statement date_default_timezone_set('America/Chicago'); establish the time zone for you. To see a list of all time zones, go to http://www.php.net/timezones/.
- There are many parameters you can pass to the date method, the one uses below are:
- g = Hours
- i = Minutes
- a = AM or PM
- l = Day of the week
- F = Month
- j = Day of the month
- Y = Year
NOTE: Parameters are case-sensitive. For example, Y will yield 2015; whereas, y will yield 15. a will yield am/pm; whereas, A will yield AM/PM. You can also add commas and colon to make the format easier to read and you can add the parameters in any logical order you want (e.g., date/time or time/date).
- The server time zone can also be set in the PHP configuration file (e.g., php.ini) which is better then setting it on a page-by-page basis.
- It is important to note that the date and time is concatenated between the two string from another PHP script. We could not use the curly braces like in some previous examples or the PHP script block (e.g., <?php code... ?>).
- Replace the non-breaking space ( ) with the following highlighted PHP script in the LAST
<li>
tag in the ListView. Also, add the style attribute as well:
<li style="text-align: center" data-role = 'list-divider'><?php echo date_n_time()?></li>
- Add the following highlighted PHP script ABOVE the <!doctype html> statement:
<!-- Date / Time PHP Script --------------------------->
<?php
function date_n_time()
{
 date_default_timezone_set('America/Chicago');
 return $dateTimeStamp = date('l F j, Y: g:i A');
}
?>
<!doctype html>
CHECK POINT: Save the file and preview it in a browser by logging into the app. You should see the current date and time (e.g., Friday March 15, 2018: 12:55 PM) based on the time zone you set in the code.
Add Dynamic Thumbnails to Table
Let's improve the app by adding thumbnails to the rows in the table.
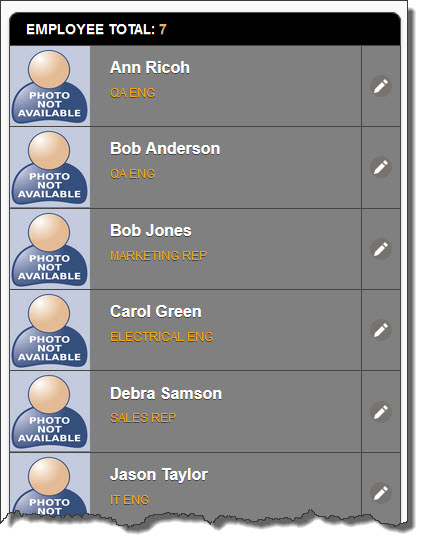
- Within the SECOND <li> tag and within the <a> tag, add the following static <img> tag:
<li>
<a href = 'detail_page.php?recordID=<?php echo $row["ID"]; ?>'><?php echo $row["FullName"]; ?>
<img src='images/photo_not_available.png' width='80' height='80' alt='photo not available' />
<p style = 'color:orange; text-transform:uppercase'><?php echo $row["Title"]; ?></p>
</a>
<a href = 'edit_page.php?recordID=<?php echo $row["ID"]; ?>'>EDIT <?php echo $row["FullName"]; ?></a>
</li> - CHECK POINT: Save the file and preview it in a browser by logging into the app. You should see the static photo (PHOTO NOT AVAILABLE) for each item in the ListView:
- Replace the static image (photo_not_available.png) with its dynamic counterpart (<?php echo $row["Image"]; ?>):
<li>
<a href = 'detail_page.php?recordID=<?php echo $row["ID"]; ?>'><?php echo $row["FullName"]; ?>
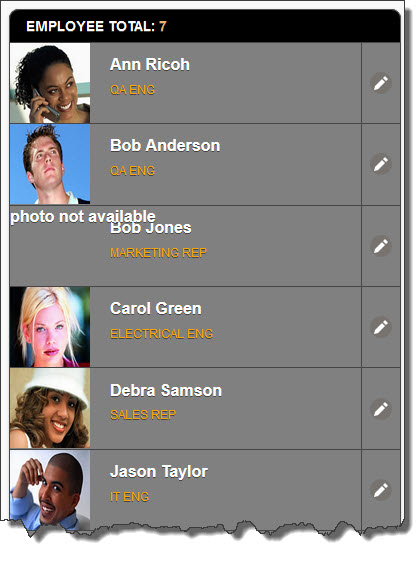
<img src='images/<?php echo $row["Image"]; ?>' width='80' height='80' alt='photo not available' />
<p style = 'color:orange; text-transform:uppercase'><?php echo $row["Title"]; ?></p>
</a>
<a href = 'edit_page.php?recordID=<?php echo $row["ID"]; ?>'>EDIT <?php echo $row["FullName"]; ?></a>
</li>
- Add a comma, space and the word Image to the $sql variable:
WHY: To return the Image column from the database so that thumbnail images can be displayed.
$sql = "SELECT ID, CONCAT(FirstName, ' ' , LastName) AS FullName, Title, Image FROM employees
WHERE FirstName LIKE :keyword OR LastName LIKE :keyword OR Title LIKE :keyword ORDER BY FullName ASC";
- CHECK POINT: Save the file and preview it in a browser by logging into the app. You should see thumbnails for any images that are in the images folder and referenced in the database. If no image is available, a broken image icon will be displayed in some browsers or the alt text "photo not available." will be displayed instead.
Provide an Avatar for Missing Images
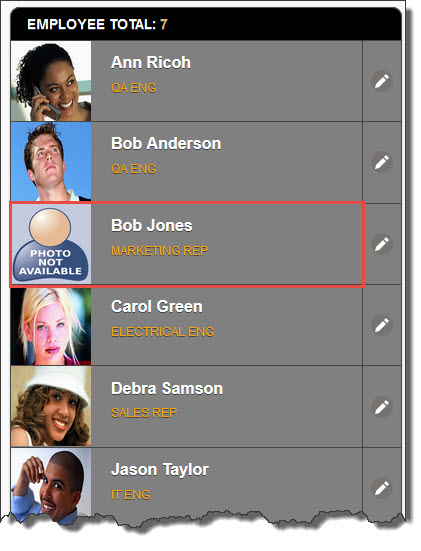
When the app is completed with enhancements, there should not be a need for this process. However, if someone enters information directly into the database, there may not be an image available at the time. You need to account for this slim chance of not having an image.
- Click the
<img>
tag in the Code View and add three to four BLANK LINES BEFORE and AFTER it. Then, replace the current
<img>
tag with the following highlighted code:
WHY: To select it so that we can see the changes that will be made easier.
FROM:
[blank line here]
[blank line here]
[blank line here]
<img src='images/<?php echo $row["Image"]; ?>' width='80' height='80' alt='photo not available' />
[blank line here]
[blank line here]
[blank line here]
TO:
<?php
  $source_img = $row['Image'];
     if($source_img == "")
     {
        print "<img src='images/photo_not_available.png' width='80' height='80' alt='photo not available' />";
      }
    else
     {
        print "<img src='images/$source_img' width='80' height='80' alt='$source_img' />";
     }
?>
CODE EXPLANATION:
- The "if/else" conditional statement is used to check if an image is available.
   - If no image is available, display the static image.
   - If an image is available, display the actual image.
- CHECK POINT: Save the file and preview it in a browser by logging into the app. You should see the avatar image displayed when no image is available.
Display Message If No Record is Found
There are occasions where you want to ensure that if no record is returned from a database that a message is displayed instead of a blank ListView, table, etc.
- Wrap an "if/else" PHP conditional statement around the
<ul>
tag and all of its content.
NOTE: Notice the $row_count=0; statement that was also added to SIMILATE that no record is being returned from the database.
<?php
$row_count=0;
if($row_count==0)
{
    echo ("<p class='error'>No employee record is found</p>");
}
else
{
?>
<ul data-role = 'listview' data-inset = 'true' data-split-icon = 'edit'>
...
...
...
</ul>
<?php
}
?>
CODE EXPLANATION:
- The "if/else" conditional statement is used to check if any records has been returned from the database.
  - If so, display the ListView.
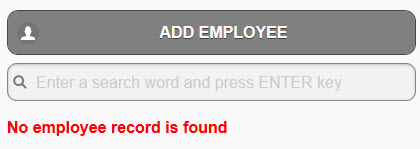
  - If not, display the message, "No employee record is found."
- CHECK POINT: Save the file and preview it in a browser by logging into the app. You should see the message, "No employee record is found."
- Comment out or delete the $row_count=0; statement:
WHY: It was only used to SIMILATE that no records were returned from the database when in reality there were some based on the default setup.
<?php
// $row_count=0;
if($row_count==0)