Add Layers
If you are familiar with the Layers panel in Adobe Illustrator, you will feel right at home in Muse. Like Illustrator, adding layers in Muse upfront makes it easier to organize content and to adjust the stacking order.
The Layers panel is used to control the DEPTH LEVEL for ALL PAGES and TEMPLATES. So, once you defined the layers names, you see them the same regardless of what page or template have open. However, the objects will be different based on the page or template you have selected.
Instruction
- While in Plan view, double-click the A-Master template to open it in Design View.
- Open the Layers panel.
- Double-click on the text Layer1 and rename it to Header and the click the OK button.
- Create two other layers by clicking on the new layer icon and name them Content and Footer, respectively.
- Optionally, drag-and-drop the layers in this order (Header, Footer, andContent).
TIP: Notice the color strips on the left side of the panel that denotes what layer elements are on
(See screenshot below).
- Expand the header layer, if necessary, and click on the first Rectangle’s target to see what object is selected on the screen and then rename it (e.g., footer) and then drag the small blue box to the correct layer to move the content to that layer.
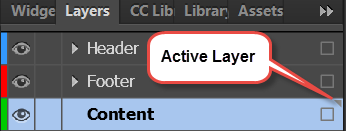
- Select the Content layer so that any new element get placed on that layer as elements are placed on the screen.
TIP: You will see a small triangle at the top/right corner of the current ACTIVE layer. Also, notice the layer name has black text and is bold. It is best to do the header and footer in the Master template FIRST, then all you have to do is select the CONTENT layer so that all of the REST of the content will be placed on the correct layer.