Prep For Site
IMPORTANT: This tutorial allows you to either use the exercise assets or replace them with your own assets. The conventions are:
- Instructions will always use paragraphs, notes and bullet lists
- Exercise Steps will always use number lists
- Values that are replaceable will always use lower case letter lists (e.g., a, b, c)
Determine the goals of your web site. They could include:
- Informational
- Promotional
- Sales
- Entertaining
Gather or Create Assets
If necessary, it may be helpful to gather assets needed for your web site (e.g., images, fonts, backgrounds, audio, video, text for pages, etc.) and place them in the appropriate folders (e.g., images). Then, create a composition (comp for short) for your website before you used Muse.
TIP: Photoshop can be used to gather and generate assets, create a comp and store them in a Library.
Create Folders
Typically, a folder is created to hold all of the content of the web site. It is best practice also to create a folder titled images that will hold all of the images for the site.
- Create a folder and give is a descriptive name (e.g., CorneliusPortfolio)
- Create another folder inside of that folder and name it images.
Create Copy For Site
It is best to create the copy (or text content) for your site in advanced.
- Create a MS Word or InDesign document of site with headings that will respresent each menu item.
EXAMPLE:
ABOUT ME
Home info goes here....
EXPERIENCE
Experience goes here...
PORTFOLIO
Portfolio goes here...
CONTACT ME
Contact goes here....
- You will use this document later to cut and paste content into your site as needed.
Create Wireframe
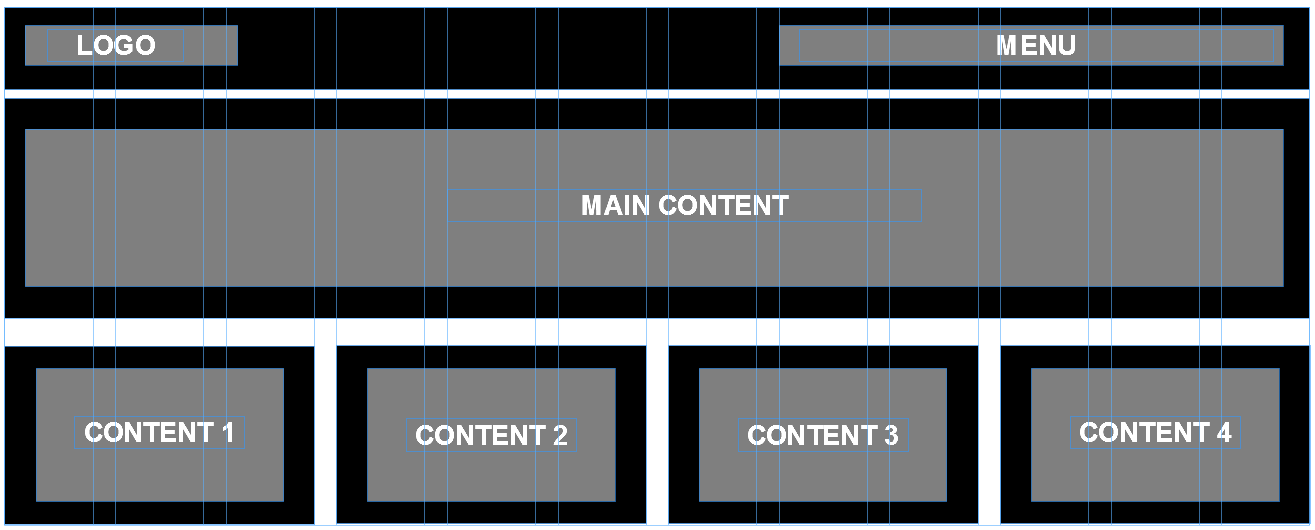
Creating a wireframe of your site will help you to create the sitemap later. It will also help determine how much text you need and the size of graphics that you need. This will prevent you from having to recreate graphics later because the size was not correct. This guide is useful when choosing to double the size of graphics beyond a standard format, suggested for Retina devices.
- Create wireframes of each different layout page for your site using MS Word, Visio or another wire-frame app.
TIP: You could use Muse to create your wireframe by drawing rectangle and filling them with color and region names using a 12 column gri. Take note of the region sizes so that you know EXACTLY what size to create your image assets.
- You will use this wireframe to design your web site pages at a later time.
EXAMPLE:
Gather / Create Graphics
- If necessary, create assets that you need at their proper size (e.g., Photoshop for images, and Illustrator for SVG)
- After gathering or creating assets, create a comp in Photoshop (or any other image editor) with a canvas width of about 1200px and then set a guide 100px from the right and left of the canvas making the work area 1000px. Height is not as important so set to 700px for each page in your site.
- If you are using Photoshop or Illustrator:
- In the Layers panel, add descriptive name and web-friendly formats image extensions (e.g., *.jpg, *.gif, or *.png) to each layer’s name that you want to export as KEY assets (e.g., imagename.jpg).
NOTE: Image extension should be:
*.jpg for photographic images
*.png for images with transparent
*.gif for images that are clip art or have a lot of solid color
- Select the background image layer and append 30% to it (e.g., background.jpg 30%).
NOTE: Because a background image it typically large and would take a long time to download, it should be optimized to a lower quality (e.g., 30% quality).
- In the Layers panel, add descriptive name and web-friendly formats image extensions (e.g., *.jpg, *.gif, or *.png) to each layer’s name that you want to export as KEY assets (e.g., imagename.jpg).
- Select File > Generate > Image Assets to create a folder where the *.psd file is and for alll of the images that have an extension on them.
- Optionally, in Photoshop, you can add assets to your Libraries Panel:
- In the Libraries panel, from the drop-down menu, select Create New Library menu and give it a name (e.g., Cornelius’ Portfolio) and then click the Create button.
- Click on a layer and then click the Add To Library icon at the bottom of the Libraries panel to add KEY assets (e.g., images, logo, etc.)
- Use the Color Picker tool to select a color and then click on the Color icon at the bottom of the Libraries panel. Repeat for each color you like to include in your color palette.
[SHOW PICTURE OF COMP]
LINK TO COMP
[SHOW IMAGE OF LIBRARY ASSET]
Create Comp (Clean up)
You can create a composition (comp for short) of pages for your site in Photoshop and import the various element into Muse easily.
- Open Photoshop and create a comp for a page that is the same size as the Muse page you intend to create (1200px x 857px) and give each layer a descriptive name.
- Go to Muse and select File > Place... and navigate to the *.psd file and select the Open button.
- In the Import Image Options dialog box that appears, select the Import Composite Image checkbox to bring in flatten image of all layers to use as a template.
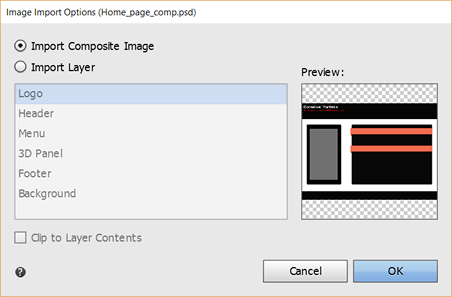
- Right-click on the image and select Lock.
- Select File > Place... again but this time, select Import Layer checkbox and select the Logo layer and then select the Clip to Layer Contents checkbox to trim the layer and then click the OK button.
- With the Place gun loaded, place the image and then move it over the current logo.
- Repeat the previous two steps to load the other elements and place them over the template. You will have to right-click on the Header and select Arrange > Send to Back.
- Delete composite template layer.
- Open the Layers panels and move the content on their appropriate layer (header, content, footer).
Gather Text
Use Microsoft Word and other text editor to create the “copy” text for your web site. Optionally, you can copy some dummy text from www.ipsum.com/, paste it in a MS Word file and use them as placeholders when you don’t have the actual text for your site.
Gather Fonts
While we will show you how to use regular web fonts, you also have the option to use self-hosted fonts. In this tutorial, we will use a set of fonts from fontawesome.io:
- To add Self-Hosted Fonts, go to http://fontawesome.io/.
- Click on the Download button to download the zip file.
- Right-click on the zip file and select Extract All.
- In the fonts folder, double-click on the *.ttf or *.otf and press the Install button to install a system file.
CAUTION: If you don’t do this step, you will get an error when you attempt to install the other FontAwesome fonts without a matching system font later.