Create Site Map
By creating an “org chart” of sort for your site, Muse will AUTOMATICALLY create a sitemap.xml file that can be used by a search engine like Google to index your site more effectively.
It is important to note, that pages are not the same as templates (e.g., A-Master). Content of a template is APPLIED to pages to make them more consistent and easy to update. While you can have multiple templates on your site, you can only have ONE template applied to a page at a time.
By default, all pages are AUTOMATICALLY based on the A-Master template. And while you can remove a template from a page, it is to your advantage to use a template even if you have a one page web because you may need to create additional pages later and the common areas (e.g., header, menu and, footer) will already be established.
MEMORY TIP: It is helpful to think of a template as a rubber stamp. For example, you could have five blank pages and if you APPLY (STAMP) those pages with the PAID IN FULL rubber stamp that does not have any ink applied to it, there will be no change to the pages even though the rubber stamp was applied to each page. However, if you dip the PAID IN FULL rubber stamp in some ink and then apply it to the same five pages, you see that those five pages will receive the PAID IN FULL stamp so that they are all consistent. While you could also have another rubber stamp, let's say a OVER DUE rubber stamp, you would not want to apply it to a page that already have a PAID IN FULL stamp applied. Hence, you can only applied one of these stamp (template) to a page at a time.
How to CREATE/DELETE a page or template:
- Click on the plus sign (+) to the right or left of a page’s thumbnail to ADD a SIBLING page or template.
- Click on the plus sign (+) at the bottom of a page’s thumbnail to ADD a CHILD page AND then click on the plus sign (+) to the right for EACH child page you want to create.
CAUTION: Be careful NOT to click the plus sign (+) repeatedly at the bottom of the thumbnail because you will create a child of a child page which may not be what you want.
- Click on the small x at the top of a page’s thumbnail to DELETE a page.
How to APPLY/REMOVE a template to a page:
- Drag-and-drop template thumbnail to a page thumbnail to apply the template to the page. Remember, you can only apply one template/page.
- Right-click on a page thumbnail and select Masters > [templateName] (e.g., A-Master) from menu.
NOTE: By default, the A-Master template is AUTOMATICALLY applied to a page when it is created. You can either remove it or apply another template to the page if you want.
How to REMOVE a template from a page:
- Right-click on a page and select Masters > No Master.
How to prevent a page from being exported:
- Right-click on a page and deselect the Export Page option.
[SHOW DEMO HERE]
Instruction
- Open up Muse and select File > New Site... from the menu or press CTRL+N.
- In the New Site dialog box that appears, change the Column Width to 1200.
NOTE: Notice the Column Width MATCHS the Comp size created in Photoshop we created earlier. The Min Width (320) and Min Height (500) properties correspond to the average size of a small phone.
TIP: Click on the Advanced Settings link and hover over each element in this dialog box to see a tool tip about how to use them. Click on the question mark icon to see additional on-line help. To view the elements that are dimmed, either click to increase the number of columns to change the gutter size or the link icon to change the margins.
- Click the OK button.
- Select File > Save and navigate to the folder you created in the Prep section (e.g., Cornelius Portfolio), give the file a name (e.g., CorneliusPortfolio) and then click the Save button.
- Double-click on the first thumbnail's name (Home) and rename:
- About Me
- About Me
- Double-click the page thumbnail to open it in Design View.
- Click on the Text Tool and drag out a Text Box at the top center of the screen and in it type:
- About Me
- Double-click to select the text INSIDE of the text box that you just created to highlight (select) the text.
- Click on the Text button to open the Text properties panel and change:
- Font size to 30
- Font all caps
- Font weight to Bold
- Text alignment to Center
- Heading Level to <h1> Headline 1
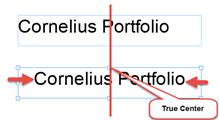
- With the selection tool, move the text box to the top/center of the screen below the header area using the smart guide.

NOTE: It is best to center the text in the Text box and have the Text box sized to match the largest title that will be entered so that if you center the text on the page it will be a true center and not a center based off of the Text Box width:
- Click on the website tab (e.g., CorneliusPortfolio) to return to the Plan View.
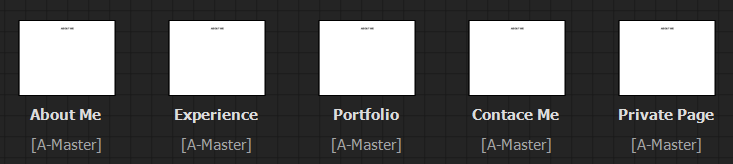
- Press and hold down the ALT (PC) or Option (Mac) key and click the plus sign (+) to the right of the thumbnails repeatedly to add the following SIBLING pages based on the [A-Master] template and give each descriptive title name:
- About Me (Bio or Objective)
- Experience (Resume)
- Portfolio (Works / Accomplishments)
- Contact Me (Feedback form)
- Private Page (Not shown on site)
NOTE: By using the ALT or OPTION key, you DUPLICATED the page with the About Me header on it instead of creating blank pages where you would had to add a heading to each one of them individually.
NOTE: It is important to give the page short names as they will be used as menu items later.
- CHECK POINT: You should see each page created with the heading ABOUT ME displayed.
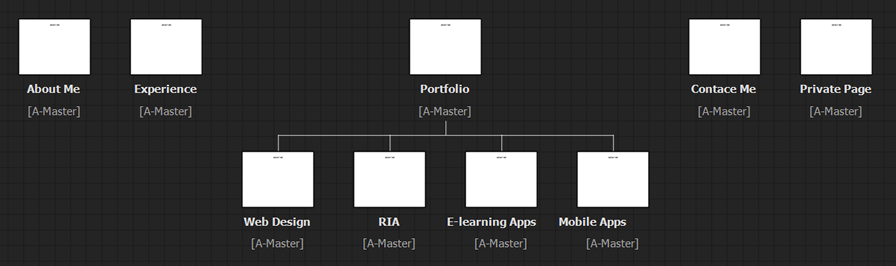
- Click the plus sign (+) at the bottom of the Portfolio thumbnail (or whatever page you want to add a sub-menu to) and add the following CHILD page based on the [A-Master] template and give it a descriptive title name:
- Web Design
- Click the plus sign (+) to the right of the the Web Design thumbnail (or whatever page you want to add a sub-menu to) and add the following CHILDREN pages based on the [A-Master] template and give them descriptive title names:
- RIA
- E-learning Apps
- Mobile Apps
- CHECK POINT: You should see the following site maps:
You will see later, that when you use a menu widget:
- top-level pages—will show as the main-menu items
[SHOW MAIN MENU HERE]
- child-level pages—will show as the sub-menu items
NOTE: A small caret icon (v) will be shown to denote sub-menus
[SHOW SUB MENU HERE]
- hidden pages—will NOT show as either a main menu or sub-menu item when the menu widget is used
[SHOW MAIN MENU HERE]
Time-saving Tips
Below is a list of other things you can do while in the Plan View:
- You can also MOVE a page/template around by dragging it to another location to the left or right. You can also PROMOTE or DEMOTE a page by dragging it up or down.
[SHOW SCREENSHOT]
- You can HIDE the Master badges by deselecting the Master badge checkbox. This is useful if you are not using and Master template or you are using the default template so that it can free up more real estate on the screen and make the pages easier to read.
[SHOW SCREENSHOT]
- If your sitemap get to large to show horizontally, you can switch to a VERTICAL view by clicking on the Show Vertical.
[SHOW SCREENSHOT]
- You can RESIZE the pages’ thumbnails by adjusting the slider at the top of Plan view.
[SHOW SCREENSHOT]
- You can also COLLAPSE multiple pages by clicking on the chevron (>>). You will see the multiple pages displayed as a group icon (show)
[SHOW SCREENSHOT]
- You can also have MULTIPLE TEMPLATES that you can apply to different pages.