Advanced Enhancements
Below is a list of enhancements that you can add to your Muse site as you see fit.
Create a Rotator
A rotator is a common element that you see on many web sites that is used to create an animated slideshow.
- From the Widgets Panel, drag-and-drop a blank composition widget to the page.
- Click on the composition to select the target element and resize it to the height and width you need for the page (e.g., 200 x 200).
- SHIFT+click on the three triggers and move them to the left bottom edge of the target.
- Delete the second and third triggers.
NOTE: The composition widget does not have a Edit Together feature like the menu widget so the other two triggers were deleted. However, once the first trigger is styled, new triggers will be created that will inherit the styles as you will see later.
- Optionally, zoom in so that you can see and style the trigger better.
- Using the Transform Panel, resize the trigger so that it is small (e.g., 10px x 10px).
- With the trigger selected, select the Normal state in the top/left corner and then select the four corner radius to convert the square to a circle. Repeat for other states.
- With the trigger still selected:
- In the Normal state, remove the stroke and give it a fill color (e.g., black).
- Select the RollOver state, remove the stroke and give it a fill color (e.g., gray).
- Select the Mouse Down state, remove the stroke and give it a fill color (e.g., yellow).
- Select the Active state, remove the stroke and give it a fill color (e.g., red).
- Add whatever text and graphic you want to the FIRST target.
- Click the plus sign (+) next to the trigger to create another trigger and then select it.
- Click on the target for the second trigger and add whatever text and graphic you want.
- Repeat previous steps for as many target and triggers that you need.
- Click on the blue arrow icon and in the Options panel, select the AutoPlay checkbox.
- CHECK POINT: Preview result. You should see that the target changes every three seconds automatically. However, you can click on any one of the triggerS to change the target.

Add Photo SlideShow To Device
A common practice is to include a slideshow inside of another device (e.g., iPad, iPhone).
- Place an image on the page of a device that you want to use (e.g., iPad) on the page and resize it and position it as needed.

- From the Widgets Library panel, drag-and-drop a Blank slide show widget on top of the image.
- Resize and reposition the widget to fit with the host device frame.
- Click on the blue arrow icon and in the Options Part section:
- deselect the counter, caption and AutoPlay checkboxes
- change Transition to Horizontal
- click on the Add images and navigate to the images you want to use and press the Open button.
- Move the Prev and Next arrows to the left and right side of the slideshow inside the slideshow.
- (Optional) Style the Prev and Next arrows as you like (e.g., remove background color, increase size or replace arrows).
- CHECK POINT: Preview page. You should be able to click on the arrows to navigate through the images.

3D Ribbon
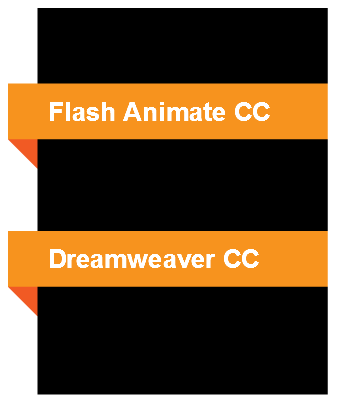
Normally, done in Photoshop or Illustrator, the 3D ribbon is a common format that is used on many web sites though is easy to recreate in Muse to reduce file size and bandwidth.
- Use the Rectangle tool and draw the panel you need and give it a Fill color (e.g., black)
- Use the Rectangle tool and draw a narrow ribbon slightly below the top of the panel and give it a Fill color (e.g., orange) with the width hanging slightly over the left edge of the panel and flush with the right edge of the panel.

- Press ALT+drag on the current ribbon to duplicate it and then:
- Resize it to a square
- Change the color to a darker color or the same color
- Rotate it 45 degrees.
- Position it at the left/bottom of the original ribbon.

- Right-click on the square and select Send to Back:

- (Optional) Select the ribbon and the square and hold down the the ALT key and click on them to duplicate anothe ribbon below the current one.
TIP: Hold down the SHIFT key to contrast movement.

- Add whatever text or graphics you want to add:

Create WuFoo Contact Form
WuFoo is a free online contact form creator provider that you can use instead of creating one in Muse.
- Go to http://www.wufoo.com and follow prompt and direction on their site to create an account.
- Click on the New Form to create a new form, then:
- Give form a name (e.g., myCustomForm)
- Give description
- Fill out other fields as needed.
- Click on the Add a field and then click on the fields that you want to add.
- Click on fields to change properties as needed.
- Click the Save button.
- Click on the Setup email notifications for this form and fill out needed fields
- Click the Save button.
- Style form as needed
- Click on the Code button and then click on the Embed Form Code and copy a version (e.g., JavaScript)
- In Muse on the page you want to insert your form, select Object > Insert HTML to insert the form on your page
- Position the form as needed and test on a server.
Add Parallax Scrolling
You can simulate animation of your page with parallax effects but don’t overdo it. This is a trendy effect that is used on many modern website.
Parallax scrolling is used to create the illusion of depth by layer multiple layers and moving them at different speed or direction.
- Create a new page and add enough content so the page is long to scroll for the parallax scroll effect.
- Place an image of an object or a block of text somewhere on the page that you want to "animate."
NOTE: In our case, we used and image and placed it at the top/right corner of the page.
- Click on the object and open the Scroll Effect Panel.
NOTE: Notice you have three options (motion, opacity and slideshow)
- Click on the Motion check box.
- Set the Key Position in px (e.g.125) by either:
- Setting a value from the drop-down menu.
- Dragging the the guide (a horizontal line) where you want.
NOTE: The Key Position is when the browser window reaches the specified scroll position. In essence, where you want your object to be visible.
- Set Motion Before Key for both direction and speed (In our case, we used down and 1.5 ; right and 0).
- Set Motion After Key for both direction and speed (In our case, we used down and 1.5 ; right and 0).
NOTE: A speed of zero means the object does not move, a speed of 1 means the object moves at the SAME speed as the scroll speed and a speed above one means the object move FASTER than the scroll speed. (e.g., 3.5 is 3.5 times the current scroll speed).
- CHECK POINT: Preview page to see effect.
- (OPTIONAL) Select the object and click on the Effect link and select the Shadow checkbox and adjust the shadow to your liking with the properties options.
- CHECK POINT: Preview page to see effect.
Create Horizontal Scrolling (Does not work in new version)
Most scrolling is done vertically, however, there are a few times when you may want to do horizontal scrolling of large images. This is accomplished by
- creating a site with a large width
- adding images
- adding anchor points (horizontally instead of vertically)
- create a navbar
- Select File > New Site... and in the New Site dialog box that appears, for the Max Page Width, enter 2000 and then click the OK button.
- In Plan view, double-click on the Home page to open it up in Design View.
- Select File > Place... and navigate to a series of large images that you want to use.
- Use the Place gun and align the images horizontal across the page.
- If necessary, resize the images so that the height matches and they fit within the 2000px page width
- Create a text box and add the names of the images to it separated by pipe ( | ) symbols (e.g., photo 1 | photo 2 | photo 3).
- Click the anchor gun tool the exact number of images you have.
- CHECK POINT: You will see the number of anchors you can placed in a set of parenthesis. In our case it is (5).
- Click to add anchors above the top/left corners of each image and give them corresponding names but without spaces.
Add Google Analytics
You can use the FREE Google Analytics to track trends on your web site so that you can make the necessary changes based on these trends.
- Go to Google Analytics (http://www.google.com/analytics/) and then:
- Create an account using your Google ID
- Click the Sign Up button and then:
- Give account a name
- Give site URL
- Time zone
- Industry category
- select Terms and Condition checkbox
- Click Create Account
- Copy the script code
- Click on the Standard option and then:
- What are you tracking (e.g., A single domain)
- Copy code
- Add tracking code to EACH page on your site that you need to track by inserting HTML into <head>
tag using one of the two methods below:
- Go to home page and select Page > Page Properties... and enter script into Metadata section in the HTML for <head> and click the OK button. This will insert code in the <head> tag.
NOTE: This is the preferred method instead of the next method.
OR
- On the master template, select Object > Insert HTML and paste the script into the HTML code text field and then click the OK button. You will get an HTML box that you can position any where on your page.
- Go to home page and select Page > Page Properties... and enter script into Metadata section in the HTML for <head> and click the OK button. This will insert code in the <head> tag.
- Go back to Google Analytic and click the Save button and then click on the Home button at the top of the page.
Use Google Webmaster Tools
You can use Google Webmaster Tools to:
- Check the health of your site
- Understand search traffic
- Make optimization to help Google understand your site
- Go to http://www.google.com/webmaster/tools/.
- Create an account and login.
- Add your website URL in the ADD A SITE text field and click ADD A SITE button.
- Google with prompt you on how you want to verify that you own that site, you have several options:
- Recommended methods:
- Download HTML verification file
- Upload your URL, confirm and verify it
- Alternate methods (Easy):
- Link to Google Analytics
- HTML tag (Add meta tag to your site home page)
- Domain name provider (Sign into your domain name provider)
We will use the HTML option: - Click on the HTML tag option and copy the meta tag
- Return to your site and select Site > Paste Properties... and then paste it into the HTML for <head> text field and then click the OK button.
- Upload new version of the home page to server.
- Return to Google and click the Verify button.
- CHECK POINT: You should get a message from Google saying that you have successfully verified your ownership.
- Click the Continue link.
- Click on the Optimization link to expand it and then select Sitemaps.
- Click on the ADD/TEST SITEMAP button and provide link to your sitemap (e.g., corneliusportfolio/sitemap.xml)
- CHECK POINT: Click the Submit Sitemap button and then refresh the browser page to see it. Within a couple of days, the Processing field will change from Pending to Processed and how many pages Google has indexed.
- (Optional) You can also use the other options (Configuration, Health, Traffic, Remove URLs, HTML Improvements, Content Keywords, Structured Data, and other Resources)
Misc.
A common effect that you may see on the web that is easy to create