Production
Click the Share button to export the project using various options (e.g., Local File, Web Media services like YouTube, which requires you to sign in).
- PRO TIP: The project can also be exported as a zip file that contains:
- Camtasia project file (*.tscproj)
- Screen recordings (*.trec)
- Other media (*.mp3)
IMPORTANT NOTE: On the Mac, all media files are contained within the project file (*.tscproj), so there is no need for a zip file. This technique is also available on Windows, but it is called Stand-Alone Project.
- To import a zipped project into a new project, go to File > Import Zipped Project.
- If you export to a Local file, review some of the most important settings:
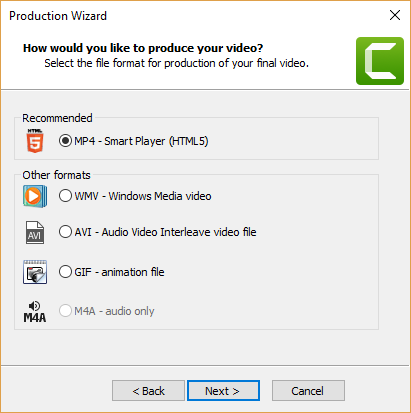
- How would you like to export the video: MP4 – Smart Player (HTML5) – Recommended
- Smart Player Option:
- Controller tab: Uncheck Produce with controller (Smart Player) unless you have quizzes or interactive hotspot or a table of content.
- Video setting: Adjust the Encoding mode to increase or decrease the video quality. Note that the higher the quality, the larger the file size.
- Production Name/Folder: Give the File a descriptive name and Folder location.
Camatsia for the Mac and Windows differ on how it export content. While there are a host of formats to choose from, MP4 is the recommended format for most projects. If you include the Smart Player with the video, you can include some interactive content:
- Table of Contents (based on markers)
- Clickable Hotspots
- Closed Captions
- Quiz / Survey / SCORM
Windows:
Mac: (REPLACE WITH MY OWN)
Sharing
There are multiple ways to share your project with others. (VERIFY ALL WAYS LATER)
Local File
The most common way to share your movie is to export it locally and then use it any where.
Windows:
- Select Share > Local Files… or click the Share button on the top-right corner of the screen and select Local Files..., or press CTRL+P (Windows)
- Click the Custom Production Settings... and then click the Next button.
NOTE: See the screen shots above. - Select the MP4 - Smart Player (HTML5) file format and then click the Next button.
- In the Smart Player Options dialog box that appears (Most options are self explanatory)
- In the Controller tab, ensure that the Produce with controller check box is selected if you have any interactive content (See list above)
- In the Size tab, you can either have the Embed Size width and height match the Video Size or you can may is smaller to fit in web page (e.g., blog) and allow the user later to view the content at Full Screen by clicking on the Full Screen button on the video player.
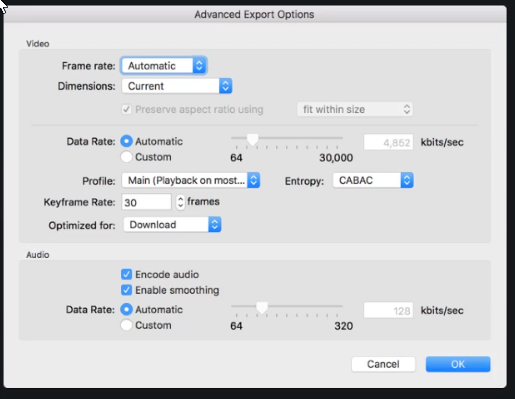
- In the Video Settings tab, you can set the frame work to 15 fps if you want to save some file space.
- In the Audio settings tab, set the bitrate to128kbps.
- In the Options tab, set the options (TOC, Searchable, Captions, and Quizzing) that you need based on your project. These options will be grayed out if they are not in your project.
NOTE: If you select the Searchable option, this will index the TOC and the Captions and make them searchable. - Click the Next button to go to the Video Options dialog box:
- If you click the Options button, you can set some metadata for your video.
- You can check the Watermark checkbox and then select a watermark to use for your project. Click on the Options... button to set the watermark paths, effects, scaling, and position as well as a Preview button.
- You can select the Embed video into HTML. - Click the Next button to go to the Makers Options dialog box:
- You can set the TOC options based on the markers and then render a preview of it. - Click the Next button to go to the Quiz Reporting Options dialog box:
- Set the Quiz reporting options as needed for your project. - Click the Next button to go to the Produce Video Options dialog box:
- Set the output file name, folder location, post-production options, FTP options.
TIP: In the Folder text field, add a folder called output to the end of the path name with a backslash (....\....\myProject\output). You will be prompted to create the folder later. - Click the Finish button.
- CHECK POINT: You will see the Rendering Project dialog box followed by the video playing in the video player.
Mac:
- Select Share > Local Files… or click the Share button on the top-right corner of the screen and select Local Files..., or press CMD+E (Mac).
- OPTIONAL: Click the New Folder button and create a new folder called output at the project folder level
- From the File Format drop-down menu, select Export to MP4 (.mp4).
- OPTIONAL: If you want to reduce the file size, click the Options... button and set the frame rate to 15 and then click the OK button.
- Set the other options below before clicking the Export button:
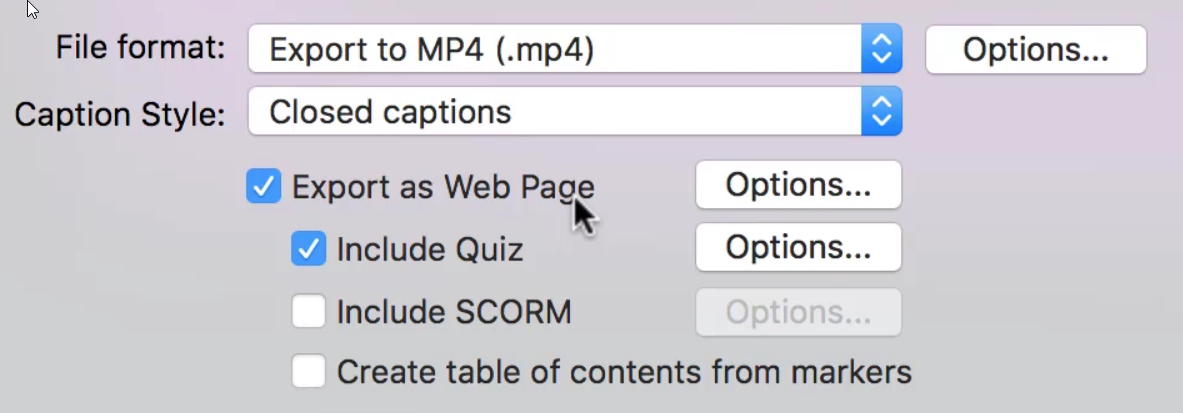
NOTE: in the Quiz options..., you can localize the content in the Appearance tab:

- Select Share > Share History... to view a history of shared content available on your hosting services.
- You can set or edit a Production Project
Production Preset
You an also set or edit a production preset if you know the all or most of the settings will be the same for the project you are working on so that you can go straight into production.
- Select File > Custom Production > Add/Edit Presets.... from the menu
- In the Manage Production Presets dialog box that appears, you can select any of the existing presets and edit it or you can click on the New... button to create a new preset.
- In the Create a Production Preset dialog box that appears, set all of the options (name, description, formate) you need for your project and then click the Next button
- In the Smart Player Options, set the options you need for your project and click the Next button.
- In the Video Options, set the options you need for your project and click the Next button.
- Click the Finish button
- CHECK POINT: Click on the Production presets drop down to see the newly created preset in the list. Click Click and OK to close the dialog boxes.
- Select File > Production > NameOfYourPreset to use the preset as needed for future projects.
- In the dialog box that appears, give the production a name and navigate to the folder where you want to save it and then click the Finish button.
High-Resolution Preset
Below is a list of high resolution settings that can by used for all projects because the settings are all set to their highers values.
- Select Export > Local File...
- From the drop-down menu, select Add/Edit preset...
- Click the New... button to create a new preset and give the Preset aname (e.g., RMCS Preset) and Description (e.g., Preset with high settings that can be used with most projects).
- Under the File Option section, select MP4 - Smart Player (HTML5) and then click the Next button.
- In the Smart Players Options panel that appears under the Controller tab, deselect the Produce with controller checkbox.
- Click the Size tab, ensure the Use the editing dimensions checkbox is selected.
- Click the Video settings tab, ensure:
- Fame rate is 30 fps
- Quality to 100%
- Keyframes every to 1 second
- Change H.264 profile to Baseline
- H.264 level from Auton to 5.1
- Change Color mode to HDTV
- Click the Audio tab, ensure Bit rate is set to 1024 kbps.
- Click the Next button and the Finish buttons to commit the changes.
- The next time you use Export, select Local File
- Click the custom preset (e.g., RMCS Preset)
- Click the Next button
- Give project a name Prodution name (e.g., MyFinalProject)
- Click the Browser button to navigate to where you want to save the project and click the Save button.
- Optionally, deselect the Organize produced files into sub-folders.
- Click the Finish button.
ScreenCast
Another way to share your project is to use TechSmith ScreenCast:
- Sign up for a free account with TechSmith’s ScreenCast (http://www.screencast.com) to host a few video. You can also upgrade to the Go Pro subscription at $10/mo or $100/yr.
- In Camtasia, select Share > Screencast.com.
- In the Production Wizard dialog box that appears, use the credential that you created earlier and then click the Next button.
- In the dialog that appears, give the video a Title and select a screencast.com folder and then click the Next button.
- If you are including a quiz, in the Quiz Reporting Options, click the Report quiz results through emails checkbox, set an options you need,.and then click the Finish button.
- CHECK POINT: You should see Camtasia RENDER your video to ScreenCast.com in the Rendering Project dialog box and then UPLOAD your video in the Upload to Screencast.com dialog box
- OPTIONAL: You can click the Detail button to edit the video properties (e.g., file, title, description, keywords, release date, etc.) and then click the Save button. You can also use the Detail button to include attachment and Captions.
- Click the Share button to COPY the video URL or embed code and paste it in another place or you can send an email invite separate by commas to others.
- Once you upload video, you can set the various type of privacy settings. An icon will show next to the video as to why type it is. You can set it by clicking on the gear icon.

YouTube
You can also upload to YouTube if you have an account with them.
TIP: To create a thumbnail for your YouTube video, select a SINGLE frame in the timeline (add text and other graphics if you want to) and then select Share > Export Frame As…, give the file a name and then click the Save button. Then in YouTube, in the Video Manager, select the Custom thumbnail button and navigate to the image you created to upload it. Then select it and click the Save changes
NOTE: If you don’t create a thumbnail for your video, YouTube will automatically select one for you which may not be the one you want.
- Sign up for a free account with YouTube if you do not already have one.
- In Camtasia, select Share > YouTube.
- In the Production Wizard dialog box that appears, click the Sign In... button.
- In the Sign in with Google dialog box that appears, select an account.
- In the next screen that appears, click the ALLOW button.
- In the Production Wizard, add title, description, tag separated by commas, category, privacy settings, upload captions, and TOC, and then click the Finish button.
- CHECK POINT: You should see the Rendering Project dialog appear with the rendering and upload progress bars.
Google Drive
Another way to share your project is to use Google Drive. However, Google Drive does not support quizzes, interactive hotspots or closed captions. It is best used when you want to share your movie in a shared folder with a team.
- In Camtasia, select Share > Google Drive.
- If you have included unsupported features (quizzes, etc.), you will be prompted with a dialog box highlighting those features, then, click the OK button.
- Log in to your Google Drive account, give your video a title and then click the Browse button to navigate to the folder you want to save it to and then click the Select button.
- Click the Finish button.
- CHECK POINT: Camtasia will render and upload your video to your Google Drive.
- Click the Visit button if you want to review the movie.
Vimeo (Windows Only)
Another way to share your project is to use Vimeo.
- Sign up for an account with Vimeo.
- In Camtasia, select Share > Vimeo...
- Log in to Vimeo
- In the dialog box that appears, click the Allow button
- In the Production Wizard, add title, description, tag separated by commas, category, privacy settings, upload captions, and TOC, and then click the Finish button.
- CHECK POINT: Camtasia will render and upload your video to Vimeo
Audio Only
You can export an audio only copy of your project
- Disable any audio track that you do not want to render (e.g., background)
- Select Share > Export Audio Only…
- Select a file format (e.g., m4a)
- Click the Export button.
NOTE: m4a is a replacement for mp3.
Single Frame
You can select a single frame of your project as a png file. This process is useful to create the thumbnail for the Smart Player option.
- Set the playback head to the frame you want to export.
- Temporary disable the caption track if you have one by clicking on the eye icon on the left side of the timeline track; otherwise is will be rendered with the single frame.
- Select Share > Export Frame As….
- Give the file a name and then click the Save button.
- If you want to use this image in your project, select the Import to Media Bin checkbox in the Save Video Frame As dialog box. If you want to replace the default first frame, select it to replace it and then click the Save button.
Selection of Frames
You can select a range on the timeline to output.
- Select a range of content on the timeline.
- Select Share > Produce Selection As... from the menu or press CTRL+F
- In the Production Wizard dialog box that appears, use the same steps as you would for a normal project.
NOTE: The Mac does not have this option but if you select a range of frame and select Share > Local Files... you will accomplish the same task.
Captions
You can export the caption file to be used by a third-party hosting service (e.g., YouTube).
- Select Share > Export Captions..
- Select a format (*.srt or *.smi) and give the file a name and then click the Save button.
- Upload the file to a host service.
Batch Production (Windows only)
You can also create a "batch" of project files that you can process all at one time.
- Select File > Batch Production from the menu.
- In the Batch Production dialog box that appears, click the Add files/projects... button and select any file or project that you want to include in the batch production.
- Repeat the previous step for each file or project.
- Click the Next button.
- In the Batch Production - Preset Options dialog box that appear, select a radio button option to set one production preset or multiple preset. If you select the second option, you will have a chance to change the preset for each file.
- Click the Next button and select an output folder and/or sub-folder as well as show the production results and then click the Finish button.
- CHECK POINT: In the Rendering Batch Production dialog box that appears, you should see each file being rendered.